Firmware Update Procedures
Note: The EagleEye Converter (EEC) currently does not support the firmware update procedure for Windows 64-bit operating systems. We apologize in advance for any inconvenience, we don’t like it either. In short, the EEC chip is just not compatible with a 64-bit OS. Firmware update 2.0 is a one time only procedure. This means that once you update your EEC with the new program, you don’t have to do it again…until the next firmware update. If you happen to have a 64-bit Windows OS, you’d have to find a 32-bit OS PC to perform your update. Again, this is a one time only procedure. We’re sure there are other ways besides running to your friends and ‘borrowing’ their 32-bit for a few minutes. If you know another way, feel free to share it with everyone and post it on our forum.
Let’s begin…
In order to update to Firmware 2.0, you must first download the Firmware 2.0 BETA update pack (Beta 10.15.2010). Save the folder to a location you desire. Please follow both steps 1 and 2 below.
Step 1 - Eagle Eye Windows Driver Installation
1. Turn the switch on the back of your EEC to "PROGRAM."
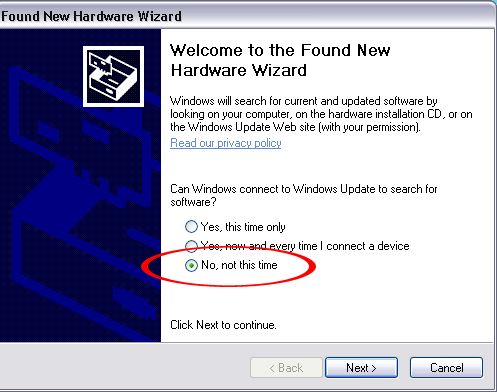
2. Plug your EEC in the USB port of your PC. - Windows will detect the EEC as a new hardware and ask you for permission to search for software. Select “No, not this time” and click “Next>” to continue.
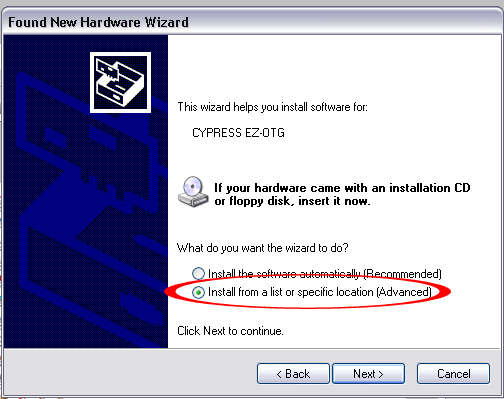
Go through with the windows Hardware Wizard. DO NOT let Windows scan for the driver. Instead, search for the driver in the "Drivers" folder located at /EEC20/EEC Firmware 2.0/Drivers/

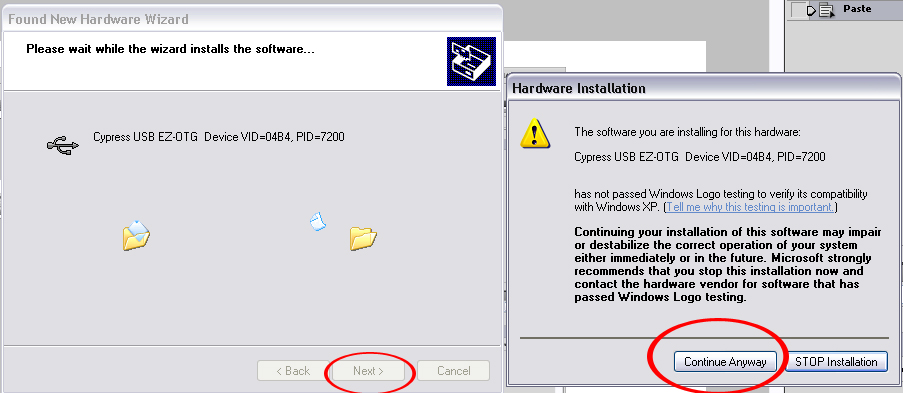
If you get a ‘Hardware Installation’ caution message, click “Continue Anyway”
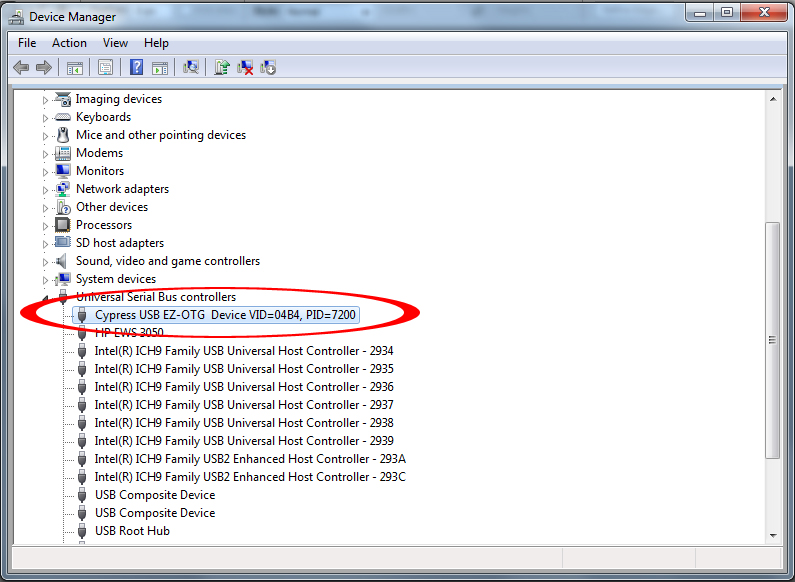
To make sure the driver is installed properly, you should see “Cypress USB EZ-OTG Device” in the Device Manager under “Universal Serial Bus controllers. If you see a question mark beside the Cypress USB item, then the driver is not yet installed.
To view the Device Manager: click Start> Control Panel> System> Hardware> Device Manager.(For Windows XP)
Step 2 - Firmware Installation
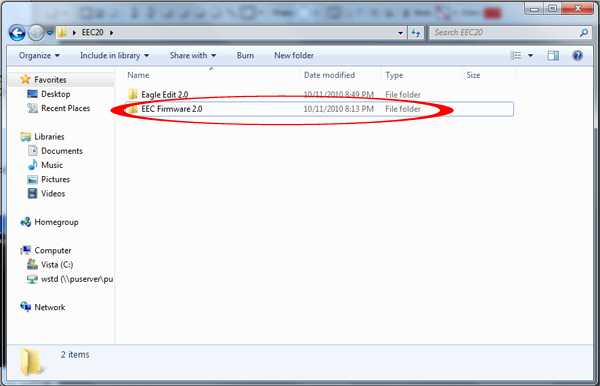
1. Locate the Sub-Folder (EEC Firmware 2.0) in your EEC20 Folder
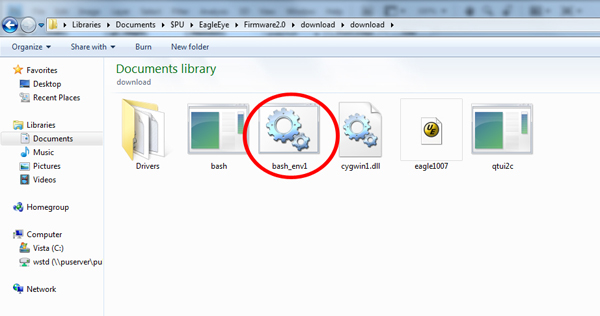
2. Double Click on the file (bash_env1.bat).
3. Switch EEC to "PLAY"
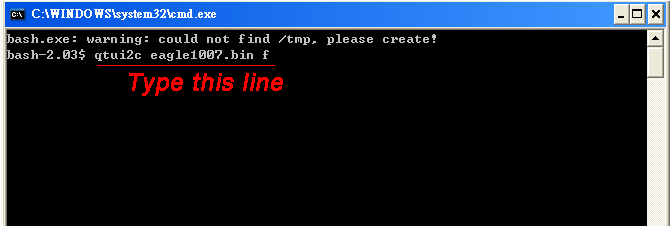
4. Type in the following exactly as it appears: qtui2c eagle1007.bin f
注意!! FW2.0finalの場合は : qtui2c eagle1111.bin f を入力
Then press Enter
5. You’ll be asked to wait; it should take about 30-90 seconds to complete. Once completed, you will see this:
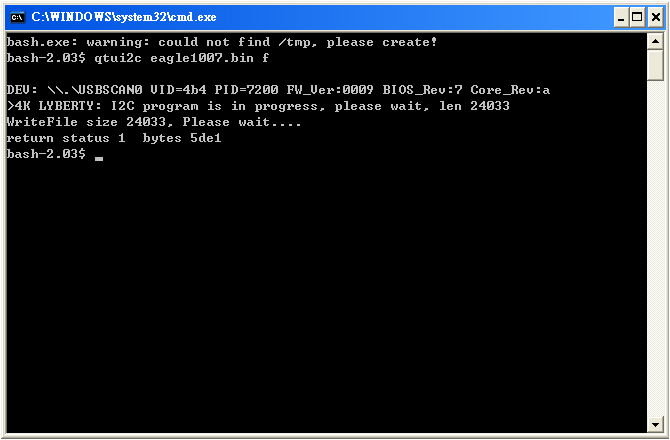
Congratulations! You have now completed the Firmware Update.
How to Perform In-Game Advance Calibration Function
After completing the firmware update, your EEC will be equipped with the Advance Calibration Function to adjust the Deadzone and Sensitivity for your mouse.
Tuning Mode commands:
F1: Enters X-axis deadzone tuning mode. (range 1-30)
F2: Enters X-axis sensitivity tuning mode. (range 1-100)
F3: Enters Y-axis deadzone tuning mode. (range 1-30)
F4: Enters Y-axis sensitivity tuning mode. (range 1-100)
F5: Save settings on Eagle Eye's EEPROM
F6: Reverts back to default calibration.
In Tuning Mode, use the mouse wheel to adjust the deadzone and sensitivity levels. Scroll UP to increase, DOWN decrease. Each ratchet equals one increment.
During Tuning Mode, the original functions of the wheel are disabled until you press F5(save), which returns to Play mode. You will no longer be able to map F1-F6 to your PS3 controller in Eagle Edit Software.
To enable the Tuning Mode, you must be in-game. Be sure to ‘feel’ the mouse movement as you adjust. Once you are in-game, follow these steps (assuming you are using Key Map 1):
Step 1: Press F2 to enter Tuning Mode for the x-axis sensitivity. Scroll UP to increase the sensitivity for the x-axis. Scroll DOWN to decrease the sensitivity.
Step 2: Press F4 to enter Tuning Mode for the y-axis sensitivity. Scroll UP to increase the sensitivity for the y-axis. Scroll DOWN to decrease the sensitivity.
Step 3: Press F1 to enter Tuning Mode for the x-axis deadzone. Scroll UP to increase adjustment. Scroll DOWN to decrease.
Step 4: Press F3 to enter Tuning Mode for the y-axis deadzone. Scroll UP to increase adjustment. Scroll DOWN to decrease.
Step 5: Once you’re comfortable with the mouse movement, press F5 to save your adjustment settings.
Note: To calibrate the mouse for Key Map 2, you must first store the calibration into the EEC for Key Map 1. To do this; unplug the EEC from your PS3, wait 3 seconds, then plug it back in. Now switch your EEC to Key Map 2 and repeat steps 1-5 for the calibration adjustment process.
Tips
1) If you are using a mouse with a DPI of 3200 or higher, try to keep the sensitivity at 10 or lower.
2) If applicable: Disable all macro and/or keyboard-simulate functions on your mouse before use with the EEC.
3) For a smoother mouse movement: Start off by adjusting the Sensitivity. Then, set the Deadzone increment by a multiple of your sensitivity.
Example:
If X/Y sensitivity is 8, set X/Y deadzone to 16, 24, 32, 40, 48, etc.
If X/Y sensitivity is 5, set X/Y deadzone to 10, 15, 20, 25, 30, you get the point.
Original factory default setting for firmware 1.0 is the following: X/Y sensitivity is set to 8, X/Y deadzone is set to 48.
4) Lower all attributes to 1 to start the calibration by pressing F1 and scrolling repeatedly downwards. Repeat the same for F2-F4. Slowly increase the sensitivity (F2 and F4 equally) first to a desired speed. Then move on to the deadzones (F1 and F3) and increase the deadzone to your desired gaming performance.
New in Eagle Edit 2.0 and Steps to Synchronize your In-game Advance Calibration Settings
New in Eagle Edit 2.0 Software
  1. Allow you to synchronize in-game advance calibration. Click File> Synchronization to load your saved calibration.
  2. Pressing Send to Device will prompt you to choose between Key Map 1 or Key Map 2 memory slot. Previously, the selection was done before you press Send to Device.
  3. New deadzone and sensitivity adjustments could be done in Eagle Edit 2.0 software.
  4. Can now map up to 9 mouse buttons.
  5. F1-F6 is now reserved for in-game Advance Calibration and could no longer be used to map to PS3 buttons.
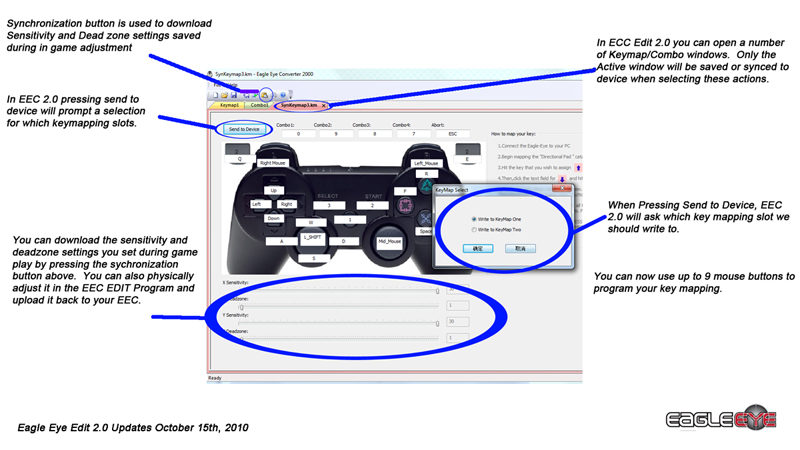
Synchronize Your In-game Advance Calibration Setting
Step 1: Pause the game and unplug the EEC from your PS3.
Step 2: Unplug the keyboard and mouse from your PS3.
Step 3: Plug the EEC into your PC and open Eagle_Edit 2.0.
Step 4: Click File> Synchronization to load your saved calibration.
At this point, you can save your calibration settings into the Save file. Accumulate and organize your different mapping schemes and calibrations to each specific game.
Updated October 25th, 2010
Eagle Firmware 2.0 Beta with DeadZone Naturalization & Bug Fixes (Updated 10.25.2010)
To update to the new Firmware 2.0 Beta with Deadzone Neutralization function and fixes below, please download the new "Eagle Firmware 2.0 Beta with Deadzone Neutralization..." update above and follow the "Firmware Update Procedures" 1-4 above. Instead of typing qtui2c eagle1007.bin f at step 4, please type qtui2c eagle1025.bin f in the DOS prompt.
Bug Fixes and Improvements
  1. Fixed issues where F11-F12 previously could not be mapped.
  2. Auto Tab no longer occurs in Eagle Edit 2.0, F8 skipping error eliminated.
  3. Fixed spelling errors in Eagle Edit 2.0.
  4. Refresh Rate reset to Eagle 1.0 Level – Results in firmware 1.0 mouse movement.
  5. Fixed Eagle Edit 2.0 Horizontal bar scrolling issue.
  6. Implemented jagged edges reduction.
  7. Added Deadzone Neutralization function.
Deadzone Neutralization
The new version of Eagle Edit 2.0 Beta now contains a Deadzone Neutralization function. Please see following instructions:
  1. When you are in-game, press F1(X-axis Deadzone) and scroll your mouse wheel up several times until you see the crosshair automatically move to the right.
  2. Start scrolling down slowly, 1-2 mouse clicks at a time until you see the crosshair COMPLETELY stops. We suggest you zoom-in and carefully look at the crosshair's micro movements during this stage to get the most accurate results.
  3. When you come to a complete stop, you have successfully neutralized your X-axis Deadzone.
  4. Press F3(Y-axis Deadzone) and repeat steps to neutralize the Y-axis Deadzone. You'll see the crosshair automatically move up
  5. Once completed, adjust your sensitivity. You might notice for some games that the x-axis is more sensitive than the y, or vise versa. You may want to increase the sensitivity of the slower axis in that case.
  6. Press F5 to Save your new X/Y Deadzone and sensitivity.
More tips on adjusting your deadzones and sensitivity:
1. Adjust the Deadzones first before you adjust the Sensitivity within the Eagle Eye.
2. If you feel that you have to adjust the Sensitivity of your mouse, tweak it as best as you can in-game, meaning tweak your game's sensitivity first. Then, use the EEC's Sensitivity function to fine-tune your mouse movements.
Pending Issues:
We noticed an occasional mouse hiccup in the new firmware. This requires further investigation.
Revert back to the original Eagle Eye firmware 1.0
eagle.bin
If you wish to revert back to firmware version 1.0, please download the firmware 1.0 software eagle.bin above. Save the eagle.bin file to your EEC Firmware 2.0 Folder and follow procedures 1-4 above. Instead of typing qtui2c eagle1007.bin f at step 4 above, please type qtui2c eagle.bin f in the DOS prompt.
最終更新:2010年11月29日 18:08


