Sir Isaac Pitman 著 - 1892
...
613 ページ
Before the side shields can be removed, the short pieces of the side frame by
the right and left top row keys must be unscrewed as shown in Fig. 2. ...
614 ページ
In the event of the type-bars locking, the paper carriage must be raised and the
... One important feature is that there is no adjustment of type- bars, ...
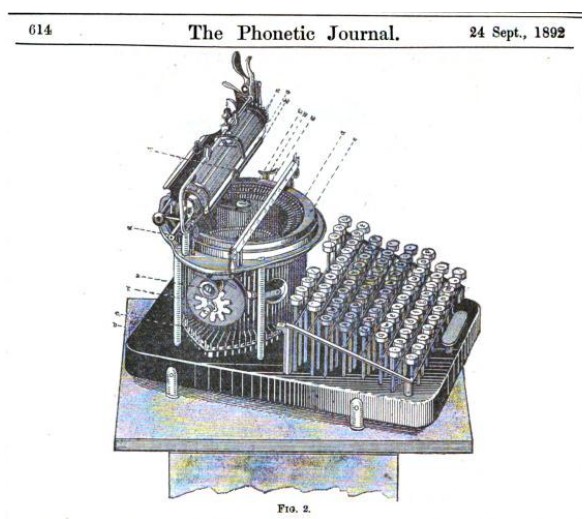
614 The Phonetic journal. 24 Sept., 1892
Fig.2
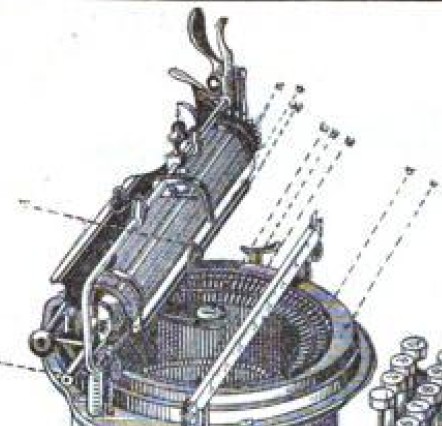
connecting rods by means of a push rod (see c.Fig.2).
The action is as follows: On depressing the key, the "key-stem" and "key-lever" are lowered at the key end and the latter raised at the type-bar end, the key-lever being, as before stated, swung across a central fulcrum. This "key-lever" in its turn pushes up the connecting-rod(?. Fig.2) causing the type-bar to carry the type(d)to the inking pad(e) and print through the guide(f). The link holder(g,Fig.2) is fixed at one end, and gives the type-bar its unique,quick and effective motion. It will be apparent that if two keys be accidentally struck together no impression will be made. as only one type can enter the guide at a time, and the act of striking two keys locks each, neither leaving an imprint upon the paper. In the event of the type-bars locking. the pap.r carriage must be raised and the keys put back in place by tapping them in the elbow, or,easier still, by striking the key working the type on the opposite side of the type-bar circle, which will knock them back into place.
It will be seen from Fig.2 that the type-bars are arranged in a circle, the point of percussion of the type being at a common centre, viz., through the centre guide(f). All the types, which are slightly bevelled, strike through this common guide hole, which is correspondingly bevelled. The whole of the type being cut in alignment on the type blanks, variation from perfect adjustment at the printing point is impossible. One important feature is that there is no adjustment of type-bars, as they are riveted and held in loose bearings where wear can have no effect, except perhaps to render the action easier. The centre guide will last for years, as it is constructed in the shape of a come, thus guiding the type. To insert a new centre guide all that is needed is to remove the screw on the right hand side of the guide-holder and unscrew the centre guide, insert the new guide and screw it to the same depth as the one removed, then fasten firmly in position by means of the screw. Before doing this, however,see that types to pass through without any perceptible friction.
The inking is done by a pad, contained in a three-sided case, which can be removed, and another case, containing another pad, can be substituted in a few seconds. Should a pad have become deranged, lay the key-plate evenly upon the key-board and press it down until all the types are bunched toward the centre. Insert the pad case firmly in the ring, flat side down, and with the junction of the end exactly in the middle of and under the centre guide holder. Be sure it is pressed securely into place.