| # How to use the Viewer to debug recognition. |
#ビューアを使って認識をデバッグする方法。 |
| ## Introduction |
## 前書き |
| Tesseract has a built-in capability to display its internal state, so that you can view its segmentation and recognition. |
Tesseractにはその内部状態を表示する機能が組み込まれているので、そのセグメンテーションと認識を見ることができます。 |
| ## Building and installing |
##ビルドとインストール |
| The following components are required to run the viewer: |
ビューアを実行するには、以下のコンポーネントが必要です。 |
| * Java runtime |
* Javaランタイム |
| * piccolo2d-core-3.0.jar |
* piccolo2d-core-3.0.jar |
| * piccolo2d-extras-3.0.jar |
* piccolo2d-extras-3.0.jar |
| * jaxb-api-2.3.1.jar |
* [jaxb-api-2.3.1.jar](http://search.maven.org/remotecontent?filepath=javax/xml /バインド/jaxb-api/2.3.1/jaxb-api-2.3.1.jar ) |
* ScrollView.jar, built from the source in tesseract/java or download from wiki ScrollView.jar (build on 64bit Linux with jaxb-api-2.3.1.jar, piccolo2d-core-3.0.jar, piccolo2d-extras-3.0.jar and javac 1.8.0_181) |
* ScrollView.jarはtesseract / javaのソースから構築されているか、wiki ScrollView.jarからダウンロードしてください(64bit Linux上で構築jaxb-api-2.3.1.jar、piccolo2d-core-3.0.jar、piccolo2d-extras-3.0.jar、およびjavac 1.8.0_181を使用) |
make ScrollView.jar will download them automatically to tesseract/java if curlis present in your path. |
curlがあなたのパスにあれば、make ScrollView.jarはそれらを自動的に tesseract / javaにダウンロードします。 |
| All these jar files need to go in a single directory. Tesseract learns the location either through the environment variable SCROLLVIEW_PATH or a compiler define of the same name. |
これらのjarファイルはすべて単一のディレクトリに入れる必要があります。 Tesseractは、環境変数SCROLLVIEW \ _PATHまたは同じ名前のコンパイラ定義を使用して場所を学習します。 |
| Alternative download link by Dmitri Silaev is available from http://www.4shared.com/zip/FnP8RSu0/tess_debug_3_02.html. |
Dmitri Silaevによる代替ダウンロードリンクは、http://www.4shared.com/zip/FnP8RSu0/tess_debug_3_02.htmlから入手できます。 |
| Copy piccolo-1.2.jar, piccolox-1.2.jar and ScrollView.jar from the downloaded package to C:\Tesseract-OCR\java. |
ダウンロードしたパッケージからpiccolo-1.2.jar、piccolox-1.2.jar、およびScrollView.jarをC:\ Tesseract-OCR \ javaにコピーします。 |
| On Linux: |
Linuxの場合 |
| * Copy piccolo2d-core-3.0.jar, piccolo2d-extras-3.0.jar and jaxb-api-2.3.1.jar to tesseract/java. |
* piccolo2d-core-3.0.jar、piccolo2d-extras-3.0.jar、およびjaxb-api-2.3.1.jarをtesseract / javaにコピーします。 |
| * cd java |
* cd java |
* make ScrollView.jar |
* ScrollView.jarを作る |
| * Set the SCROLLVIEW_PATH environment variable to point to your java directory containing all 3 jar files. |
* SCROLLVIEW \ _PATH環境変数を、3つすべてのjarファイルを含むJavaディレクトリを指すように設定します。 |
| On Windows: |
Windowsの場合 |
| The build process for building ScrollView.jar is not defined. It is included in packages tesseract-2.04.exe.tar.gz, tesseract-ocr-3.02-win32-portable.zip and tesseract-ocr-setup-3.02.02.exe. Place piccolo-1.2.jar and piccolox-1.2.jar to the same location (Tesseract-OCR/java). Then set the SCROLLVIEW_PATH environment variable to point to the java directory. |
ScrollView.jarをビルドするためのビルドプロセスは定義されていません。これはパッケージtesseract-2.04.exe.tar.gz、tesseract-ocr-3.02-win32-portable.zipおよびtesseract-ocr-setup-3.02.02.exeに含まれています。 piccolo-1.2.jarとpiccolox-1.2.jarを同じ場所に配置します(Tesseract-OCR / java)。次に、SCROLLVIEW \ _PATH環境変数をjavaディレクトリを指すように設定します。 |
| ## Segmenter Debug Mode |
##セグメンタデバッグモード |
| To run a test of the segmenter, try this: |
セグメンターのテストを実行するには、これを試してください。 |
` | ` |
| tesseract phototest.tif test1 segdemo inter |
tesseract phototest.tif test1 segdemo inter |
` | ` |
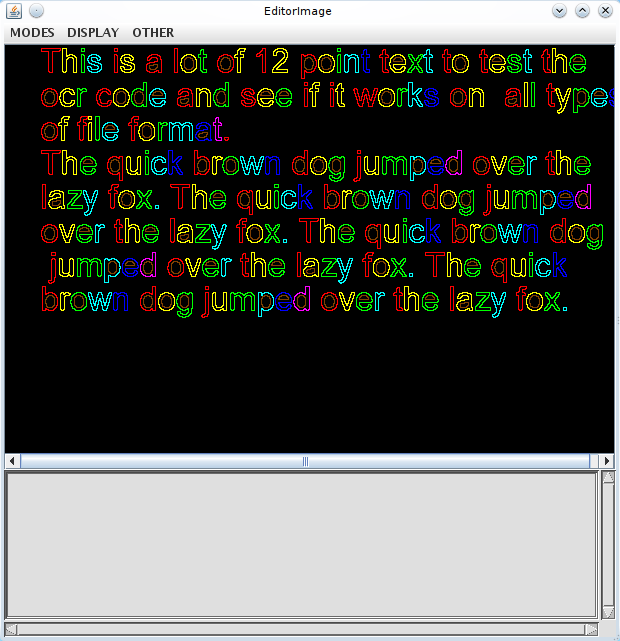
| You should see something like this: |
このようなものが見えるはずです。 |
 |
|
| The words found in the image are represented as blue rectangles. There are 3 menus: |
画像内の単語は青い四角形で表されます。 3つのメニューがあります。 |
| MODES sets the mode for what a left-click or selection does. |
MODESは、左クリックまたは選択した操作のモードを設定します。 |
| DISPLAY changes the requested displayed content of the window. (Not immediately) |
DISPLAYは要求されたウィンドウの表示内容を変更します。 (すぐではありません) |
| OTHER provides a bunch of miscellaneous global actions. |
その他は、さまざまなグローバルな行動を提供します。 |
| If you right-click in the Editor Image window, you can change the values of any of the "new" config variables on the fly. Depending on what you want to change though, a lot of the useful variables are in the old style and cannot be changed this way. Some day, someone will update all the old style variables to new ones. |
Editor Imageウィンドウを右クリックすると、その場で任意の「新しい」設定変数の値を変更できます。何を変更したいのかによっては、便利な変数の多くは古いスタイルであり、この方法では変更できません。いつか、誰かが古いスタイル変数をすべて新しいものに更新するでしょう。 |
| NOTE that the menus seem rather strange. This is because the tool was originally designed to provide the capability to create ground truthed files, in excruciating detail with labels on the characters, information on the connected components making up each character etc. Most of this functionality is redundant and hasn't been used in over 10 years. Some of the functionality advertised can easily crash the program, but the functionality documented here should work... |
メニューはかなり奇妙に見えることに注意してください。これは、このツールが元々、文字のラベル、各文字を構成している関連コンポーネントの情報など、細部まで細部にわたる詳細なファイルを作成する機能を提供するように設計されていたためです。 10年以上で。宣伝されている機能の中にはプログラムを簡単にクラッシュさせるものがありますが、ここに記載されている機能はうまくいくはずです... |
| To show the characters, deselect DISPLAY/Bounding Boxes, select DISPLAY/Polygonal Approx and then select OTHER/Uniform display. |
文字を表示するには、[表示/境界ボックス]の選択を解除し、[表示] / [多角形の近似値]を選択してから[その他] / [均一表示]を選択します。 |
| To zoom in, position the cursor over a word, and roll the mouse scroll wheel away from you 2 or three clicks. Each click doubles the size. To zoom out roll the mouse wheel towards you. If you haven't got a mouse wheel ... you may be out of luck. The Java code needs some work in this area. |
ズームインするには、カーソルを単語の上に置き、マウスのスクロールホイールを2〜3回クリックして離します。クリックするたびにサイズが2倍になります。縮小するには、マウスホイールを手前に回転させます。マウスホイールを持っていないのなら...運が悪いかもしれません。 Javaコードはこの分野でいくらかの作業を必要とします。 |
| Now select MODES/Recog words and click in a word. If you choose the word 'code' (the 2nd word on the 2nd line) then you should get something like this: |
次にMODES / Recog wordsを選択して単語をクリックしてください。 「code」(2行目の2番目の単語)という単語を選択した場合は、次のようになります。 |
| You may also notice text in your terminal window where you started tesseract: |
tesseractを開始した端末ウィンドウのテキストにも気付くでしょう。 |
` | ` |
| chop_word: |
chop_word: |
| 6.81 -2.16 : c [63 ]a 14.38 -4.56 : o [6f ]a 14.53 -4.61 : e [65 ]a 15.15 -4.81 |
6.81 -2.16:c [63] a 14.38 -4.56:o [6f] a 14.53 -4.61:e [65] a 15.15 -4.81 |
| : ¢ [a2 ] |
:¢[a2] |
| chop_word: |
chop_word: |
| 3.98 -1.11 : 0 [30 ]0 8.37 -2.33 : o [6f ]a 10.94 -3.04 : c [63 ]a 14.43 -4.01 : |
3.98 -1.11:0 [30] 0 8.37 -2.33:o [6f] a 10.94 -3.04:c [63] a 14.43 -4.01: |
| ¤ [a4 ] |
añ[a4] |
| chop_word: |
chop_word: |
| 8.24 -1.77 : d [64 ]a |
8.24 -1.77:d [64] a |
| chop_word: |
chop_word: |
| 17.58 -4.26 : e [65 ]a 23.65 -5.73 : a [61 ]a |
17.58 -4.26:e [65] a 23.65 -5.73:a [61] a |
| system words: |
システムの言葉 |
| 52.17 -5.73 : c [63 ]a : o [6f ]a : d [64 ]a : a [61 ]a 45.49 -4.26 : c [63 ] |
52.17 -5.73:c [63] a:o [6f] a:d [64] a:a [61] a 45.49 -4.26:c [63] |
| a : o [6f ]a : d [64 ]a : e [65 ]a |
a:o [6f] a:d [64] a:e [65] a |
| permute_characters : 45.49 -4.26 : c [63 ]a : o [6f ]a : d [64 ]a : e [65 ]a |
permute_characters:45.49 -4.26:c [63] a:o [6f] a:d [64] a:e [65] a |
` | ` |
| What it all means: |
それがすべて意味するもの: |
| The line after each chop_word: is the classifier output for each of the original connected components, as were shown in the Editor Image window in different colors. Each classifier result consists of a rating, a confidence, a character string, its hexadecimal unicode representation, and a character indicating its ctype. The rating is a positive distance number and is scaled by the outline length. The confidence is the distance from the nearest prototype, but negated so more negative numbers are worse than numbers closer to zero. The ctype is 'a' for lower case letter, 'A' for upper case letter, 'x' for letter that is neither, and '0' for digit. An absent ctype means none of the above. |
各chop \ _word:の後の行は、[エディタ画像]ウィンドウに異なる色で表示されているように、元の各連結成分の分類子出力です。各分類器の結果は、評価、信頼度、文字列、その16進数のUnicode表現、およびそのctypeを示す文字で構成されています。評価は正の距離数であり、アウトラインの長さによって拡大縮小されます。信頼度は最も近いプロトタイプからの距離ですが、負になるので負の数の方がゼロに近い数よりも悪いです。 ctypeは、小文字の場合は 'a'、大文字の場合は 'A'、どちらでもない場合は 'x'、そして数字の場合は '0'です。 ctypeが存在しないと、上記のいずれも意味しません。 |
| After the last chop_word, is a permute_characters. This shows the first attempt at building a word string from the classifier output. The rating is the sum of the ratings for all the characters, and the confidence is the worst of all the characters. |
最後のチョップ\ wordの後に、並べ替え\ characterがあります。これは、分類子の出力から単語列を構築する最初の試みを示しています。評価はすべての文字の評価の合計であり、信頼度はすべての文字のうち最悪です。 |
| There isn't one in this case, but an improve 1 and improve 2 would be 2 halves of a chopped blob, and a corresponding permute_characters. |
この場合はありませんが、改善1と改善2は、切り刻まれたBLOBの2つの半分と、それに対応する置換文字です。 |
| Now click in the Segmentation window. You will see that the d and e become all one color, and the corresponding classifier result appears on your terminal. This is the associator experimenting with different character segmentations to see if it can improve the result. |
次にSegmentationウィンドウをクリックします。 dとeがすべて1色になり、対応する分類子の結果が端末に表示されます。これは、結果を改善できるかどうかを確認するためにさまざまな文字セグメンテーションを試しているアソシエータです。 |
| Click again and it experiments with joining the c and o, then the o and d, and finally the c and o at the same time as the d and e. |
もう一度クリックすると、cとo、次にoとd、最後にcとoがdとeと同じように結合されます。 |
| A further click then gives you a new window called FXDemo showing the final segmentation with the baseline and meanline for the word: |
さらにクリックすると、FXDemoという新しいウィンドウが表示され、単語のベースラインとミーンラインを含む最終的なセグメンテーションが表示されます。 |
| You are now back to being able to click in the editor window. Since tesseract is not re-entrant, you cannot recognize more than one word at a time, so while the segmenter is running, you can't start another ;-) |
これでエディタウィンドウをクリックできるようになりました。 tesseractは再入可能ではないので、一度に複数の単語を認識することはできません。したがって、セグメンタが実行されている間は、別の単語を開始することはできません。 |
| ## Classifier Debug Mode |
##クラシファイアデバッグモード |
` | ` |
| tesseract phototest.tif test1 matdemo inter |
tesseract phototest.tif test1 matdemoインター |
` | ` |
| As with segdemo, to show the characters, deselect DISPLAY/Bounding Boxes, select DISPLAY/Polygonal Approx and then select OTHER/Uniform display. |
segdemoと同様に、文字を表示するには、[表示/境界ボックス]の選択を解除し、[表示/多角形近似]を選択してから[その他/均一表示]を選択します。 |
| Now select MODES/Recog blobs and click on a character. If you choose the word 'e' in the word 'code' (the 2nd word on the 2nd line) then you should get something like this (you might have to scroll the window to get the character in the center): |
MODES / Recog blobsを選択してキャラクターをクリックしてください。 「code」という単語(2行目の2番目の単語)で「e」という単語を選択した場合は、次のように表示されます(文字を中央に表示するには、ウィンドウをスクロールする必要があります)。 |
| and this text should appear in your terminal: |
そして、このテキストはあなたの端末に現れるはずです: |
` | ` |
| AD Matches = e [65 ]a(8) 21.83 a [61 ]a(16) 29.38 |
AD Matches = e [65] a(8)21.83 a [61] a(16)29.38 |
| Debugging class = e (All Templates) ... |
デバッグクラス= e(すべてのテンプレート)... |
| Best built-in template match is config 24 (21.0) (cn=0) |
最適な組み込みテンプレートの一致は設定24(21.0)です(cn = 0) |
| No AD templates for class 8 = e |
クラス8のADテンプレートはありません= e |
| Integer Matcher ------------------------------------------- |
整数マッチャー------------------------------------------- |
| Match Complete -------------------------------------------- |
完全一致-------------------------------------------- |
| Left-click in IntegerMatch Window to continue or right click to debug... |
IntegerMatchウィンドウを左クリックして続行するか、右クリックしてデバッグします。 |
` | ` |
| Now if you right-click, you get a small pop-up menu with 3 items in it. In theory, you could ask it to debug using adaptive, static, or both sets of templates. The code to tell the difference between the different menu items isn't written yet, and if it did, it wouldn't make any difference as the rest of the code stands. You have no adaptive templates because pass1 hasn't run yet. At some point this will get fixed so that you can choose between observing a word as it is processed in pass1 or in pass2. Then it will make sense. |
右クリックすると、3つの項目を含む小さなポップアップメニューが表示されます。理論的には、アダプティブテンプレート、スタティックテンプレート、またはその両方のテンプレートセットを使用してデバッグするように要求できます。異なるメニュー項目間の違いを示すコードはまだ書かれていません、そして、もしそれが行われたとしても、残りのコードがそうであるようにそれは少しも違いを生じないでしょう。 pass1はまだ実行されていないため、アダプティブテンプレートはありません。ある時点で、これは修正されますので、パス1またはパス2で処理されるときに単語を観察するかを選択できます。それは意味があります。 |
| So click on a random menu item and you get a dialog text box asking you to enter a class to debug. It is asking for the character string of the character class, which for most of the latin languages is just a character, but for other languages, such as Kannada, might be a whole sequence of characters. To make it easier for a non-language speaker to enter non-keyboard characters, this box accepts 0xdddd as a 4-digit hex Unicode code. |
ランダムなメニュー項目をクリックすると、デバッグするクラスを入力するように求めるダイアログボックスが表示されます。それは、ほとんどのラテン言語では単なる文字ですが、カンナダ語のような他の言語では文字列全体の文字列であるかもしれない、文字クラスの文字列を要求しています。非言語話者がキーボード以外の文字を入力しやすくするために、このボックスでは4桁の16進数のUnicodeコードとして0xddddを受け入れます。 |
| This time enter a single lower case c followed by enter (clicking on OK doesn't seem to work!), and you should get this in your terminal window: |
今度は小文字のcを1つ入力してからEnterキーを押します([OK]をクリックしてもうまくいかないようです)。これをターミナルウィンドウに表示します。 |
` | ` |
| Debugging class = 34 = c (All Templates) ... |
デバッグクラス= 34 = c(すべてのテンプレート)... |
| Best built-in template match is config 4 (22.0) (cn=1) |
最適な組み込みテンプレートの一致は設定4(22.0)です(cn = 1) |
| No AD templates for class 34 = c |
クラス34 = cのADテンプレートはありません |
| Integer Matcher ------------------------------------------- |
整数マッチャー------------------------------------------- |
| Match Complete -------------------------------------------- |
完全一致-------------------------------------------- |
| Left-click in IntegerMatch Window to continue or right click to debug... |
IntegerMatchウィンドウを左クリックして続行するか、右クリックしてデバッグします。 |
` | ` |
| The IntMatchWindow should show that the lower case c matches quite well. The fact this it gets a number between that of the e and a above indicates that the c was rejected by the class pruner. |
IntMatchWindowは、小文字のcが非常によく一致することを示すはずです。これがeの値と上記の値の間の数になるという事実は、cがクラスプルーナによって拒否されたことを示しています。 |
| In the IntMatchWindow, the correspondence between the features and prototypes is shown. The prototypes are the long thin lines, and the features the shorter thicker lines. The colors from best match to worst go in this somewhat arbitrary sequence: White, Green, Red, Blue. The gray lines should indicate which kind of prototype the unknown matched, but they seem to be one classification behind. The square indicates the static classifier and shows the unit of normalization. The tram-lines indicate an adaptive classification and show the position of the baseline, meanline, descenders and ascenders. |
IntMatchWindowでは、機能とプロトタイプの対応関係が表示されます。プロトタイプは長い細い線で、機能は短い太い線です。最良一致から最悪一致までの色は、多少任意の順序で並んでいます:白、緑、赤、青。灰色の線は、未知のものとどの種類のプロトタイプが一致したかを示しているはずですが、それらは背後にある1つの分類のようです。四角は静的分類子を示し、正規化の単位を示します。路面電車線は適応的分類を示し、ベースライン、平均線、子孫および子孫の位置を示します。 |
| ## Other MODE possibilities |
##その他のMODEの可能性 |
| In general, the selected MODE will perform some action with blobs or words that you select or click on with the left mouse button. |
一般的に、選択されたMODEは、あなたが選択するか、マウスの左ボタンでクリックするブロブまたは単語で何らかの行動をとるでしょう。 |
| The MODE Show BL Norm Word will show a work you left-click on (in the editor window) in a separate window with baseline and meanline added. At time of writing, you have to move the mouse over to the BlnWords window to make it display anything. |
MODE Show BL Norm Wordは、ベースラインとミーンラインが追加された別のウィンドウに(エディタウィンドウで)左クリックした作品を表示します。これを書いている時点で、あなたはそれを何かが表示されるようにするためにマウスをBlnWordsウィンドウに動かす必要があります。 |
| Recog Blobs is useful for testing the classifier on a single blob, without having to click through all the segmentations. It will treat the selection as a "word" so you can select more than one blob and stand some chance of seeing most combinations classified. |
Recog Blobsは、すべてのセグメンテーションをクリックしなくても、1つのBLOBで分類子をテストするのに役立ちます。これは選択を「単語」として扱うので、複数のBLOBを選択して、ほとんどの組み合わせが分類される可能性があります。 |
| Show point is useful to get the coordinates of a specific blob in tesseract coordinate space, so you can input them into textord_test_x and textord_test_y to find out why some specific blob never makes it into the output. |
Show pointは特定のBLOBの座標をtesseract座標空間で取得するのに役立ちます。そのため、それらをtextord \ _test \ _xおよびtextord \ _test \ _yに入力して、特定のBLOBが出力にならない理由を見つけることができます。 |
| About the only other MODEs that do anything are Dump Word, Row Gaps Hist, and Block Gaps Hist, all of which dump information to your terminal window. |
他にできることは、Dump Word、Row Gaps Hist、Block Gaps Histだけです。これらはすべてターミナルウィンドウに情報をダンプします。 |
| ## Other Display modes |
##その他の表示モード |
| You can save some display time by not selecting Other/Uniform Display after deselecting Display/Bounding Boxes and selecting Display/Polygonal Approx. Instead, each word that you click on will get redisplayed in the new format |
Display / Bounding Boxesの選択を解除してDisplay / Polygonal Approxを選択した後、Other / Uniform Displayを選択しないで表示時間を節約することができます。代わりに、クリックした各単語が新しい形式で再表示されます。 |
| ## Troubleshooting |
## トラブルシューティング |
| Get the message "kill %1: no such job" in the middle of a bunch of ScrollView: Waiting for server... messages? You have a problem with launching Java. On windows, the error messages should make it out to your terminal window, but on Linux, you will have to edit svutil.cpp to remove the ">/dev/null 2>&1" from the cmd_template string. |
ScrollView:サーバーを待っています...というメッセージの途中で、 "kill%1:no such job"というメッセージが表示されます。 Javaの起動に問題があります。ウィンドウズでは、エラーメッセージはあなたのターミナルウィンドウでそれを明らかにするべきです、しかし、Linuxでは、cmd \ _template文字列から "> / dev / null 2>&1"を削除するためにsvutil.cppを編集しなければなりません。 |
| Try to run this command on linux |
Linuxでこのコマンドを実行してみてください |
` | ` |
| java -Xms512m -Xmx1024m -Djava.library.path=$SCROLLVIEW_PATH -cp $SCROLLVIEW_PATH/ScrollView.jar:$SCROLLVIEW_PATH/piccolo-1.2.jar:$SCROLLVIEW_PATH/piccolox-1.2.jar com.google.scrollview.ScrollView |
java -Xms512m -Xmx1024m -Djava.library.path = $ SCROLLVIEW_PATH -cp $ SCROLLVIEW_PATH / ScrollView.jar:$ SCROLLVIEW_PATH / piccolo-1.2.jar:$ SCROLLVIEW_PATH / piccolox-1.2.jar com.google.scrollview.ScrollView |
` | ` |
| On Windows try this: |
Windowsではこれを試してください。 |
` | ` |
| java -Xms512m -Xmx1024m -Djava.library.path=%SCROLLVIEW_PATH% -cp %SCROLLVIEW_PATH%/ScrollView.jar;%SCROLLVIEW_PATH%/piccolo-1.2.jar;%SCROLLVIEW_PATH%/piccolox-1.2.jar com.google.scrollview.ScrollView |
java -Xms512m -Xmx1024m -Djava.library.path =%SCROLLVIEW_PATH%-cp%SCROLLVIEW_PATH%/ ScrollView.jar;%SCROLLVIEW_PATH%/ piccolo-1.2.jar;%SCROLLVIEW_PATH%/ piccolox-1.2.jar com.google.scrollview。 ScrollView |
` | ` |
| If everything is ok with java and SCROLLVIEW_PATH setting you should see: |
javaとSCROLLVIEW \ _PATHの設定ですべて問題なければ、次のようになるはずです。 |
> Socket started on port 8461. |
> `ソケットはポート8461から始まりました。 |
| Otherwise you need to fix problem e.g.: |
それ以外の場合は、問題を解決する必要があります。例: |
| * java runtime is not installed |
* Javaランタイムがインストールされていません |
| * java is not in the path |
* javaはパスにありません |
| * SCROLLVIEW_PATH includes space or non-ASCII characters |
* SCROLLVIEW \ _PATHにはスペースまたはASCII以外の文字が含まれます |
| ## Other Things You Should Know |
##知っておくべきその他のこと |
| This is a debug tool, not a proper UI, and as such, it doesn't handle well anything outside the normal execution path. The problems/bugs include, but are not limited to: |
これはデバッグツールであり、適切なUIではありません。そのため、通常の実行パス以外ではうまく処理できません。問題/バグには以下が含まれますが、これらに限定されません。 |
| * If you close one of the secondary windows, it will never come back without a restart of tesseract. |
*セカンダリウィンドウの1つを閉じても、tesseractを再起動しないと元のウィンドウに戻ることはありません。 |
| * The Java viewer process now terminates correctly most of the time. If Tesseract appears to hang when you would expect the viewer to appear, it is probably because you have a rogue java process that you must kill by hand. |
* Javaビューアプロセスはほとんどの場合正しく終了します。ビューアが表示されるはずのときにTesseractがハングしているように見える場合は、おそらく不正なJavaプロセスがあるために手動で強制終了する必要があります。 |
| * You still can't run more than one Tesseract using the new viewer at a time. |
*それでも、新しいビューアを使用して一度に複数のTesseractを実行することはできません。 |
| * The demo modes shown here do not exactly reproduce what goes on in Tesseract, because the 2-pass nature and adaptive classifier are not reproduced. |
* 2パスの性質と適応分類器は再現されていないため、ここに示されているデモモードはTesseractで行われるものを正確に再現していません。 |