Table of Contents
Introduction
This page will go over all the available customization options you have as Rockman, as well as cover NKG.
Changing your online name
You can change your online name which others players will see when searching for matches like this:
- I) Click the Menu button.
- II) Click the Brother tab.
- III) Click your profile picture.
- IV) Click on the top-left box which shows your current name.
- V) Skip some of the dialogue which comes up by pressing A and then choose the left option to enter your new name.
Abilities
One of the first and most important customization options we'll cover are Abilities.
You can access abilities by going to Menu > Rockman:
Then click the Abilities button highlighted in the picture:
This will bring you to the ability menu:
- 1) Name of the ability and the ability list.
- 2) How much LP the ability costs.
- 3) Your current maximum LP.
- 4) Your remaining LP which changes after you equip certain abilities.
- 5) Your ability list.
Here, you can equip Rockman with various types of abilities. You use what is known as Link Power to equip these abilities. By yourself, you have1020 LP but with Brothers who are on your team, you can get a maximum of 1900 LP!
To equip Rockman with an ability, click one of the abilities from the ability on the left or press A to equip it. To remove an ability, go to your ability on the right and click it or press A to un-equip it.
Ability List
Before you start equipping abilities, make sure to first check that the abilities you have the correct quantity of abilities equipped by checking this list here:
| Ability Name |
Link Power |
Description |
Quantity |
| HP+50 |
120 |
Increases Rockman's HP by 50 |
x1 |
| 110 |
Increases Rockman's HP by 50 |
x1 |
| 100 |
Increases Rockman's HP by 50 |
x1 |
| 90 |
Increases Rockman's HP by 50 |
x1 |
| HP+100 |
220 |
Increases Rockman's HP by 100 |
x1 |
| 205 |
Increases Rockman's HP by 100 |
x1 |
| 190 |
Increases Rockman's HP by 100 |
x1 |
| 170 |
Increases Rockman's HP by 100 |
x1 |
| HP+200 |
310 |
Increases Rockman's HP by 200 |
x1 |
| 290 |
Increases Rockman's HP by 200 |
x1 |
| 270 |
Increases Rockman's HP by 200 |
x1 |
| 250 |
Increases Rockman's HP by 200 |
x1 |
| HP+300 |
420 |
Increases Rockman's HP by 300 |
x1 |
| 390 |
Increases Rockman's HP by 300 |
x1 |
| 370 |
Increases Rockman's HP by 300 |
x1 |
| 340 |
Increases Rockman's HP by 300 |
x1 |
| HP+400 |
490 |
Increases Rockman's HP by 400 |
x1 |
| 470 |
Increases Rockman's HP by 400 |
x1 |
| 450 |
Increases Rockman's HP by 400 |
x1 |
| 430 |
Increases Rockman's HP by 400 |
x1 |
| HP+500 |
610 |
Increases Rockman's HP by 500 |
x1 |
| 570 |
Increases Rockman's HP by 500 |
x1 |
| 540 |
Increases Rockman's HP by 500 |
x1 |
| 450 |
Increases Rockman's HP by 500 |
x1 |
| 350 |
Increases Rockman's HP by 500 |
x1 |
| UnderShrt |
60 |
1 HP left after a fatal hit |
x1 |
| 50 |
1 HP left after a fatal hit |
x1 |
| 30 |
1 HP left after a fatal hit |
x1 |
| 5 |
1 HP left after a fatal hit |
x1 |
| AirShoes |
450 |
Allows you to move over holes |
x1 |
| 400 |
Allows you to move over holes |
x1 |
| 350 |
Allows you to move over holes |
x1 |
| 260 |
Allows you to move over holes |
x1 |
| 200 |
Allows you to move over holes |
x1 |
| FltShoe |
300 |
Allows you to ignore certain panel effects |
x1 |
| 270 |
Allows you to ignore certain panel effects |
x1 |
| 240 |
Allows you to ignore certain panel effects |
x1 |
| 210 |
Allows you to ignore certain panel effects |
x1 |
| 150 |
Allows you to ignore certain panel effects |
x1 |
| Rflct |
260 |
Reflects damage from shielding non-dimming, non-break attacks back to the opponent |
x1 |
| 230 |
Reflects damage from shielding non-dimming, non-break attacks back to the opponent |
x1 |
| 200 |
Reflects damage from shielding non-dimming, non-break attacks back to the opponent |
x1 |
| 150 |
Reflects damage from shielding non-dimming, non-break attacks back to the opponent |
x1 |
| 50 |
Reflects damage from shielding non-dimming, non-break attacks back to the opponent |
x1 |
| SprArmr |
900 |
Prevents Rockman from flinching |
x1 |
| 700 |
Prevents Rockman from flinching |
x1 |
| FlshBody |
300 |
Makes Rockman immune to blind & confuse effects |
x1 |
| 200 |
Makes Rockman immune to blind & confuse effects |
x1 |
| GravBody |
500 |
Makes Rockman immune to gravity effects and push & pull effects |
x1 |
| 300 |
Makes Rockman immune to gravity effects and push & pull effects |
x1 |
| ParaBody |
800 |
Makes Rockman immune to paralysis effects |
x1 |
| 600 |
Makes Rockman immune to paralysis effects |
x1 |
| FrzBody |
800 |
Makes Rockman immune to freeze effects |
x1 |
| 600 |
Makes Rockman immune to freeze effects |
x1 |
| BblBody |
800 |
Makes Rockman immune to bubble effects |
x1 |
| 600 |
Makes Rockman immune to bubble effects |
x1 |
| FstBarr |
60 |
Begin the battle with a 1 HP Barrier |
x1 |
| 50 |
Begin the battle with a 1 HP Barrier |
x1 |
| 40 |
Begin the battle with a 1 HP Barrier |
x1 |
| 30 |
Begin the battle with a 1 HP Barrier |
x1 |
| FstAura |
600 |
Being the battle with Aura |
x1 |
| 400 |
Being the battle with Aura |
x1 |
| Mega+1 |
440 |
Increase your folder's Mega card capacity by one |
x1 |
| 400 |
Increase your folder's Mega card capacity by one |
x1 |
| 360 |
Increase your folder's Mega card capacity by one |
x1 |
| 270 |
Increase your folder's Mega card capacity by one |
x1 |
| 200 |
Increase your folder's Mega card capacity by one |
x1 |
| Giga+1 |
750 |
Increase your folder's Giga card capacity by one |
x1 |
| 700 |
Increase your folder's Giga card capacity by one |
x1 |
| 650 |
Increase your folder's Giga card capacity by one |
x1 |
| 400 |
Increase your folder's Giga card capacity by one |
x1 |
| +V |
90 |
Changes Rockman's charge shot pattern to a V shape |
x1 |
| 80 |
Changes Rockman's charge shot pattern to a V shape |
x1 |
| 70 |
Changes Rockman's charge shot pattern to a V shape |
x1 |
| 50 |
Changes Rockman's charge shot pattern to a V shape |
x1 |
| +X |
150 |
Changes Rockman's charge shot pattern to an X shape |
x1 |
| 130 |
Changes Rockman's charge shot pattern to an X shape |
x1 |
| 110 |
Changes Rockman's charge shot pattern to an X shape |
x1 |
| 90 |
Changes Rockman's charge shot pattern to an X shape |
x1 |
| 45 |
Changes Rockman's charge shot pattern to an X shape |
x1 |
| SpreadShot |
200 |
Changes Rockman's charge shot to a spread which hits adjacent panels |
x1 |
| 180 |
Changes Rockman's charge shot to a spread which hits adjacent panels |
x1 |
| 160 |
Changes Rockman's charge shot to a spread which hits adjacent panels |
x1 |
| 140 |
Changes Rockman's charge shot to a spread which hits adjacent panels |
x1 |
| 100 |
Changes Rockman's charge shot to a spread which hits adjacent panels |
x1 |
| +WoodPnl |
220 |
Rockman's charge shot will create grass panels upon hit |
x1 |
| 200 |
Rockman's charge shot will create grass panels upon hit |
x1 |
| 170 |
Rockman's charge shot will create grass panels upon hit |
x1 |
| 150 |
Rockman's charge shot will create grass panels upon hit |
x1 |
| 50 |
Rockman's charge shot will create grass panels upon hit |
x1 |
| +IcePnl |
220 |
Rockman's charge shot will create ice panels upon hit |
x1 |
| 210 |
Rockman's charge shot will create ice panels upon hit |
x1 |
| 180 |
Rockman's charge shot will create ice panels upon hit |
x1 |
| 160 |
Rockman's charge shot will create ice panels upon hit |
x1 |
| 50 |
Rockman's charge shot will create ice panels upon hit |
x1 |
| +ParaPnl |
250 |
Rockman's charge shot will create para panels upon hit |
x1 |
| 230 |
Rockman's charge shot will create para panels upon hit |
x1 |
| 210 |
Rockman's charge shot will create para panels upon hit |
x1 |
| 180 |
Rockman's charge shot will create para panels upon hit |
x1 |
| 70 |
Rockman's charge shot will create para panels upon hit |
x1 |
| +GnulPnl |
200 |
Rockman's charge shot will create Gnull Panels on hit |
x1 |
| 190 |
Rockman's charge shot will create Gnull Panels on hit |
x1 |
| 170 |
Rockman's charge shot will create Gnull Panels on hit |
x1 |
| 140 |
Rockman's charge shot will create Gnull Panels on hit |
x1 |
| 50 |
Rockman's charge shot will create Gnull Panels on hit |
x1 |
| +PsnPnl |
270 |
Rockman's charge shot will create poison panels on hit |
x1 |
| 250 |
Rockman's charge shot will create poison panels on hit |
x1 |
| 230 |
Rockman's charge shot will create poison panels on hit |
x1 |
| 120 |
Rockman's charge shot will create poison panels on hit |
x1 |
| AutoLkOn |
950 |
Changes Rockman's lock-on type to Auto Lock-On |
x1 |
| QkGauge |
500 |
Speeds up the Custom Gauge to MAX speed |
x1 |
| 300 |
Speeds up the Custom Gauge to MAX speed |
x1 |
| AntiDmg/Kawarimi |
370 |
Press Up + Y just as an attack hits Rockman. Read more about it here |
x1 |
| 350 |
Press Up + Y just as an attack hits Rockman. Read more about it here |
x1 |
| 330 |
Press Up + Y just as an attack hits Rockman. Read more about it here |
x1 |
| 250 |
Press Up + Y just as an attack hits Rockman. Read more about it here |
x1 |
| DiagLk |
5 |
Changes Rockman's lock-on type to Diagonal Lock-On |
x1 |
| SideLk |
5 |
Changes Rockman's lock-on type to Side Lock-On |
x1 |
| AcePGM |
0 |
Allows Rockman to harness the power of Noise |
x1 |
| JokerPGM |
0 |
Allows Rockman to harness the power of Noise |
x1 |
| SArEater |
5 |
Changes support cards into Area Eater |
x1 |
| SDbStone |
5 |
Changes support cards into Double Stone |
x1 |
| SPfmt |
5 |
Changes support cards into Panel Format |
x1 |
| HumrWrd |
1 |
Changes the conversations you have with War-Rock |
x1 |
| HumrB1 |
1 |
Makes the Rock Buster sound like a dog |
x1 |
| HumrB2 |
1 |
Makes the Rock Buster sound like a cat |
x1 |
Rock Buster
You can change the way the Rock buster works by:
- I) Click on the Menu button.
- II) Click the Rockman tab.
- III) Click the War-Rock button.
This will bring you to the Rock Buster menu:
Initially, you will see the name of the weapon Rockman has currently equipped as well as its stats:
- ATK: Determines how much damage the Rock Buster will inflict.
- RPD: Determines the rate of fire of the Rock Buster.
- CHRG: Determines how long it takes to charge the Rock Buster for a charge shot.
Usually, the maximum value of these stats ends up being 5, but certain cards and noises can bypass these stats. For example, the amount of damage Rockman's charge shot inflicts in his base form is 50. Whereas Wolf noise's charge shot deals 100 damage (this is all assuming the ATK stat is at 5).
You can change the current weapon equipped to Rockman by pressing A on the top option you see in the Rock Buster menu and then press left/right to cycle through each weapon whilst also seeing their description. Press A again to change your current weapon or press B to exit the menu.
Noise Kaizou Gear
Also known as Noise Modification Gear. This is an additional series of power-ups and customization options available to Rockman in the Japanese version of the game, with it being cut out from the North American version of the game.
The customization options from NKG are extremely vital and greatly change the way the game is played, especially for PvP. With NKG, you'll have a LOT of variety when it comes to creating a build with every Noise.
These next sections will break down each part of NKG.
Noise Cards
If you have ever played Rockman EXE before, Noise Cards are essentially similar to NaviCust but uses poker cards and combos as well as other rules to determine what kind of power-ups or bugs Rockman gets from them.
This is how you can access Noise Cards:
- I) Click the Menu button.
- II) Go to the Rockman tab.
- III) Click on the parameter box.
- IV) You will get a dialogue box asking you to input a Noise Card, choose the left option to input a Noise Card.
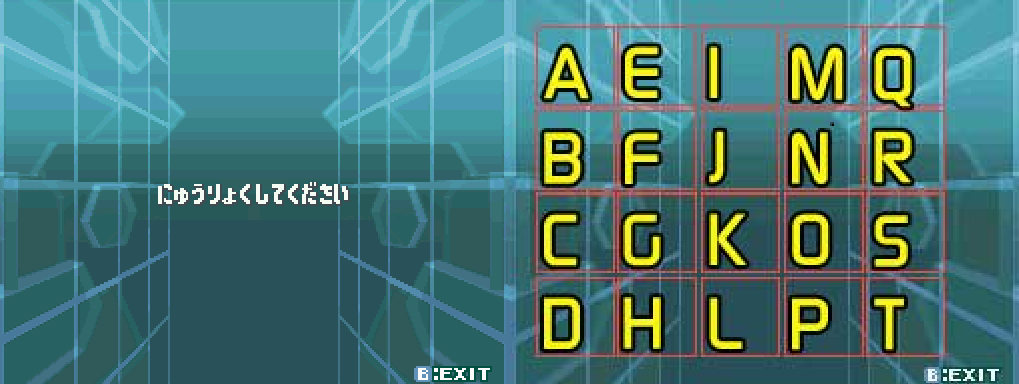
After doing so, you will get a screen which will ask you to input a code for a Noise Card. Use the image on the right as a reference when inputting codes:
Down below will be a list of codes for the Noise Cards you can input. You can also simply use
thistle's save editor to quickly create a Noise Card setup for your Noise. However, before you start inputting Noise cards manually or through
thistle's save editor, it's best to first explain the basics of how Noise Cards work, as well as their rules.
Noise Card Breakdown
- 1) Suit of the Noise Card.
The suits are ♠, ♥, ♦, ♣, J.
- 2) Noise Card name.
- 3) Noise Card ability name.
- 4) Noise Card number.
- 5) Noise Card combo.
Noise Card Rules
- There can only be five Noise Cards.
- There cannot be duplicate Noise Cards. You cannot have Noise Cards which have the same name, suit, number and ability. For example, you cannot have two Jack Corvus Noise Cards, which are 11♥ and Fire+20.
- There cannot be Noise cards which have the same suit and number.
- Cards which are the same suit and are next to each other won't cause any bugs. Cards which are of a different suit and are next to each other will cause bugs to happen.
- However, if you go for a Noise Card combo then you will have no bugs and will gain a bonus depending on the combo you go for. You can see all the Noise Card combos you can get below this section and what combinations are needed to get them.
- The bugs you get will also be determined by the suit of a card and how much of that card you have. For example, if you have three ♥ Noise Cards and two ♣ Noise Cards, then you will get a Lv3 HP Bug from the ♥ Noise Cards and Lv2 Buster Bug from the ♣ Noise Cards. Down below will be a list of bugs you get from each suit.
- You can only have ONE Noise Card which is of the J suit. Noise Cards from this suit are a wild card which you can use for ANY Noise Card combo.
Noise Card Combos
| Combo Name |
Combo Requirements |
Combo Bonus |
| 2 Pairs |
Two pairs of Noise Cards with the same number (2+2 and +3+3) |
No bugs |
| 3 of a kind |
Three Noise Cards with the same number |
No bugs |
| 4 of a kind |
Four Noise Cards with the same number |
Mega+2 |
| 5 of a kind |
Five Noise Cards with the same number |
Status guard |
| Straight |
Noise Cards in a sequential order of numbers (1+2+3+4+5 or 6+7+8+9+10 and etc.) |
HP+300 |
| Flush of Diamonds |
All Noise Cards must be of the ♦ suit |
Air Shoes |
| Flush of Hearts |
All Noise cards must be of the ♥ suit |
Super Armor |
| Flush of Clubs |
All Noise Cards must be of the ♣ suit |
Anti-Damage/Kawarimi and HP+200 |
| Flush of Spades |
All Noise Cards must be of the ♠ suit |
Float Shoes |
| Full House |
Requires a 3-of-a-kind and a 2-of-a-kind (e.g. 1+1+1 and 2+2) |
HP+500 |
| Straight Flush |
A straight with all Noise Cards being from one suit |
Giga+1, Mega+1 |
| Royal Straight Flush |
Ace+King+Queen+Jack+10 of the same suit |
Auto Lock-On |
Noise Card Bug List
| Suit |
Bug |
| ♠ |
Panel Crack bug. Causes Rockman to create cracks/holes whenever he steps on panels/cracked panels. |
| ♥ |
HP bug |
| ♣ |
Buster bug, can prevent Rockman from firing his buster. |
| ♦ |
Status bug. Will have Rockman start with a status at the start of a battle. |
Noise Card List
This is a list of Noise Cards with each input code if you wish to input them manually instead of using
thistle's save editor.
| Suit |
Number |
Ability |
Code |
| ♦ |
Ace (1) |
+Ice Panel |
SHCIMG |
| ♦ |
Ace (1) |
Aqua+10 |
BCNTMP |
| ♦ |
2 |
Support Ice Stage |
EKNCHO |
| ♦ |
2 |
Bubble Body |
IQMDLA |
| ♦ |
3 |
Ice Spin Charge Shot |
QGCPMD |
| ♦ |
4 |
Support Whistle |
KEFPAR |
| ♦ |
4 |
Break+10 |
DRLKGI |
| ♦ |
5 |
Shuriken Charge Shot |
EITGOA |
| ♦ |
5 |
HP+250 |
KTACNL |
| ♦ |
6 |
First Barrier |
HELARO |
| ♦ |
6 |
Freeze Body |
LSOGQM |
| ♦ |
7 |
Aqua+20 |
MPIBQT |
| ♦ |
7 |
+Gravity |
ICEPRD |
| ♦ |
8 |
+Paralyze Panel |
RCQFDL |
| ♦ |
9 |
Support Black Ink |
QBARPC |
| ♦ |
10 |
HP+250 |
NPIMRT |
| ♦ |
10 |
HP+150 |
SCFTGM |
| ♦ |
Jack (11) |
Gravity Body |
QCRGBN |
| ♦ |
Jack (11) |
HP+150 |
CNQRMB |
| ♦ |
Queen (12) |
+Confuse |
FACEIB |
| ♦ |
Queen (12) |
Mega +1 |
RPABDH |
| ♦ |
King (13) |
HP+250 |
KGCOM |
| ♦ |
King (13) |
Aqua GA+ |
SPIRBL |
| Suit |
Number |
Ability |
Code |
| ♥ |
Ace (1) |
Fire GA+ |
ESCTPD |
| ♥ |
Ace (1) |
HP+200 |
HNQCRB |
| ♥ |
2 |
Break+10 |
DETSLA |
| ♥ |
2 |
Machine Flame Charge Shot |
KPQCMJ |
| ♥ |
3 |
Support Attack+10 |
BRPSQI |
| ♥ |
3 |
Super Armor |
STACPM |
| ♥ |
4 |
HP+250 |
FGCEMA |
| ♥ |
5 |
Break+20 |
CDMQHP |
| ♥ |
5 |
Fire+10 |
NGRTEM |
| ♥ |
6 |
Support Attack Panel |
SRBTMI |
| ♥ |
7 |
Flash Body |
EQPGOC |
| ♥ |
7 |
Fire+10 |
QFIEBP |
| ♥ |
8 |
HP+400 |
NRKGHB |
| ♥ |
8 |
Heavy Drop Charge Shot |
QDAGSK |
| ♥ |
9 |
Reflect |
CIARMB |
| ♥ |
9 |
Sword+10 |
DPKGIL |
| ♥ |
10 |
Support Double Eater |
NDMCSK |
| ♥ |
10 |
Support Bombalizer |
KQHALE |
| ♥ |
Jack (11) |
Fire+20 |
ARCNOT |
| ♥ |
Jack (11) |
+Cross Spread |
DARKHQ |
| ♥ |
Queen (12) |
Normal G.A+ |
RAIPHD |
| ♥ |
Queen (12) |
HP+150 |
RSTMLC |
| ♥ |
King (13) |
+Poison Panel |
HRISTG |
| ♥ |
King (13) |
First Aura |
ITEMSQ |
| Suit |
Number |
Ability |
Code |
| ♠ |
Ace (1) |
HP+200 |
ISHPLM |
| ♠ |
Ace (1) |
Elec G.A+ |
LCQHEK |
| ♠ |
2 |
HP+150 |
KDCRQB |
| ♠ |
2 |
Elec+10 |
CKBRHA |
| ♠ |
3 |
HP+300 |
RTLQOD |
| ♠ |
3 |
HP+150 |
CLEDQH |
| ♠ |
4 |
Flash Strike Charge Shot |
KLHQAI |
| ♠ |
4 |
Support Panic Cloud |
KBSLAM |
| ♠ |
5 |
+Invis |
FADHQT |
| ♠ |
6 |
HP+200 |
BSCLTD |
| ♠ |
6 |
Support Paralyze Stage |
PGMRHB |
| ♠ |
7 |
Elec+10 |
MSPGBH |
| ♠ |
7 |
UnderShirt |
DNQIHA |
| ♠ |
8 |
HP+150 |
QPOSHA |
| ♠ |
8 |
+Paralyze |
MAEQTL |
| ♠ |
9 |
Paralyze Body |
HQILRS |
| ♠ |
9 |
+GnullPanel |
GKLROA |
| ♠ |
10 |
Mad Vulcan Charge Shot |
DIQSOA |
| ♠ |
Jack (11) |
HP+150 |
DLIQCB |
| ♠ |
Jack (11) |
HP+250 |
FTKPHS |
| ♠ |
Queen (12) |
+Blind |
TBMGPQ |
| ♠ |
King (13) |
Card Heal |
CLQTSF |
| ♠ |
King (13) |
Sword+10 |
IBDPEL |
| Suit |
Number |
Ability |
Code |
| ♣ |
Ace(1) |
Mu Technology Charge Shot |
SBCRKP |
| ♣ |
Ace(1) |
HP+250 |
PABDQS |
| ♣ |
2 |
Air Shoes |
SCIPHL |
| ♣ |
2 |
Wood+10 |
FISBDJ |
| ♣ |
3 |
HP+250 |
SGHATB |
| ♣ |
4 |
HP+400 |
PAQCTO |
| ♣ |
4 |
Wood+10 |
CRISTB |
| ♣ |
5 |
Sword+10 |
PMGKSH |
| ♣ |
5 |
Wood G.A+ |
QTORMI |
| ♣ |
6 |
+Wind |
HITBCR |
| ♣ |
7 |
Spreader Charge Shot |
TLQEDB |
| ♣ |
7 |
+Grass Panel |
ESRDPF |
| ♣ |
8 |
Quick Gauge |
INQAEL |
| ♣ |
8 |
HP+250 |
BTFCSD |
| ♣ |
9 |
Wood+20 |
EQDSMC |
| ♣ |
9 |
Anti-Damage/Kawarimi |
DSPLHB |
| ♣ |
10 |
Support Divide Line |
SQPDAF |
| ♣ |
Jack (11) |
Support: Grass Stage |
DBOLCE |
| ♣ |
Queen (12) |
Support: Recovery 30 |
MDICLN |
| ♣ |
Queen (12) |
HP+400 |
RSAKTN |
| ♣ |
King (13) |
Shuriken Charge Shot |
RCFMBA |
| ♣ |
King (13) |
HP+250 |
ILEBHR |
| Suit |
Ability |
Code |
| J |
Buster MAX |
OLSQAD |
| J |
Body Pack (Super Armor, Float Shoes, Air Shoes, Under Shirt) |
SEHDQB |
| J |
HP+500 |
RQISND |
| J |
Auto Lock-On |
QFLPSB |
| J |
Support Invisible |
SIHRAF |
Rezon Cards
Rezon cards allow you to customize and buff your Finalize form. You can input Rezon cards by:
- I) Click on the menu button.
- II) Click on the brother tab.
- III) Click and choose your own profile picture.
- IV) Click on the box at the bottom.
- V) Choose and click the third option.
You'll be met with exactly the same input screen you saw when you were inputting Noise Cards. Use the image on the right as a reference for inputting the codes in:
Rezon Card List
| Rezon Card Name |
Rezon Card Abilities |
Code |
| Ultimate Battle Master |
Normal Cards 3+ Attack Stars, Charge Shot Finalize Mad Vulcan |
BTRLPD |
| Ultimate Fire Master |
Fire Cards +3 Attack Stars, Charge Shot Finalize Machine Flame |
DOFMAP |
| Ultimate Aqua Master |
Aqua Cards +3 Attack Stars, Finalize Ice Panel |
KOEAIQ |
| Ultimate Thunder Master |
Thunder Cards +3 Attack Stars, Finalize Gnull Panel |
GDHQPM |
| Ultimate Wood Master |
Wood Cards +3 Attack Stars, Finalize Grass Panel |
GDIEHP |
| Ultimate Sword Master |
Sword Cards +3 Attack Stars, Finalize Super Barrier |
GPELAI |
| Ultimate Break Master |
Break Cards +3 Attack Stars, Charge Shot Finalize Drill Arm |
PADMLS |
| Ultimate Guard Master |
Finalize Turn+1, Finalize Holy Field, Finalize Aura |
CMDGPL |
| Ultimate Paralyze Master |
Charge Shot Finalize Plasma Spread, Paralyze Panel |
SGALMK |
| Ultimate Finalize Form |
Finalize Turn+2, Access Lv+1, Charge Shot Finalize Cannon |
KLADJE |
Team Rezon Bonus
If your brothers are on your team, then you can also gain some of their Rezon buffs. Most notably, you can stack:
- Attack Stars
- Finalize Turns
- Access Lv buffs from your brothers
Other things such as different charge shots and stage modifiers are given to you based on brother priority, with your own Rezon and your first brother (top-left) being the lowest priority, whereas your sixth brother (top-right) has higher priority.
So say you yourself have equipped the Ultimate Guard Master Rezon Card, but you wish to also have a Plasma Spread charge shot, if your sixth brother has the Ultimate Paralyze Master Rezon Card equipped, then you will now have a Plasma Spread charge shot when you Finalize into Red Joker along with an Aura and an extra Finalize turn.
However, you will lose your Holy field since it'll be replaced by the Paralyze field from the Ultimate Paralyze Master Rezon card because the sixth brother is equipped with that card and the sixth brother has higher priority than your own Rezon card.
You can view what Rezon buffs you and your bros currently have:
- I) Click on the menu button.
- II) Click on the brother tab.
- III) Click and choose your own profile picture.
- IV) Click on the box at the bottom.
- V Click on the the last option.
Here you will see the name of each brother/your own name and what buffs you currently have for your Finalize Form.
Secret Satellite Server / Meteor Server Cards
Before explaining how SSS/MS cards, it's best to use
Thistle's save editor when it comes to setting up SSS/MS cards because the actual process to get SSS/MS is extremely long and it can be very confusing to explain. The save editor also has an image of every SSS/MS folder available inside the program.
Before discussing SSS/MS cards further, it's best to first learn the rules of SSS/MS cards:
- You can have a max of three SSS/MS cards.
- They cannot be duplicates.
You can have up to three SSS/MS cards, but you'll have to sacrifice bros for it. SSS/MS cards essentially allow you to get a hand from a different set of pre-made folders outside of yours. There is a way to also determine what hand you get from one of the SSS/MS folders.
To better explain this, we'll use an example. First we'll have to choose an SSS/MS card as well as see its folder using Thistle's save editor. Lv28 Blues seems to be a good SSS card with a good folder:
So we'll sacrifice one brother and assign it to the 4th slot:
Then, let's equip our SSS/MS card by going to our folder:
- I) Click on the Menu button.
- II) Click on the Battle Card section.
- III) Go to your currently equipped folder.
- IV) Equip the SSS/MS card by scrolling down to the bottom and pressing A on it or clicking it.
Now that we have it equipped, it's time to wait for it to appear in battle. Make sure to note down its custom screen position:
When you click on the SSS/MS card, you will have three addresses listed as A, B and C:
The card's custom screen position and the address determine what cards you get. Each position on the custom screen is a number:
When you combine the custom screen position number (1 from 6) with a folder address (A, B or C), you'll determine what hand you get from the SSS/MS folder.
Our SSS card's position is 4 so we'll go ahead and pick the C address. This will give us the hand shown on the graph above in the 4C section:
Another thing to mention would be the SSS/MS hand layouts. These are all the possible hand layouts for all the SSS/MS cards:
They can give you a good guess as to what the hand layout might be for a certain SSS/MS hand. One thing that's for sure is that you will have a perfectly clean and aligned hand without any sort of overlap if your SSS/MS hand has no Mega or Giga cards in it. Which can be good or bad depending on the type of build you're making.
That covers SSS/MS. Whilst it may be painful sacrificing a brother or two for these cards (unless you play Burai), they do provide a lot of answers to certain situations and also prevent you from running out of cards since you gain an additional 6 cards from an SSS/MS card.
Most Noises will tend to use 1 SSS/MS card since it's sufficient enough. However, Burai can take advantage of 3 SSS/MS cards. Another bonus of SSS/MS cards, is the fact that you can get access to the Satellite Admin Giga cards from SSR1, since you can't access them in any other way (legitimately of course).
最終更新:2021年03月23日 08:28