version6.6にてscript(Lua Scripting)に対応しました
この機能によりある程度のオートメーション化に役立つと思われますが現時点でサンプルが少なく(2016/02/21現在11件)
初心者は手が出しにくい状態になっています
どなたかわかる方は記述をお願いいたします。
参考ページ
(参考アドレス)
http://steamcommunity.com/sharedfiles/filedetails/?id=714904631
When you save your scripts in Tabletop,
あなたのスクリプトをTTSで保存するとき
it will use your most recent save and then load the script into it.
最新のセーブ、スクリプトがはいったものを使うこと
So for any script you intend to write, you will need to do the following:
スクリプトを書き足す時には下の事に注意しましょう。
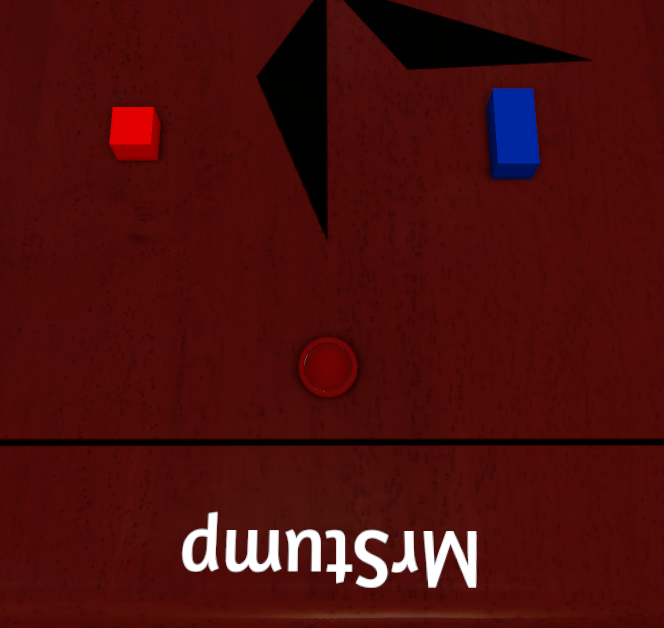
For this exercise, take a blank table and spawn two objects (I used a square
block and rectangle block) as well as a red checker.
たとえば右の画像みたいに赤と青のブロックと
赤い確認用コインがあります。
Remember to save/load then open up the scripting in Atom
Atomでセーブする前にセーブ&ロードすること、
or go to Host > Scripting in Tabletop Simulator to begin.
ホストとしてTTSをはじめることを覚えておいてください
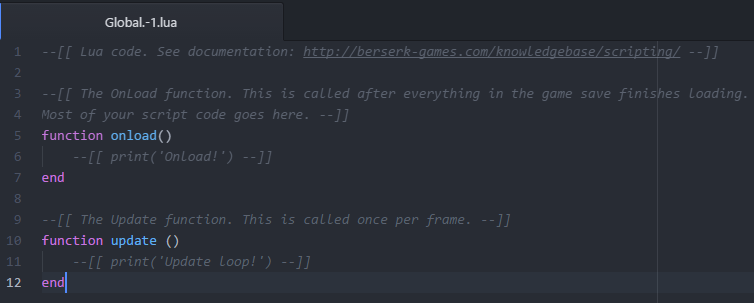 Global.lua is the scripting which is a part of the save
file.
Global.lua is the scripting which is a part of the save
file.
「Functions」はコードの1グループとして機能します。
Some of them are built into the scripting system (ex. onload()) while others can be created by the user.Every function will start with the word function and end with the word end.
右の図でいうピンク文字の「function」から「end」までが1グループとなります。
A common function built into Tabletop Simulator is onload(). This function
triggers every time the script is loaded (like if Undo/Redo is pressed).
TTSでよく使う「onload()」はゲームの読み込み時に機能します。
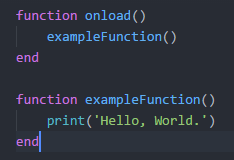
So let us get started by using it to activate a function we will create. Functions should start with a lowercase letter, and cannot contain spaces. We'll use exampleFunction.
「Functions」の機能は「小文字で表記」し、「スペースを含めてはいけません」
Now our script, when it loads, will try to run a function named exampleFunction. But we haven't written one yet! So now we will create our own function, right after the onload function has ended.
上のままじゃ特に何もおきません。
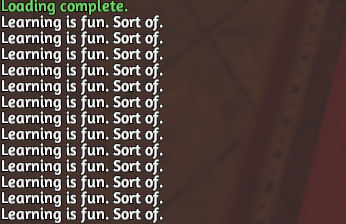
The command of print() is also a function. But instead of triggering a section of code in LUA, it activates programming inside of Tabletop Simulator to produce a desired effect. In this case, printing a message to the host of the game, in chat.The message is called a string, and is always surrounded by quotes to indicate that. A string is a series of characters. (Ex: "This is a string." or 'So is this!')When you save and upload your script, it should now print "Hello, World." to chat.
【print('表示させたい文字')】 :「表示させたい文字」がチャット欄に表示されます。
このメッセージは「string」とよばれます
Extra Credit: When you create your own function, you can also pass variables along with it for the function to use. Another way to write our starting exercise would be:
応用編:下の通りにやってみましょう。
We created a variable to represent the string (passedString) and then printed what was contained in that variable.
「passedString」は?
「オブジェクト」はTTSでは物理的なものになります。
たとえば、さっきつくった赤と青とコインがあるだけの謎のゲーム。
これにスクリプトを使って追加したボタンで動きをあたえてみましょう
Global.luaを開いて全てのテキストを一度けしましょう。
To affect and object, first we must identify it in LUA. There are several ways to do this, such as identifying items being picked up or put down by players, finding objects inside of a scripting zone and more. We will be identifying these objects by their GUID.
まず「プレイヤーがそのオブジェクト」を「持っている」か「持っていないか」を見極めることが大切です。
そのために「GUID」の機能を使いましょう。
A GUID is a unique identifier which each spawned item in TS will have.
Even 2 of the same item will have different GUIDs. To locate an object's GUID,
right click on it and go to Scripting. If you click on its GUID there, it will
copy it to your clipboard. A GUID is always a string, so remember strings are
always in quotes. Lets create some variables with the GUIDs of our
objects. REMEMBER: Your GUIDs will be different than mine.
TTS上で作られたオブジェクト毎に上のような「GUID」のコードが設定されている。(見た目が同じものや、コピーしたものでも違うGUIDになる)
このGUIDはオブジェクトを右クリックしたとき、上記のように、チャット欄に出てくる
(上のGUIDのコードはあなたが実際に試したものとは違う数字になるでしょう)
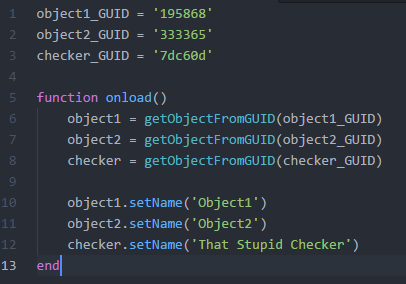
Defining Objects オブジェクトの定義
Then, using onload so this happens when the script is loaded, we will make variables to represent our objects.
All of these variable names we've been making must start with a lower case letter and not contain spaces,
but other than that you are fairly free to make up variable names yourself. You want to make it clear what it represents. I will be using object1, object2 and checker to represent my objects. The function we will use to identify will be getObjectFromGUID(string). We place the GUID in the spot for the string.
次に、onloadを使用して、スクリプトがロードされたときに、オブジェクトを表す変数を作成します。
これらの変数名はすべて小文字で始まり、空白を含まないようにしなければなりませんが、
変数名を自分で作ることはかなり自由です。
今回は、何を表しているかを明確にしたいので、オブジェクトを表すためにobject1、object2、checkerを使用します。
識別に使用する関数は「getObjectFromGUID(string)」です。 GUIDを文字列の場所に配置します。
Now we need to manipulate these objects somehow. We will give them a name. In onload(), after we defined our objects, we will use the function of setName(string). Notice that setName, like other object functions, must be tied to an object. Otherwise the script will not understand what object's name we want to change. The string in setName will be what we set the name to.
これらのオブジェクトを何らかの形で操作する必要があります。 そのため、これらに名前をつけます。
onload()では、オブジェクトを定義した後、setName(string)の関数を使用します。
setNameは、他のオブジェクト関数と同様に、オブジェクトに結びつけられなければならないことに注意してください。
それ以外の場合、スクリプトはどのオブジェクトの名前を変更したいのか理解しません。
setNameの文字列は、名前を設定する文字列になります。
Extra Credit: You may be curious as to why we didn't put the object
GUIDs directly into getObject (EX: object1
= getObjectFromGUID('195868') ). We could have, it would work. This
example was to show you that, sometimes, it is more convenient to set a
variable early on so you can reference it later. That way, if that variable
needs to change (new GUID) you don't have to try to track it down to fix it
throughout your code.
If you wanted to, for the checker, there is no reason you couldn't write it
like:
追記:なぜオブジェクトGUIDを直接getObject(EX:object1 = getObjectFromGUID( '195868'))に入れなかったのか
疑問をもたなかったでしょうか? そのままでもうまくいくでしょう。
この例では、後で参照できるように、変数を早期に設定する方が便利な場合があることを示しています。
そうすれば、その変数を変更する必要がある場合(新しいGUID)、
コード全体で修正するためにそれを追跡する必要はありません。
あなたが途中のチェック用に使うのでなければとめませんが・・・
The reason I do not encourage that for learners is partially an aesthetic choice, and partially for code clarity. You want it to be easy for someone else to understand your code, and once you start doing things more complex than changing the name of an object it can get VERY difficult to see what is going on. It can also make future revisions to your code a chore.
「先に名前の定義を書く」ことで、やりやすくなるでしょう。
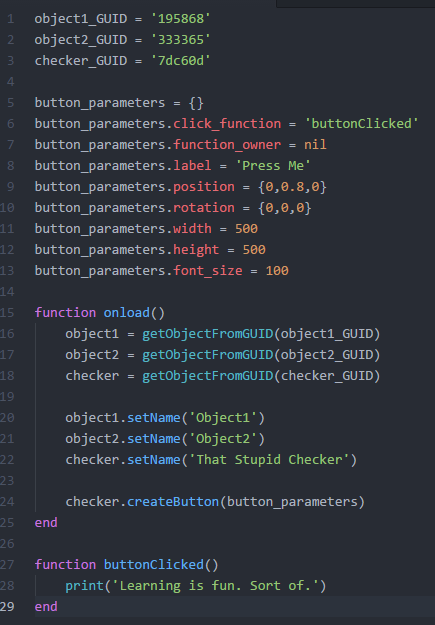
機能を有効にする方法はたくさんありますが、ボタンはプレーヤーがボタンを押したときにスクリプトを起動するわかりやすい機能です。 すべてのボタンはオブジェクトに関連付けする必要があり、パラメータを使用して作成されます。 ボタンを関連付けするオブジェクトはチェッカーであり、これらのパラメータはナレッジベースのObjectsページにあります。 多くはオプションです。ここでは参考にしています。
Tables in LUA are collections of entries. You can store most anything inside of a table and reference it later. All tables are indicated by curly brackets {}. You can reference entries in a table by a name or by an index number (what number entry it is, indexes start at 1 in LUA.). We will be creating a table right beneath where we established our GUIDs and then filling it with entries to use with the createButton(table) function. The name we are choosing for our table is button_paramiters
LUAのテーブルはエントリの集合です。 ほとんどのものはテーブルの中に格納し、後で参照することができます。 すべてのテーブルは中括弧{}で示されます。 テーブル内のエントリは、名前またはインデックス番号(どの番号エントリか、LUAのインデックスは1から始まります)によって参照できます。 GUIDを作成した場所の直下にテーブルを作成し、createButton(table)関数で使用するエントリを入力します。 テーブル用に選択している名前はbutton_paramitersです。
Now we have a table with the paramiters listed within it. So lets use the
object function to create a button on the checker. Enter this inside of
function onload() before its end.
今度は、その中にリストされたパラメータを持つ表があります。 オブジェクト関数を使用してチェッカーにボタンを作成させます。 終了する前にfunction onload()の中でこれを入力してください。
Save and apply your code. You should now have a button which floats a few inches above your checker. If you don't see it and didn't get an error, try flipping your checker over. It might be upside down so the button is hiding inside the table! If you did flip the checker over, remember to save over your old save with the checker correctly positioned.
コードを保存して適用します。 チェッカーの上に数インチ上に浮かぶボタンがあります。
表示されず、エラーが表示されない場合は、チェッカーを裏返しにしてみてください。
それは、ボタンがテーブルの中に隠れているので、逆さまになっているかもしれません!
チェッカーを裏返しにした場合は、チェッカーが正しく配置された状態で古いセーブを保存してください。
Add Button Function ボタン追加
Now we need to add the button's function into our code. To test the function out, we'll print ourselves a message. We'll add this user-defined function to the end of our script.
今度はボタンの機能をコードに追加する必要があります。 関数をテストするために、メッセージを表示します。 このユーザー定義関数をスクリプトの最後に追加します。
After uploading our script, pressing the button should print our message once for each click.
スクリプトをアップロードした後、ボタンを押すと、クリックごとにメッセージが1回表示されます。
Click it repeatedly because of course you will.
同じコードを繰り返すので、繰り返しクリックした表記になります
EXTRA CREDIT: 追記
When you create tables, there are several ways to accomplish it[www.lua.org]. The way used here was to provide visual clarity. However, creating button parameters like this, if you are going to have many buttons, takes up A LOT of space. I prefer to create my tables in such a way that it saves space but doesn't create a run-on line that goes well off the right side of the screen. Using our example, I would have created my parameter table like this:
テーブルを作成するときに、テーブルを作成するにはいくつかの方法があります[www.lua.org]。
ここで使用される方法は、視覚的な明快さを提供することでした。
しかし、このようなボタンパラメータを作成すると、多くのボタンを使用する場合は、多くのスペース(広さ)が必要になります。
私はスペースを節約するが、画面の右側からうまくいくランオンラインを作成しないような方法でテーブルを作成することを好みます。
私の例を使って、私は次のように私のパラメータテーブルを作成したでしょう:
EXTRA CREDIT: This is the perfect point to start playing with different things you can do with objects. Go to the Object page in the Knowledge Database and try stuff. Move the objects, make them switch positions, change their colors, whatever you can think of.
これは、オブジェクトで行うことができるさまざまな作業を開始するのに最適なポイントです。
ナレッジデータベースのオブジェクトページに移動して試してみてください。
オブジェクトを動かす、位置を切り替える、色を変える、何でも考えることができます。
EXTRA CREDIT: Also,
any time you press a button, its click_function triggers with 2 parameters. The
first is an object reference, specifically the reference to the object the
button is attached to. The second is a color (ex. "Blue") in string format of
the color player who pressed the button.
また、ボタンを押すたびに、そのclick_functionが2つのパラメータで引用されます。 1つはオブジェクト参照です。具体的には、ボタンがアタッチされているオブジェクトへの参照です。 2番目のボタンは、ボタンを押したカラープレーヤーの文字列形式の色(例: "Blue")です。
論理文[www.lua.org]は、一般に「if文」と呼ばれます。 彼らはあなたのコードを与えられた状況で何をしたいのかを伝えるために使われます。 ステートメントがアクティブになると(たとえばボタンを押すことによって)、ステートメントに含まれるロジックは、指定された条件が真である場合にのみアクティブになります。 それらは常に次のようにフォーマットされます。
You can also add "else" to that, so that if the statement is false, something ELSE happens instead. Notice here I added commenting using two minus signs in a row. The engine will ignore anything on a line after --.
また、 "else"を追加することもできます。その結果、文が偽であれば、代わりにELSEが発生します。 ここでは、2つのマイナス記号を連続して使用してコメントを追加しました。 エンジンは〜の後の行の何かを無視します。
What you place in the area I labeled CONDITION in these examples are
called relational and conditional operators.[www.tutorialspoint.com] Using
them, you can compare many things to eachother. They produce what is called a
boolian value (a variable value that is either "true" or "false").
これらの例でCONDITIONというラベルを付けた領域に配置するものは、リレーショナルおよび条件付き演算子と呼ばれます。[www.tutorialspoint.com]これらを使用して、多くのことをお互いに比較できます。
ブーリアン値(「真」または「偽」のいずれかの可変値)を生成します。
We will try a few of these out. Erase the current contents in your buttonClicked() function. Now enter into that function these statements:
これらのうちのいくつかを試してみましょう。 buttonClicked()関数の現在の内容を消去します。 その関数に次の文を入力します。
When those lines are used and the button pressed, you will see that only the
print functions located in the TRUE statement were printed. Also, because 5==0
is a false statement it activated the print function located in the "else" part
of the logic.
これらの行が使用され、ボタンが押されると、TRUEステートメントにある印刷機能だけが表示されます。 また、5 == 0は偽の文であるため、ロジックの「else」部分にある印刷機能を有効にしました。
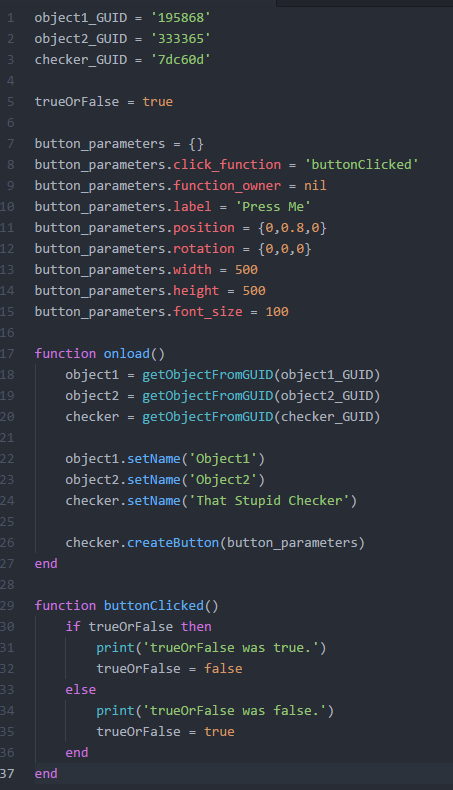
Once again, erase all of the scripting inside of the buttonClicked() function. We are going to be creating a new variable, then altering it. The new variable will be a bool. Bool values can only be true, false or nil (nil means neither). Bool values are always written in all lower case. First, we will create our variable just beneath our object and checker GUIDs being established.
もう一度、buttonClicked()関数内のすべてのスクリプトを消去します。 私たちは新しい変数を作成し、それを変更します。 新しい変数はboolになります。 Boolの値はtrue、false、またはnil(nilはどちらも意味しません)のみです。 ブール値は常にすべての小文字で記述されます。 まず、オブジェクトとチェッカーのGUIDが確立される直前に変数を作成します。
Then, in buttonClicked, we will establish some logic to check if trueOrFalse
is, well, true or false. If it is true, we'll print that it was true and switch
it over to false. If the button is clicked again, it will print that it was
false and switch it to true.
次に、buttonClickedでは、trueOrFalseがtrue、falseまたはfalseであるかどうかを確認するロジックを確立します。 真であれば、それが本当であることを表示し、それを偽に切り替えます。 ボタンを再度クリックすると、falseであることが表示され、trueに切り替えられます。
We could have also written that as "if trueOrFalse == true then" but that is
unnecesary. Remember, the IF statement just needs to be fed True or False. And
since trueOrFalse is already one of those, we can skip the operators.
以下のように書くこともできます」trueOrFalseが、その後真==場合は、「それはunnecesaryであるように、その。IF文がちょうどTrueまたはFalseに供給する必要があることを覚えておいてください。trueOrFalseは既にそのうちの一つであるので、私たちは、事業者をスキップすることができます。
ループは、1回だけ起動すると複数回/連続して実行できるコードのセクションです。 これらは、LUAで使用するより複雑な要素の一部です。
彼らはしばしばテーブルと手を携えてテーブルの各エントリにコードを実行させます。
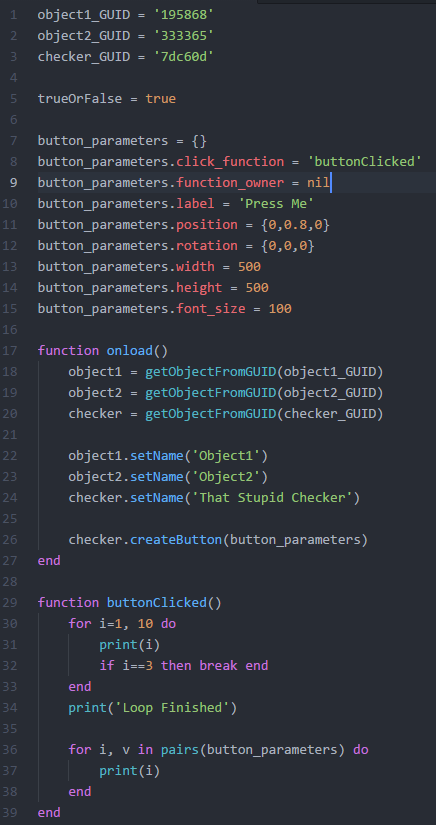
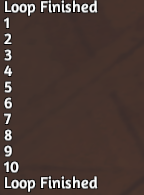
A numeric for loop[www.lua.org] is one which runs a set number of times. You give it 2 or 3 numbers and a unique variable name (I will use "i", which stands for index) and it starts at the first number, then goes until it hits the second number. If a third number is used, it will count by that. So normally it counts up from 1 by 1, but if you put, as a third number, a 2 it would count by 2s. Each number is separated by a comma. Replace the code in your buttonClicked function with this and give it a try. "i", the index, will be equal to 1 on the first run, then it will go up by 1, and be equal to 2 and run again, and keep doing that until it hits 10.
ループ[www.lua.org]の数値は、設定された回数だけ実行される数値です。 2つまたは3つの数字と一意の変数名(私は "i"を使用します)は最初の数字から始まり、2番目の数字に当たるまで続きます。 3番目の数字が使用されている場合は、それによってカウントされます。 通常は1から1までカウントアップしますが、3番目の数字として2を入れると2になります。 各番号はコンマで区切られています。 buttonClicked関数のコードをこれに置き換えて試してみてください。 索引「i」は最初の実行では1になり、次に1になり、2に等しくなり、再び実行され、10に達するまでこれを続けます。
A generic for loop[www.lua.org] is one which runs through entries in a table. For example, the button_parameter table we created. We would set two variables, one for index and one for value, in the loop and then it would run through each entry in the provided table. For each entry in the table, it would make index equal the name of the variable (Ex: position, width, etc) and value equal that values we gave each entry. Add this after your current for loop in buttonClicked.
一般的なforループ[www.lua.org]は、テーブル内のエントリを実行するものです。 たとえば、作成したbutton_parameterテーブルです。 ループ内に2つの変数(インデックス用と1つの値用)を設定し、提供されたテーブルの各エントリを実行します。 テーブル内の各エントリについて、変数の名前(例:位置、幅など)と同じになり、値は各エントリに与えた値と等しくなります。 buttonClickedの現在のforループの後にこれを追加します。

Break[www.lua.org] will end a for loop as soon as it is activated. For instance, if you added to your numeric for loop, just after its print function, the line if i==3 then break end, it would end the loop after it had printed 1, 2, 3.
Break [www.lua.org]は、forループがアクティブになるとすぐに終了します。 たとえば、数字のforループに追加した場合、その印刷機能の直後に、i == 3の場合は行末が終了し、1,2,3の場合はループが終了します。