MP Game Script Files (.gsc)
The purpose of this section is to outline what is needed to create the .gsc files used in a multiplayer map.
この項の目的は何がマルチプレ-ヤーマップで使われた .gsc ファイルを作るために必要とされるかについて概説することです。
Creating the level.gsc file
The first step is to create a game script file with your level's name in the filename. It goes in the following game directory:
第1ステップはファイル名であなたのレベルの名前でゲームスクリプトファイルを作成するはずです。それは次のゲームディレクトリに入ります:
\raw\maps\mp\mp_yourmap.gsc
Below is a screenshot of the mp_backlot.gsc file, opened in UltraEdit. It can be opened in any text editing application. Below the image is a breakdown of each of the lines in the script file.
下は、 UltraEdit で開かれて、 mp_backlot.gsc ファイルのスクリーンショットです。それはどんなテキスト編集アプリケーションででも開かれることができます。スクリプトファイルで画像の下にラインのそれぞれの内訳があります。
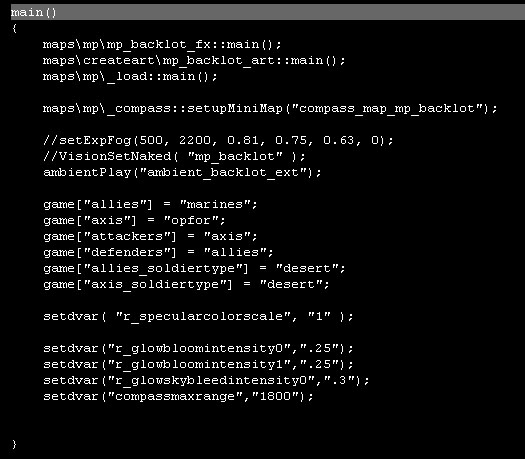
- maps\mp\mp_backlot_fx::main();
- This is a reference to the special FX file for the map. Only needed if the map_fx.gsc file exists.
- maps\createart\mp_backlot_art::main();
- This is a reference to the Art file for the map. The map_art.gsc files don't exist in the community tools, so in a user-made map this line wouldn't exist.
- maps\mp\_load::main();
- Required for map to run.
- maps\mp\_compass::setupMiniMap("compass_map_mp_backlot");
- This line is needed for the minimap image to display correctly.
- maps\mp\mp_backlot_fx::main();
- これはマップのための特別な FX ファイルにレファレンスです。ただ、もし map_fx.gsc ファイルが存在するなら、必要とされるだけです。
- maps\createart\mp_backlot_art::main();
- これはマップのための絵画写真資料フィルムにレファレンスです。map_art.gsc ファイルはコミュニティツールで存在しません、それでユーザ製のマップでこのラインは存在しないでしょう。
- maps\mp\_load::main();
- マップのために稼働するために必要とされる。
- maps\mp\_compass::setupMiniMap("compass_map_mp_backlot");
- このラインは正確に表示部にミニマップイメージのために必要です。
- //setExpFog(500, 2200, 0.81, 0.75, 0.63, 0);
- This line creates exponential fog for the map (start distance, end distance, red, green, blue, transition time). It is commented out because it was later redefined in the map_art.gsc file. It should be uncommented in a user-made map.
- //VisionSetNaked( "mp_backlot" );
- This line references the map's .vision file for post-processed color correction. It is commented out because it was later redefined in the map_art.gsc file. It should be uncommented in a user-made map with a .vision file.
- ambientPlay("ambient_backlot_ext");
- Plays the ambient sound track created for this map.
- //setExpFog(500, 2200, 0.81, 0.75, 0.63, 0);
- このラインはマップ(スタートディスタンス、終わりディスタンス、赤い、緑の、青い、遷移時間)を求めて指数のフォグを作ります。
- //VisionSetNaked( "mp_backlot" );
- この行マップが(そのために) .vision ファイルであるリファレンスが色補正をポスト - 処理しました。それが map_art.gsc ファイルで後に再定義されたから、それはコメントアウトされます。それは .vision ファイルでユーザ製のマップで uncommented されるべきです。
- ambientPlay("ambient_backlot_ext");
- 周囲のサウンドトラックがこのマップを求めて作った活動。
- game["allies"] = "marines";
- Sets the "friendly" team to Marines.
- game["axis"] = "opfor";
- Sets the "enemy" team to the OpFor desert enemies.
- game["attackers"] = "axis";
- Sets the attacking team in Search and Destroy to the "enemy" team.
- game["defenders"] = "allies";
- Sets the defending team in Search and Destroy to the "friendly" team.
- game["allies_soldiertype"] = "desert";
- The Marines in this map will be using desert gear.
- game["axis_soldiertype"] = "desert";
- The OpFor in this map will also be using desert gear.
- game["allies"] = "marines";
- フレンドリー」チームを海兵隊員に設定します。
- game["axis"] = "opfor";
- 「敵の」チームを OpFor 砂漠の敵に設定します。
- game["attackers"] = "axis";
- Search and Destroy の攻撃しているチームを「敵の」チームに設定します。
- game["defenders"] = "allies";
- Search and Destroy の防御しているチームを「フレンドリー」チームに設定します。
- game["allies_soldiertype"] = "desert";
- このマップの海兵隊員が砂漠のギアを使ってであろう。
- game["axis_soldiertype"] = "desert";
- このマップの OpFor が同じく砂漠のギアを使ってであろう。
- setdvar( "r_specularcolorscale", "1" );
- This value is defined in some maps to make surfaces more reflective. (To simulate wet surfaces in maps like Downpour, for instance). It has to be zeroed out to 1 in all other maps so it won't stay at the reflective value on a map switch.
- setdvar( "r_specularcolorscale", "1" );
- この値は表面をいっそう反射させるために若干のマップで定義されます。(Downpour のようなマップで、実例を求めて濡れた表面を装うために)。それはすべての他のマップで1にゼロで置き換えられなければなりません、それでそれはマップスイッチの上に反射する値に滞在しないでしょう。
- setdvar("r_glowbloomintensity0",".25");
- These three values are values used to tweak the bloom effect, when bloom is enabled. Not necissarily needed for user-made map.
- :setdvar("r_glowbloomintensity1",".25");
- :setdvar("r_glowskybleedintensity0",".3");
- setdvar("compassmaxrange","1800");
- Sets the display distance of the minimap.
- setdvar("r_glowbloomintensity0",".25");
- 値が、ブルームが使用可能であるとき、ブルーム効果を微調整するために使ったこれらの3つの値がそうである。
- :setdvar("r_glowbloomintensity1",".25");
- :setdvar("r_glowskybleedintensity0",".3");
- setdvar("compassmaxrange","1800");
- ミニマップの表示距離を設定します。
Creating the level_fx.gsc file
The level_fx.gsc file is optional, but can be used to add special effects to your level. It goes in the following game directory:
level_fx.gsc ファイルはオプションです、しかしあなたのレベルに特殊効果を加えるために使われることができます。それは次のゲームディレクトリに入ります:
\raw\maps\mp\mp_yourmap_fx.gsc
Below is a screenshot of the mp_backlot_fx.gsc file, opened in UltraEdit. It can be opened in any text editing application.
下は、 UltraEdit で開かれて、 mp_backlot_fx.gsc ファイルのスクリーンショットです。それはどんなテキスト編集アプリケーションででも開かれることができます。
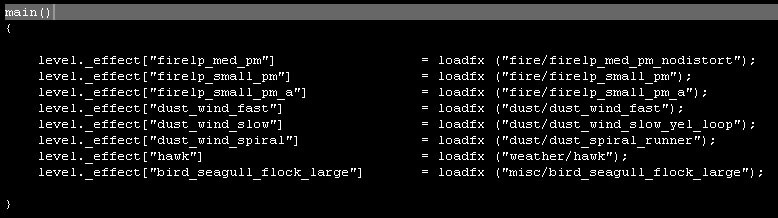
Each of these lines is loading a special effect into memory under a certain alias, which can then be referenced when defining an effect as described below.
これらのラインのそれぞれがそれから、下に記述されるように、結果を明確にするとき、参照されることができるあるエイリアスの下のメモリに特殊効果を載せています。
The maps that shipped with the game have a separate map_art.gsc file where these effects were defined. User-made maps won't have this file, so the effects should be defined within the map_fx.gsc file.
ゲームで出荷されたマップはこれらの結果が明確にされた別個の map_art.gsc ファイルを持っています。ユーザ製のマップがこのファイルを持たないでしょう、それで結果は map_fx.gsc ファイルの中で明確にされるべきです。
Names of special FX that you can use are located in the \raw\fx directory.
あなたが使うことができる特別な FX の名前は \raw\fx ディレクトリに置かれています。
Below are a few examples of what these definitions would look like.
下は定義が見えるであろうこれらを望むものの少数の例です。
Defining a looping sound at certain point in the map:
ent = maps\mp\_createfx::createLoopSound();
ent.v[ "origin" ] = ( -619.675, -2705.93, 331.715 );
ent.v[ "angles" ] = ( 270, 0, 0 );
ent.v[ "soundalias" ] = "emt_tree_palm_rustle";
ent.v[ "origin" ] = ( -619.675, -2705.93, 331.715 );
ent.v[ "angles" ] = ( 270, 0, 0 );
ent.v[ "soundalias" ] = "emt_tree_palm_rustle";
Defining a one-shot effect:
ent = maps\mp\_utility::createOneshotEffect( "firelp_small_pm" );
ent.v[ "origin" ] = ( -187.003, -703.577, 67.8959 );
ent.v[ "angles" ] = ( 270, 30.6197, 101.38 );
ent.v[ "fxid" ] = "firelp_small_pm";
ent.v[ "delay" ] = -15;
ent.v[ "soundalias" ] = "fire_metal_small";
ent.v[ "origin" ] = ( -187.003, -703.577, 67.8959 );
ent.v[ "angles" ] = ( 270, 30.6197, 101.38 );
ent.v[ "fxid" ] = "firelp_small_pm";
ent.v[ "delay" ] = -15;
ent.v[ "soundalias" ] = "fire_metal_small";
A one-shot effect places a certain effect at the specified location in a map. The effect file itself is generally set to looping, so a placed one-shot effect will generally loop.
1ショットの効果がある効果を指定されたロケーションにおいてマップに置きます。ループすることに、効果ファイル自身は一般に設定されます、それで出された1ショットの効果が一般にループするでしょう。
