Making the loadscreen image
In this tutorial I will show you how to make a custom loading image for your multiplayer map.
この学習で私はあなたにあなたのマルチプレ-ヤーマップのためのカスタムロードイメージを作る方法を示すでしょう。
You can use any photo software to make the loading image. I will leave that part up to you. You'll want to make it 24bit target ( .tga ) and a size of 1024x1024 pixels.
あなたはどんな写真ソフトウェアでもロードイメージを作るために使うことができます。私はその部分をあなたに任せるでしょう。あなたはそれを 24bit ターゲット(.tga)と 1024x1024 ピクセルの大きさにすることを望むでしょう。
Save the file to [root]\texture_assets\loadscreen_[levelname].tga [root] would be the default game path where the games .exe files are located [levelname] is the name of the bsp for the level.
ファイルをセーブしてください[ root]\texture_assets\loadscreen_[levelname].tga [ルート]はゲーム .exe ファイルが位置しているデフォルトゲームパス[ levelname ]がレベルの bsp の名前であるということでしょう。
In my example I used the test level called mp_test that was included in the mod tools. In my example I saved the loadscreen image to the following:
私の例で私は mod ツールに含められた mp_test と呼ばれるテストレベルを使いました。私の例で私は次のことに loadscreen イメージをセーブしました:
c:\program files\activision\call of duty 4 - modern warfare\texture_assets\loadscreen_mp_test.tga
Creating a material in the game using your custom targa image
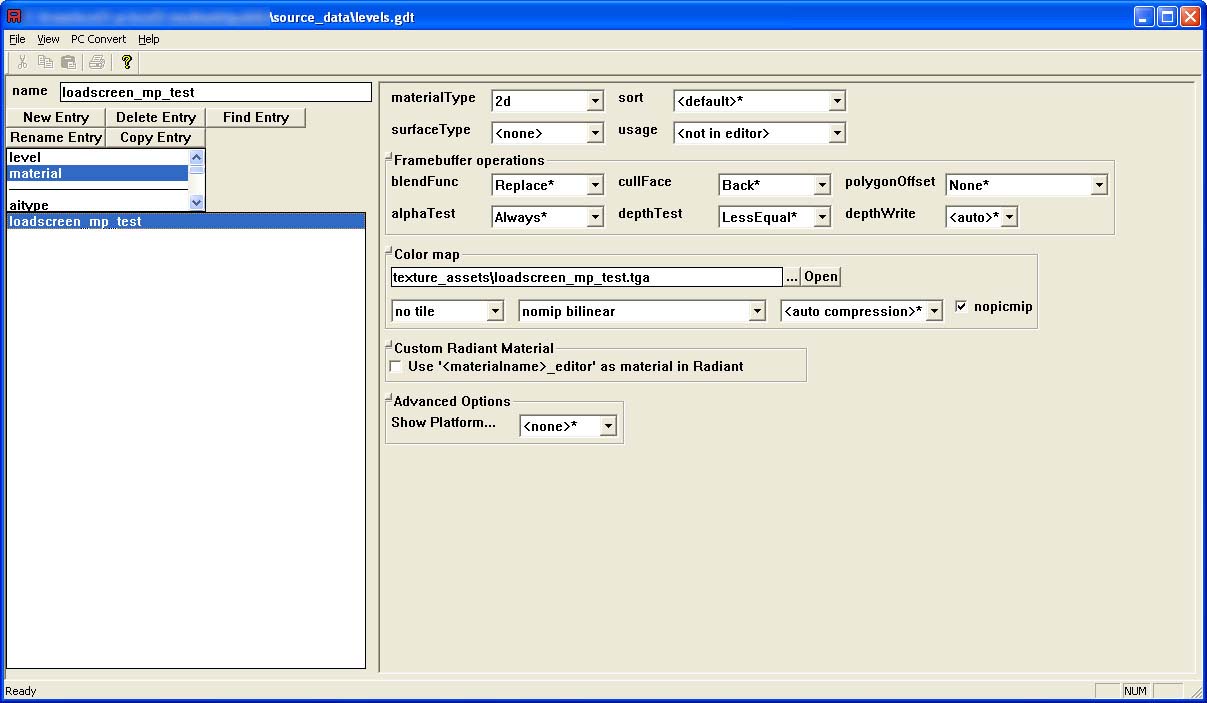
On the 'applications' tab of CoD4CompileTools click on the "Launch Asset Manager" button to launch the Asset Manager program. Now open the file "[root]\source_data\levels.gdt". You should see there is already a level entry for map names "test" and "mp_test" but we'll come back to those in a minute. Scroll down the list of asset types in the upper left and select "Material" in the list, then click the button "New Entry". You will not be prompted to enter the name of the new material you are creating. I named mine "loadscreen_mp_test" without the quotes.
CoD4CompileTools の「アプリケーション」タブの上に、資産マネージャプログラムを開始するために「資産マネージャを始動する」ボタンをクリックしてください。今ファイルを開く「[ root]\source_data\levels.gdt」. あなたはすでにマップ名「テスト」と「mp_test」のためのレベル入力があるのを見るべきです、しかし我々は1分でそれらに戻るでしょう。スクロールダウン、資産のリスト、が左上をタイプする、そしてリストで「資料」を選択して、それからボタン「New Entry」をクリックしてください。あなたはあなたが作っている新しい資料の名前を登録するよう促されないでしょう。私は引用符なしで私のを「loadscreen_mp_test」と命名しました。
You should now see many properties for the material you just created.
あなたは今あなたがただ作った資料のための多くのプロパティを見るべきです。
First, change materialType to 2d. This will remove a lot of options that aren't needed for 2D materials. Next, set surfaceType to <none>, and usage to <not in editor>.
最初に、 materialType を 2d に変えてください。これは2Dマテリアルのための必要とされないオプションの多くを取り除くでしょう。次に、エディタ > で < に <一(人・つ)も>と利用法に surfaceType を設定しないでください。
Because this is a loading image only, we do not need it to have a surface type to indicate bullet impact fx and sounds, and we also do not need it to show up in the editor. We don't plan on using this material on any world geometry.
これがロードイメージのみであるから、我々は弾丸インパクト fx と音を示すために表面形を持っているために必要性ではなくにそれをなします、そして我々はエディタで現われるために同じく必要性ではなくにそれをなします。我々はワールドジオメトリに使用方法の上にこの資料を計画しません。
The default blend options should be fine, but make sure yours match the ones in the image below to make sure.
デフォルトブレンドオプションはファインですが、確かめるために下にあなたのがイメージの(の・もの・人)と一致することを確認するべきです。
For color map click the "..." button and select the tga image you made in the previous step. Set it to no tile, nomip bilinear, and check the nopicmip box.
カラーマップのために、「・・・」ボタンをクリックして、そしてあなたが前のステップで作った tga イメージを選択してください。No. タイル、 nomip 双リニアと妨害、 nopicmip ボックス、にそれを設定してください。
Once you have the settings like the image below continue reading.
かつてあなたは下のイメージのような設定値が読み続けるようにします。
Now that you have all the settings correct lets make sure the material converts properly without any errors. Click "PC Convert" -> "Current Asset Only" from Asset Managers drop down menus. This will convert this asset in a command line window and show you the results. If you have done everything correctly up to this point it should say that converted the material and finished without any errors.
今あなたがすべての設定値を正しいようにすることはどんなエラーもなしで適切に資料コンバートに確かめさせます。資産マネージャードロップダウン・メニューから「PC Convert」 -> 「Current Asset Only」をクリックしてください。これはコマンドライン表示でこの資産を変えて、そしてあなたに結果を示すでしょう。もしあなたがこのときまで正確にすべてをしたなら、それはそれが資料を変換して、そしてどんなエラーもなしで終わったと言うべきです。
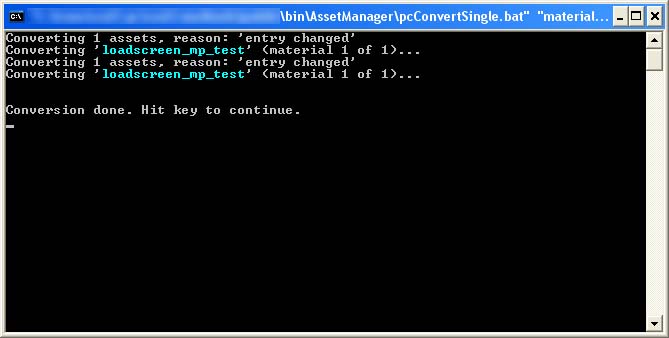
You might notice that the material has been converted to .iwi format and new files have been created: raw\images\loadscreen_mp_test.iwi raw\materials\loadscreen_mp_test raw\material_properties\loadscreen_mp_test
あなたは資料が .iwi 構成に変換された、そして新規ファイルが作成されたことに気付くかもしれません:生の raw\images\loadscreen_mp_test.iwi \ materials \ loadscreen_mp_test の rawの\ material_properties \ loadscreen_mp_test
When you package the map into a .iwd file you'll want to include the .iwi file. The others aren't necessary to be in the .iwd because they will be contained within the fast file for that level.
あなたが .iwd ファイルの中にマップをパッケージするとき、あなたは .iwi ファイルを含むことを望むでしょう。それらがそのレベルのための高速のファイルに含まれるであろうから、他のものは .iwd にあるために必要ではありません。
Tell your custom map to use the new material
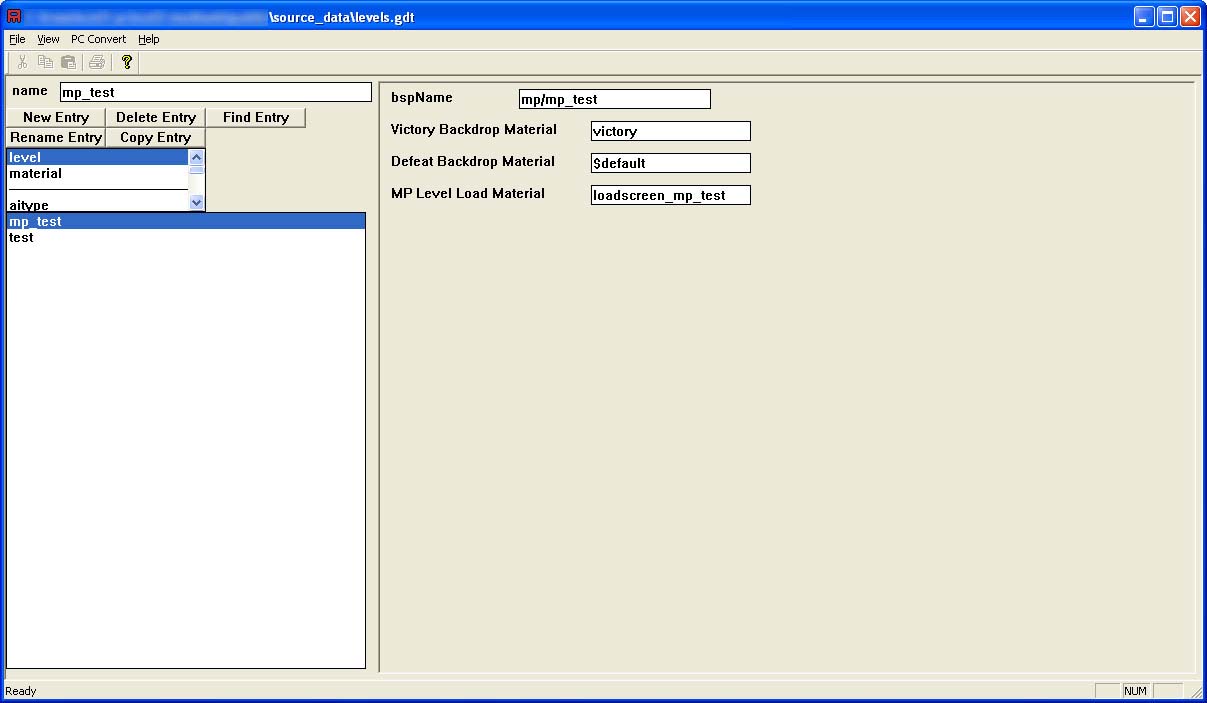
You have now successfully created a material that the game can use as a load screen. We just need to tell the game to use that material when loading your map. You should still be in Asset Manager in the file levels.gdt. You can now select "level" asset type from the list. You should see those two levels listed there as we did when we first opened this file. You'll want to click the "New Entry" button here to create a new asset of type "level" in this GDT.
あなたは今成功裏にゲームがロードスクリーンとして使用することができる資料を作りました。ゲームを話すべき我々ただ必要性は、あなたのマップをロードするとき、その資料を使います。あなたはファイル levels.gdt でまだ資産マネージャにいるべきです。あなたはリストから今「レベル」資産タイプを選択することができます。あなたは2つのレベルが我々が我々が最初にこのファイルを開いたときそうしたようにそこに上場した人たちを見るべきです。あなたはここにこの GDT でタイプ「レベル」の新しい資産を作っている「新規加入」ボタンをクリックすることを望むでしょう。
Type in the name of your level ( it must be exactly the same name as your bsp ) and click ok.
あなたのレベル(それはあなたの bsp として正確に同一名であるに違いありません)の名前でタイプして、そして OK をクリックしてください。
There are just a few settings we need to set here. First is the bspName. In my example I set it to "mp/mp_test" because that is the path and filename to my bsp.
こにただ少数が我々がここで設定する必要がある設定値ですか。最初は bspName です。私の例で、それが私の bsp にパスとファイル名であるから、私は「mp / mp_test」にそれを設定しました。
This is a MP map so I don't care about victory or defeat materials so I'll just enter some generic materials used for that.
これはMPマップです、それで私は勝利のことを気にかけるか、あるいは、私がただそれのために使われた若干のノーブランドのマテリアルを登録するように、マテリアルを破棄しません。
Now "MP Level Load Material" is the one where you'll specify the custom material you just made in the previous step. In my example I created "loadscreen_mp_test" in the previous step, so I'll enter it here.
今「MP Level Load Material」はあなたがあなたが前のステップでただ作ったカスタム資料を指定するであろう(の・もの・人)です。私の例で私は前のステップで「loadscreen_mp_test」を作りました、それで私はここでそれに入るでしょう。
Save the GDT and from CoD4CompileTools click "Run Converter" under the "Applications" tab. Converter will run and convert the level asset you just created. You shouldn't get any errors if you did everything correctly, and a new file should have been created:
「Applications」タブの下で GDT をセーブして、そして CoD4CompileTools から「Run Converter」をクリックしてください。変換器が稼働して、そしてあなたがただ作ったレベル資産を変えるでしょう。あなたは、もしあなたが正確にすべてをしたなら、エラーを得るべきではありません、そして新規ファイルが作られるべきでした:
raw\maps\[levelname].csv.
In my example it created:
それが作った私の例で:
raw\maps\mp_test.csv
This csv file tells the game what materials to use when the level is loaded. You should never edit this file directly. Always make the changes in Asset Manager and then run converter.
レベルがロードされるとき、この csv ファイルはゲームにどんなマテリアルを使うべきか述べます。あなたは決して直接このファイルを編集するべきではありません。常に資産マネージャの変更をして、そして次にコンバータを走らせてください。
This file will also need to be present in your .iwd pack file when you send the level off to others.
このファイルは同じく必要性が、あなたが他の人たちにレベルを送るとき、あなたの .iwd パックファイルに存在しているのを可能にします。
Congrats, if you followed me correctly you should now have a custom loading image for your multiplayer map. Visit the forums if you are having trouble and we'll be more specific in this tutorial.
お祝いの言葉、もしあなたが正確に私の後に従ったなら、あなたは今あなたのマルチプレ-ヤーマップのためのカスタムロードイメージを持っているべきです。もしあなたが問題を持っているなら、フォーラムを訪問してください、そうすれば我々はこの学習でいっそう特定でしょう。
