Overview
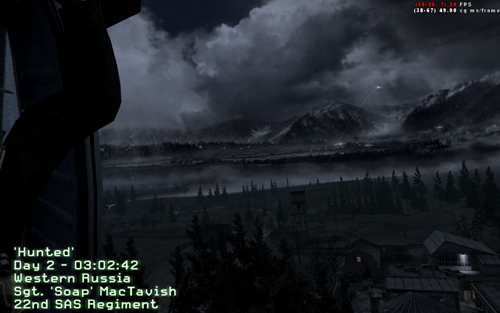
Remember seeing the mission intros with the map day, time and locations when playing through the singleplayer campaign, or even flying into the map.
You'll be able to easily make your own in just minutes.
You'll be able to easily make your own in just minutes.
singleplayerキャンペーンを通してプレーするとき、マップ日、時間と場所でミッションイントロを見るか、あるいはマップに飛びさえしたことを覚えていてください。
あなたはわずかな時間の中に容易にあなた自身のものを作ることが可能でしょう。
あなたはわずかな時間の中に容易にあなた自身のものを作ることが可能でしょう。
You'll need two things
あなたは2つのものを必要とするでしょう
あなたは2つのものを必要とするでしょう
- A GSC script file.
- A STR string file.
When you have both files prepared for the intro screen, the next time you build a FastFile, you'll have a nice intro screen for your mission.
あなたが両方ともを持っているとき、ファイルがイントロ画面のために準備しました、次の(人たち・もの)はbuild a FastFileにあなたの時間を測定します、あなたはあなたのミッションのためのすてきなイントロ画面を持っているでしょう。
Script
Inraw\maps you'll need to make a GSC script file for your map if not done so already.
raw\mapsの中にあなたはGSCスクリプトをもしそうでなければそれほどすでにされたあなたのマップのためのファイルにする必要があるでしょう。
Simply create a new text document or open your map GSC file in your preferred text editor (NotePad will do).
ただ新しいテキスト文書を作成してください、あるいはあなたの優先のテキストエディタ(メモ帳はするでしょう)の中にあなたのマップGSCファイルを開いてください。
Add the following code below as is or feel free to edit where the script is contained, replacing all instances ofYOURMAPNAME to the name of your.MAP/.D3DBSP map. Save the script asYOURMAPNAME.GSC inraw\maps.
現状のままで下に次のコードを加えてください、あるいは、あなたの.MAP/.D3DBSPマップの名前にYOURMAPNAMEのすべてのインスタンスを置き換えて、スクリプトが含まれるエディットに自由に感じてください。raw\mapsの中にYOURMAPNAME.GSCとしてスクリプトをセーブしてください。
#include common_scripts\utility;
#include maps\_utility;

main()
{
	maps\_load::main();

	precacheString(&"YOURMAPNAME_INTROSCREEN_LINE_1"); // Precache strings
	precacheString(&"YOURMAPNAME_INTROSCREEN_LINE_2");
	precacheString(&"YOURMAPNAME_INTROSCREEN_LINE_3");
	precacheString(&"YOURMAPNAME_INTROSCREEN_LINE_4");

	my_introscreen();
}

my_introscreen()
{
	lines = []; // Create An Array Of Strings
	lines[ lines.size ] = &"YOURMAPNAME_INTROSCREEN_LINE_1";
	lines[ "date" ] = &"YOURMAPNAME_INTROSCREEN_LINE_2";
	lines[ lines.size ] = &"YOURMAPNAME_INTROSCREEN_LINE_3";
	lines[ lines.size ] = &"YOURMAPNAME_INTROSCREEN_LINE_4";

	maps\_introscreen::introscreen_feed_lines( lines ); // Output Strings As Hud Elements
	wait 1;
	saveGame( "levelstart", &"AUTOSAVE_LEVELSTART", "whatever", true );

	wait( 4 );
	level notify("introscreen_complete"); // Notify level the intro screen is done
}
More Than 4 Strings
If you want to use more than just 4 strings for your mission intro screen, just be sure to precache the string and add it into the lines array.
もしあなたがただ4以上あなたのミッションイントロ画面のための文字列を使うことを望むなら、ただ文字列を前もってキャッシュすることを確かにして、そしてライン配列の中にそれを加えてください。
precacheString(&"YOURMAPNAME_INTROSCREEN_LINE_5");

lines[ lines.size ] = &"YOURMAPNAME_INTROSCREEN_LINE_5";
Flying Down Intro
You may have noticed some cool intro effects where you drop down from the sky into the first person view, using the following code you'll be able to create an awesome start to your map. As usual with scripts, feel free to tweak it around to your needs, this is just a base to get you off the ground.
あなたはあなた落下が、空から最初人表示へ、あなたがそうすることが可能であるであろう使用、次のコード、を打ち倒す若干のクールイントロ効果があなたのマップに驚嘆に値するスタートを作ることに気付いたかもしれません。 いつものようにスクリプトで、あなたの必要性に周りにそれを微調整することを遠慮なくしてください、これは地面から離れてあなたを取るためにただ基本要素に過ぎません。
You may want to play with the values forzoomHeight,weapon_delay, andextra_delay as those will differ from map to map, especially if you changezoomHeight.
あなたは、それらが、特にもしあなたチェンジzoomHeightであるなら、マップからマップまで異なるであろうように、zoomHeightのための文字で、weapon_delayとextra_delayをかけることを望むかもしれません。
#include common_scripts\utility;
#include maps\_utility;

main()
{
	maps\_load::main();

	precacheString(&"YOURMAPNAME_INTROSCREEN_LINE_1");
	precacheString(&"YOURMAPNAME_INTROSCREEN_LINE_2");
	precacheString(&"YOURMAPNAME_INTROSCREEN_LINE_3");
	precacheString(&"YOURMAPNAME_INTROSCREEN_LINE_4");
	precacheString(&"YOURMAPNAME_INTROSCREEN_LINE_5");

	thread my_introscreen();
}

my_introscreen()
{
	thread maps\_introscreen::introscreen_generic_white_fade_in( 2 ); // White fade in

	level.player freezeControls( true ); // Freeze player
	weap = level.player getweaponslist()[ 0 ];
	level.player DisableWeapons(); // Disable player's weapons

	extra_delay = 1.2; // Delay before you fly down, differs from map to map based on zoomHeight
	weapon_delay = 1.5; // Delay before pulling up your weapon, differs from map to map based on zoomHeight
	zoomHeight = 1000; // Drop down height = Player's origin + zoomHeight

	lines = [];
	lines[ lines.size ] = &"YOURMAPNAME_INTROSCREEN_LINE_1";
	lines[ "date" ] 	= &"YOURMAPNAME_INTROSCREEN_LINE_2";
	lines[ lines.size ] = &"YOURMAPNAME_INTROSCREEN_LINE_3";
	lines[ lines.size ] = &"YOURMAPNAME_INTROSCREEN_LINE_4";
	lines[ lines.size ] = &"YOURMAPNAME_INTROSCREEN_LINE_5";

	thread maps\_introscreen::introscreen_feed_lines( lines );

	origin = level.player.origin;
	level.player.origin = origin + ( 0, 0, zoomHeight );
	ent = spawn( "script_model", (69,69,69) );
	ent.origin = level.player.origin;

	ent setmodel( "tag_origin" ); // Attach a tag to the script_origin
	ent.angles = level.player.angles; // Make the player face down towards ground
	level.player linkto( ent ); // Attach player to script_origin
	ent.angles = ( ent.angles[ 0 ] + 89, ent.angles[ 1 ], 0 ); // Update player angles

	wait( extra_delay ); // Wait before moving down
	ent moveto ( origin + (0,0,0), 2, 0, 2 );

	wait( weapon_delay ); // Wait before rotating to standing stance and pulling out weapon
	ent rotateto( ( ent.angles[ 0 ] - 89, ent.angles[ 1 ], 0 ), 0.5, 0.3, 0.2 );
	wait 0.4; // Wait and save game
	saveGame( "levelstart", &"AUTOSAVE_LEVELSTART", "whatever", true );
	level.player EnableWeapons(); // Pull weapon out

	wait( 0.2 );
	level.player unlink(); // Let the player free
	level.player freezeControls( false ); // Unfreeze player

	level.player playSound( "ui_screen_trans_in"); // Play some sound effects for dropping in
	wait( 0.2 );
	level.player playSound( "ui_screen_trans_out");

	wait( 4 );
	level notify("introscreen_complete"); // Notify level the intro screen is done
	wait( 2 );

	ent delete(); // Delete the script_origin that was spawned
}
String
Inraw\english\localizedstrings you'll need to make a STR string file for your map if not done so already.
raw\english\localizedstringsの中にあなたはもしそうでなければそれほどすでにされたあなたのマップのためのSTR文字列ファイルを作る必要があるでしょう。
Simply create a new text document or open your map STR file in your preferred text editor.
ただ新しいテキスト文書を作成してください、あるいはあなたの優先のテキストエディタの中にあなたのマップSTRファイルを開いてください。
Add the following string data below changing any of the LANG_ENGLISH information to your liking.
あなたの好みまでのLANG_ENGLISH情報のいずれでも変えている次の文字列データ下を加えてください。
Save the STR asYOURMAPNAME.STR (the same map name used as your map's GSC filename) inraw\english\localizedstrings.
raw\english\localizedstringsの中にYOURMAPNAME.STR(あなたのマップのGSCファイル名と同じ使われたマップ名)としてSTRをセーブしてください。
VERSION             "1"
CONFIG              "C:\trees\cod3\cod3\bin\StringEd.cfg"
FILENOTES           ""

REFERENCE           INTROSCREEN_LINE_1
LANG_ENGLISH        "'Hunted'"

REFERENCE           INTROSCREEN_LINE_2
LANG_ENGLISH        "Day 2 - 03:02:[{FAKE_INTRO_SECONDS:36}]"

REFERENCE           INTROSCREEN_LINE_3
LANG_ENGLISH        "Western Russia"

REFERENCE           INTROSCREEN_LINE_4
LANG_ENGLISH        "Sgt. 'Soap' MacTavish"

REFERENCE           INTROSCREEN_LINE_5
LANG_ENGLISH        "22nd SAS Regiment"

ENDMARKER
