DynagenでCCIEを目指す
20100816 IP Accounting
最終更新:
it_certification
-
view
1. 目的
- IP Accountingの設定方法を確認します。
2. 構成
2.1. 設定概要
- ルータの初期設定はIPアドレスのみです。
- トップページ/手順書 サーバ系に基づいて、coLinuxがインストールされているものとします。
- トップページ/手順書 サーバ系に基づいて、ホストOS上にApacheがインストールされているものとします。
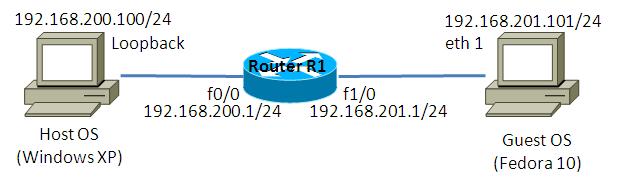
2.2. 構成図
2.3. netファイル
model = 3620
[localhost]

	[[3620]]
		image = C:\Program Files\Dynamips\images\c3620-j1s3-mz.123-18.bin
		ram = 128

	[[ROUTER R1]]
		f0/0 = NIO_gen_eth:\Device\NPF_{Host OS Loopback 0}
		f1/0 = NIO_gen_eth:\Device\NPF_{Guest OS eth 1}
2.4. 初期設定
- R1
!
version 12.3
service timestamps debug datetime msec
service timestamps log datetime msec
no service password-encryption
!
hostname R1
!
boot-start-marker
boot-end-marker
!
!
no aaa new-model
ip subnet-zero
!
!
no ip domain lookup
!
ip cef
!
!
!
!
!
!
!
!
!
!
!
!
!
!
!
interface Loopback0
 ip address 1.1.1.1 255.255.255.255
!
interface FastEthernet0/0
 ip address 192.168.200.1 255.255.255.0
 duplex auto
 speed auto
!
interface FastEthernet1/0
 ip address 192.168.201.1 255.255.255.0
 duplex auto
 speed auto
!
ip http server
ip classless
!
!
no cdp run
!
!
!
!
!
!
line con 0
line aux 0
line vty 0 4
!
!
end
2.5. Apache 設定
ホストOSにApacheをインストールし、ポートベースのバーチャルホストを定義します。構築方法はトップページ/手順書 サーバ系/Apache HTTP Server バーチャルホストの設定を参考にして下さい。
この検証例で実際に使用したhttpd.confの要所となる部分を以下に記載します。
この検証例で実際に使用したhttpd.confの要所となる部分を以下に記載します。
Listen 10880
Listen 10881
Listen 10882

NameVirtualHost *:10880
NameVirtualHost *:10881
NameVirtualHost *:10882

<VirtualHost *:10880>
    DocumentRoot "C:/Program Files/Apache Software Foundation/Apache2.2/htdocs"
</VirtualHost>

<VirtualHost *:10881>
    DocumentRoot "C:/Program Files/Apache Software Foundation/Apache2.2/htdocs10881"
</VirtualHost>

<VirtualHost *:10882>
    DocumentRoot "C:/Program Files/Apache Software Foundation/Apache2.2/htdocs10882"
</VirtualHost>
2.6. サーバ側 ルーティング設定
- Host OS
route add 192.168.201.0 mask 255.255.255.0 192.168.200.1
- Guest OS
route add -net 192.168.200.0/24 gw 192.168.201.1
3. [検証] IP Accounting 基本設定
3.1. 設定投入
ルータR1 Fa0/0の出力パケットを集計するよう、以下の設定を投入します。
R1(config)#interface FastEthernet 0/0
R1(config-if)#ip accounting
Accounting will exclude mls traffic when mls is enabled.

R1(config-if)#
3.2. 集計結果の確認
Guest OSからHost OSに向けてpingを送信します。
[root@localhost ~]# ping 192.168.200.100
PING 192.168.200.100 (192.168.200.100) 56(84) bytes of data.
64 bytes from 192.168.200.100: icmp_seq=1 ttl=127 time=9.99 ms
64 bytes from 192.168.200.100: icmp_seq=2 ttl=127 time=9.99 ms
64 bytes from 192.168.200.100: icmp_seq=3 ttl=127 time=9.99 ms
64 bytes from 192.168.200.100: icmp_seq=4 ttl=127 time=9.99 ms
64 bytes from 192.168.200.100: icmp_seq=5 ttl=127 time=9.99 ms
64 bytes from 192.168.200.100: icmp_seq=6 ttl=127 time=9.99 ms
64 bytes from 192.168.200.100: icmp_seq=7 ttl=127 time=9.99 ms
送信したpingが集計できているかを確認します。
R1#show ip accounting
   Source           Destination              Packets               Bytes
 192.168.201.101  192.168.200.100                 12                 952

Accounting data age is 0
R1#
4. [検証] 詳細情報の集計
4.1. 設定投入
設定によっては、MACアドレス, ip precedenceなどの詳細な情報を集計する事も可能です。
R1(config)#interface FastEthernet 0/0
R1(config-if)#ip accounting mac-address input
Accounting will exclude mls traffic when mls is enabled.

R1(config-if)#ip accounting mac-address output
Accounting will exclude mls traffic when mls is enabled.

R1(config-if)#ip accounting precedence input
Accounting will exclude mls traffic when mls is enabled.

R1(config-if)#ip accounting precedence output
Accounting will exclude mls traffic when mls is enabled.

R1(config-if)#
4.2. 集計結果の確認
MACアドレス, ip precedenceの集計結果はは以下のコマンドで確認する事ができます。
R1#show interfaces FastEthernet 0/0 mac-accounting
FastEthernet0/0
  Input  (511 free)
    0200.4c4f.4f50(30 ):  219 packets, 18864 bytes, last: 416ms ago
                  Total:  219 packets, 18864 bytes
  Output  (511 free)
    0200.4c4f.4f50(30 ):  203 packets, 17446 bytes, last: 424ms ago
                  Total:  203 packets, 17446 bytes
R1#
R1#
R1#show interfaces FastEthernet 0/0 precedence
FastEthernet0/0
  Input
    Precedence 0:  164 packets, 14146 bytes
  Output
    Precedence 0:  150 packets, 12876 bytes
R1#
5. [検証] 違反パケットの集計
5.1. 設定投入
ACLにより拒否されたパケットを集計する事もできます。検証例として、tcp10881のみを拒否するACLをルータR1 Fa0/0のout方向に適用します。
R1(config)#access-list 100 deny tcp any any eq 10881
R1(config)#access-list 100 permit ip any any
R1(config)#
R1(config)#interface FastEthernet 0/0
R1(config-if)#ip access-group 100 out
違反パケットを集計するためには、access-violationsオプションを付加します。
R1(config)#interface FastEthernet 0/0
R1(config-if)#ip accounting access-violations
Accounting will exclude mls traffic when mls is enabled.

R1(config-if)#
5.2. 違反パケットの送信
Guest OSからHost OSに向けてhttp requestを送信します。1つはtcp10880宛てで、もう1つはtcp10881宛てです。
[root@localhost ~]# wget -O /dev/null http://192.168.200.100:10880/
--2010-08-15 13:22:49--  http://192.168.200.100:10880/
Connecting to 192.168.200.100:10880... connected.
HTTP request sent, awaiting response... 200 OK
Length: 44 [text/html]
Saving to: `/dev/null'

100%[================================================>] 44          --.-K/s   in 0s

2010-08-15 13:22:49 (8.59 KB/s) - `/dev/null' saved [44/44]

[root@localhost ~]#
[root@localhost ~]#
[root@localhost ~]# wget -O /dev/null http://192.168.200.100:10881/
--2010-08-15 13:22:51--  http://192.168.200.100:10881/
Connecting to 192.168.200.100:10881... failed: No route to host.
[root@localhost ~]#
5.2. 集計結果の確認
以下のコマンドにより、ACLにより拒否されたパケットの総数を確認する事ができます。
R1#show ip accounting access-violations
   Source           Destination              Packets               Bytes   ACL
 192.168.201.101  192.168.200.100                  1                  60   100

Accounting data age is 7
R1#
6. [補足] その他の機能
6.1. 集計エントリ数の制限
以下のコマンドで集計できるエントリ数の上限を設定する事ができます。
R1(config)#ip accounting-threshold 2
6.2. 違反エントリ数の制限
以下のコマンドでACL違反(show ip accounting access-violationsで確認可能な項目)のエントリ数を制限する事ができます。
R1(config)#ip accounting-transits 1
6.3. IPアドレスに基づく制限 (検証失敗)
以下のコマンドでIPアドレスに基づいて、集計するエントリを制限する事ができます。
R1(config)#ip accounting-list 192.168.201.101 255.255.255.0
R1(config)#ip accounting-list 192.168.201.100 255.255.255.0
Guest OSのIPアドレスを変更する事で、エントリが制限される事を検証しようとしました。しかし、制限されるはずの192.168.201.102が表示されています。
R1#show ip accounting
   Source           Destination              Packets               Bytes
 192.168.201.101  192.168.200.100                 58                4872
 192.168.201.100  192.168.200.100                 19                1596
 192.168.201.102  192.168.200.100                  5                 420 <- エントリに載らないはずなのに…

Accounting data age is 6
R1#
また、このコマンドの使い方ですが、マニュアルにはワイルドカードを指定するように記述されていますが、「?」を入力するとマスクを入力するように指示されました。
R1(config)#ip accounting-list 192.168.201.101 ?
  A.B.C.D  IP address mask

R1(config)#ip accounting-list 192.168.201.101
添付ファイル
