DynagenでCCIEを目指す
20100822 TFTP, FTP, SCP
最終更新:
it_certification
-
view
1. 目的
- ルータ間でファイル転送を行う方法を確認します。
- ルータをTFTPサーバとして使用する方法を確認します。
- ルータをFTPサーバとして使用する方法を確認します。
- scpを用いてルータにファイルを転送する方法を確認します。
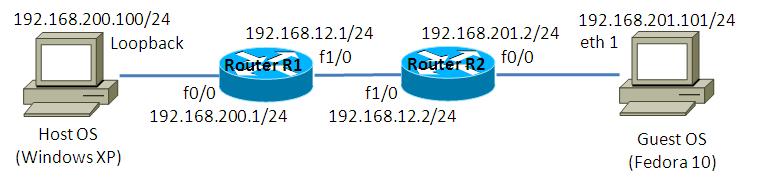
2. 構成
2.1. 設定概要
- OSPFによってルーティングを定義します。
2.2. 構成図
2.3. netファイル
ghostios = True
sparsemem = True

model = 2620
[localhost]

	[[2620]]
		image = C:\Program Files\Dynamips\images\c2600-advsecurityk9-mz.123-12.bin
		ram = 128

	[[ROUTER R1]]
		f0/0 = NIO_gen_eth:\Device\NPF_{8B89D910-5ED3-4A43-9DE9-6A272A3D7592}
		f1/0 = R2 f1/0

	[[ROUTER R2]]
		f0/0 = NIO_gen_eth:\Device\NPF_{5933302A-7AAA-475C-A8FE-A6B82B0C0F98}
2.4. 初期設定
- R1
!
version 12.3
service timestamps debug datetime msec
service timestamps log datetime msec
no service password-encryption
!
hostname R1
!
boot-start-marker
boot-end-marker
!
!
memory-size iomem 15
no aaa new-model
ip subnet-zero
ip cef
!
!
!
ip audit po max-events 100
no ip domain lookup
no ftp-server write-enable
!
!
!
!
!
!
!
interface Loopback0
 ip address 1.1.1.1 255.255.255.255
!
interface FastEthernet0/0
 ip address 192.168.200.1 255.255.255.0
 duplex auto
 speed auto
!
interface FastEthernet1/0
 ip address 192.168.12.1 255.255.255.0
 duplex auto
 speed auto
!
router ospf 1
 log-adjacency-changes
 passive-interface default
 no passive-interface FastEthernet1/0
 network 192.168.12.1 0.0.0.0 area 0
 network 192.168.200.1 0.0.0.0 area 0
!
ip classless
ip http server
no ip http secure-server
!
no cdp run
!
!
!
line con 0
line aux 0
line vty 0 4
!
!
end
- R2
!
version 12.3
service timestamps debug datetime msec
service timestamps log datetime msec
no service password-encryption
!
hostname R2
!
boot-start-marker
boot-end-marker
!
!
memory-size iomem 15
no aaa new-model
ip subnet-zero
ip cef
!
!
!
ip audit po max-events 100
no ip domain lookup
no ftp-server write-enable
!
!
!
!
!
!
!
interface FastEthernet0/0
 ip address 192.168.201.2 255.255.255.0
 duplex auto
 speed auto
!
interface FastEthernet1/0
 ip address 192.168.12.2 255.255.255.0
 duplex auto
 speed auto
!
router ospf 1
 log-adjacency-changes
 passive-interface default
 no passive-interface FastEthernet1/0
 network 192.168.12.2 0.0.0.0 area 0
 network 192.168.201.2 0.0.0.0 area 0
!
ip classless
ip http server
no ip http secure-server
!
no cdp run
!
!
!
line con 0
line aux 0
line vty 0 4
!
!
end
2.5. サーバ側 ルーティング設定
- Host OS
route add 192.168.12.0 mask 255.255.255.0 192.168.200.1
- Guest OS
route add -net 192.168.12.0/24 gw 192.168.201.2
3. [検証] TFTPサーバの設定
3.1. 設定投入
ルータをTFTPサーバとして使用するためには、以下の通り公開したいファイルを指定します。
R1(config)#tftp-server system:running-config
3.2. ルータからのGET
R1からR2へのファイル転送を試みます。R2で以下のように入力し、R1のrunning-configを取得します。
R2#copy tftp://192.168.12.1/running-config flash:r1-config
Destination filename [r1-config]?
Accessing tftp://192.168.12.1/running-config...
Erase flash: before copying? [confirm]n
Loading running-config from 192.168.12.1 (via FastEthernet1/0): !
[OK - 930 bytes]

Verifying checksum...  OK (0x920B)
930 bytes copied in 3.160 secs (294 bytes/sec)
R2#
取得したファイルが表示できる事を確認します。
R2#more flash:r1-config
!
version 12.3
service timestamps debug datetime msec
service timestamps log datetime msec
no service password-encryption
!
hostname R1
3.3. WindowsからのGET
R1からHost OSへのファイル転送を試みます。コマンドプロンプトで以下のように入力し、R1のrunning-configを取得します。
C:\>tftp 192.168.200.1 GET running-config r1-config
Transfer successful: 930 bytes in 2 seconds, 465 bytes/s

C:\>
取得したファイルが表示できる事を確認します。
C:\>more r1-config

!
version 12.3
service timestamps debug datetime msec
service timestamps log datetime msec
no service password-encryption
!
hostname R1
4. [検証] FTPサーバの設定
4.1. FTPの有効化
以下の入力を行い、FTPサーバの設定を行います。FTPサーバを有効にし、トップディレクトリを定義します。
R1(config)#ftp-server enable
R1(config)#ftp-server topdir flash:
4.2. FTPユーザの作成
FTP接続する際のユーザとパスワードを作成します。
R1(config)#ip ftp username cisco
R1(config)#ip ftp password cisco123
4.3. ルータからのGET
R1, R2間のファイル転送を試みます。R2で以下のように入力し、ファイルの送受信が可能な事を確認します。
R2#copy running-config ftp://[email protected]/r2-config
Address or name of remote host [192.168.12.1]?
Destination filename [r2-config]?
Writing r2-config !
811 bytes copied in 4.200 secs (193 bytes/sec)
R2#
R2#
R2#copy ftp://192.168.12.1/r2-config flash:r2-config
Destination filename [r2-config]?
Accessing ftp://192.168.12.1/r2-config...
Erase flash: before copying? [confirm]n
Loading r2-config !
[OK - 811/4096 bytes]

Verifying checksum...  OK (0x829E)
811 bytes copied in 0.536 secs (1513 bytes/sec)
R2#
送受信したファイルが表示できる事を確認します。
R2#more flash:r2-config
!
version 12.3
service timestamps debug datetime msec
service timestamps log datetime msec
no service password-encryption
!
hostname R2
4.4. ルータからのGET
R1, Host OS間のファイル転送を試みます。コマンドプロンプトで以下のように入力し、ファイルの送受信が可能な事を確認します。
C:\>ftp
ftp> open 192.168.200.1
Connected to 192.168.200.1.
220 R1 IOS-FTP server (version 1.00) ready.
User (192.168.200.1:(none)): cisco <- ユーザ「cisco」を入力します。
331 Password required for 'cisco'.
Password:                          <- パスワード「cisco123」を入力します。
230 Logged in.
ftp>
ftp>
ftp> put r1-config
200 PORT command successful.
150 Opening ASCII mode data connection for r1-config.
226 Transfer complete.
ftp: 996 bytes sent in 0.00Seconds 996000.00Kbytes/sec.
ftp>
ftp>
ftp> get r1-config r1-config.bak
200 PORT command successful.
150 Opening ASCII mode data connection for r1-config (996 bytes).
226 Transfer complete.
ftp: 996 bytes received in 0.00Seconds 996000.00Kbytes/sec.
ftp>
ftp> quit
221 Goodbye.

C:\>
送受信したファイルが表示できる事を確認します。
C:\>more r1-config.bak

!
version 12.3
service timestamps debug datetime msec
service timestamps log datetime msec
no service password-encryption
!
hostname R1
5. [検証] scpの設定
5.1. rsa鍵の生成
scpを使用するためには、rsa鍵が必要です。以下の通りhost名(定義済み)とdomain名を定義し、rsa鍵を生成します。
R1(config)#ip domain-name cisco.com
R1(config)#crypto key generate rsa
The name for the keys will be: R1.cisco.com
Choose the size of the key modulus in the range of 360 to 2048 for your
  General Purpose Keys. Choosing a key modulus greater than 512 may take
  a few minutes.

How many bits in the modulus [512]: 1024
% Generating 1024 bit RSA keys ...[OK]

R1(config)#
*Mar  1 00:38:31.763: %SSH-5-ENABLED: SSH 1.5 has been enabled
R1(config)#
5.2. AAAの定義
認証認可をローカルデータベースで行うように設定し、privilege 15 ユーザを作成します。
R1(config)#aaa new-model
R1(config)#aaa authentication login default local
R1(config)#aaa authorization exec default local
R1(config)#username aroyna privilege 15 password tabeta
5.3. scpの有効化
scpを有効にします。
R1(config)#ip scp server enable
5.4. Guest OS(Linux)からのファイル転送
以下の要領で、Guest OSからR1へのファイル転送ができる事を確認します。
[root@localhost ~]# echo "test" > hoge.txt
[root@localhost ~]#
[root@localhost ~]# scp hoge.txt [email protected]:/hoge.txt
The authenticity of host '192.168.12.1 (192.168.12.1)' can't be established.
RSA1 key fingerprint is 7b:56:53:1d:43:58:0c:27:01:fb:98:89:c1:a9:c7:92.
Are you sure you want to continue connecting (yes/no)? yes
Warning: Permanently added '192.168.12.1' (RSA1) to the list of known hosts.
[email protected]'s password:            <- パスワード「tabeta」を入力します。
hoge.txt                                                100% 8955     8.8KB/s   00:00
[root@localhost ~]#
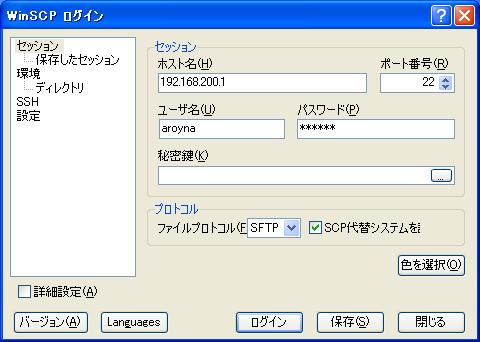
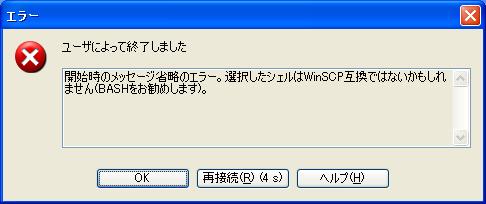
5.5. WinSCPを用いたファイル転送
Host OS上のWinSCPを使ったファイル転送も試みましたが、さすがにWinSCPは無理なようです。どうやら、BASHを使えるホストとしか通信できないツールのようです。
6. [補足] scpが使用するline
6.1. lineの確認
Guest OSからR1へのファイル転送を行いますが、わざとパスワードを入力しない状態で留めておきます。
[root@localhost ~]# scp hoge.txt [email protected]:/hoge.txt
[email protected]'s password:
R1でlineを表示させると、scpはVTY lineを設定する事が理解できます。
R1#show line
   Tty Typ     Tx/Rx    A Modem  Roty AccO AccI   Uses   Noise  Overruns   Int
*    0 CTY              -    -      -    -    -      0       1     0/0       -
    65 AUX   9600/9600  -    -      -    -    -      0       0     0/0       -
*   66 VTY              -    -      -    -    -      7       0     0/0       -
    67 VTY              -    -      -    -    -      0       0     0/0       -
    68 VTY              -    -      -    -    -      0       0     0/0       -
    69 VTY              -    -      -    -    -      0       0     0/0       -
    70 VTY              -    -      -    -    -      0       0     0/0       -

Line(s) not in async mode -or- with no hardware support:
1-64

R1#
6.2. VTYに対する認証認可設定
scpはVTY lineを用いて行われるため、実際は以下のようにVTYに対してのみ認証認可の設定を行えばscpによるファイル転送ができるようになります。
R1(config)#no aaa authorization exec default local
R1(config)#no aaa authentication login default local
R1(config)#
R1(config)#
R1(config)#aaa authorization exec EXEC_VTY local
R1(config)#aaa authentication login LOGIN_VTY local
R1(config)#line vty 0 4
R1(config-line)#login authentication LOGIN_VTY
R1(config-line)#authorization exec EXEC_VTY
7. [補足] FTPのバグ?
7.1. IOS バージョン
不具合らしき動作をしたIOSのバージョンは以下の通りです。
R1#show version
Cisco IOS Software, C2600 Software (C2600-IPBASEK9-M), Version 12.4(21), RELEASE SOFTWARE (fc1)
Technical Support: http://www.cisco.com/techsupport
Copyright (c) 1986-2008 by Cisco Systems, Inc.
Compiled Thu 10-Jul-08 01:21 by prod_rel_team

ROM: ROMMON Emulation Microcode
ROM: C2600 Software (C2600-IPBASEK9-M), Version 12.4(21), RELEASE SOFTWARE (fc1)

R1 uptime is 1 minute
System returned to ROM by unknown reload cause - suspect boot_data[BOOT_COUNT] 0x0, BOOT_COUNT 0, BOOTDATA 19
System image file is "tftp://255.255.255.255/unknown"
7.2. 症状
FTPのユーザ・パスワードは定義できるものの、FTPを有効にする事ができません。
R1(config)#ip ftp username cisco
R1(config)#ip ftp password cisco123
R1(config)#
R1(config)#ftp-server ?
% Unrecognized command
R1(config)#ftp-server ^Z
