MP Zone Files (.csv)
The purpose of this section is to outline what is needed to create the .csv files used in a multiplayer map. A .csv file basically defines the files that need to be pre-loaded into memory for the map to work properly.
この項の目的は.csvファイルを作るために必要とされるものがマルチプレ-ヤーマップで使った概要へです。 .csvファイルが基本的に適切にマップ先の仕事のためのメモリの中にプリによってロードされた必要があるファイルを定義します。
Creating the level.csv file
The first step is to create a zone file with your level's name in the filename. It goes in the following game directory:
最初ステップがファイル名の中にあなたのレベルの名前を持ったゾーンファイルを作成するはずです。 それは以下のゲームディレクトリに入ります:
\zone_source\mp_yourmap.csv
Below is a screenshot of the mp_backlot.csv file, opened in Excel. It can be opened in any text editing application. Below the image is a breakdown of lines from the file.
下は、エクセルの中に開かれて、mp_backlot.csvファイルのスクリーンショットです。 それはどんなテキスト編集アプリケーションの中にでも開かれることができます。 下にイメージはファイルからのラインの内訳です。
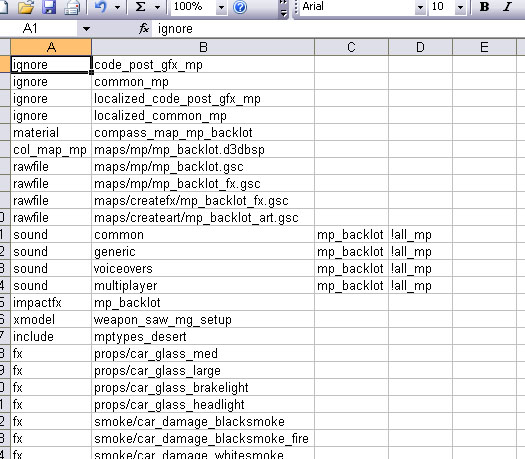
- ignore code_post_gfx_mp
- Needed for the map to run. 走らせられてマップ先のために必要とされました。
- ignore common_mp
- Needed for the map to run. 走らせられてマップ先のために必要とされました。
- ignore localized_code_post_gfx_mp
- Needed for the map to run. 走らせられてマップ先のために必要とされました。
- ignore localized_common_mp
- Needed for the map to run. 走らせられてマップ先のために必要とされました。
- material compass_map_mp_backlot
- This loads the minimap image material into memory. Needed to get a minimap image to show up, in addition to the line from the level.gsc file.
- col_map_mp maps/mp/mp_backlot.d3dbsp
- References the BSP map file, the file generated when a map is compiled. Needed for the map to run.
- rawfile maps/mp/mp_backlot.gsc
- References the map script file. Needed for the map to run properly. これはメモリの中にミニマップイメージマテリアルをロードします。 level.gscファイルからラインまで、付加の中に、現われるためにミニマップイメージを取るために必要とされます。
- rawfile maps/mp/mp_backlot_fx.gsc
- References the map effects file. Needed if the level has a level_fx.gsc file. 参照式、マップ、がファイルをもたらします。 もしレベルがlevel_fx.gscファイルを持っているなら、必要とされます。
- rawfile maps/createfx/mp_backlot_fx.gsc
- This line shouldn't be used for a user-made map. このラインはユーザ製のマップのために使われるべきではありません。
- rawfile maps/createart/mp_backlot_art.gsc
- This line shouldn't be used for a user-made map. このラインはユーザ製のマップのために使われるべきではありません。
- sound common mp_backlot !all_mp
- Loads in sounds defined for mp_backlot. The ! before all_mp is important, otherwise all sounds will be loaded in and the map probably won't load. mp_backlotのための定義された音での読み込み。 all_mpの前の!は重要です、音が中にロードされるであろうさもなければすべてとマップがおそらくロードしないでしょう。
- sound generic mp_backlot !all_mp
- sound voiceovers mp_backlot !all_mp
- sound multiplayer mp_backlot !all_mp
- impactfx mp_backlot
- Needed for the map to run properly. 適切に走らせるべきマップのために必要です。
- xmodel weapon_saw_mg_setup
- Used if the map has a mounted turret somewhere in it. 使用済みの、もしマップはそれの中にどこか(に・で)マウントされた砲塔を持っています。
- include mptypes_desert
- Loads in desert MP Types. This line has to match the definition in the level.gsc file. 砂漠のMPタイプの中にロードします。 このラインはlevel.gscファイルの中に一致に定義を持っています。
- fx misc/bird_seagull_flock_large
- This is how a special effect from the level_fx.gsc file is loaded into memory. これはlevel_fx.gscファイルからの特殊効果がどのようにメモリの中にロードされるかです。
Defining destructible cars in the level.csv file
Destructible cars are placed in Radiant from a special prefab directory. For instance, to place the Green Sedan 1 destructible car, you'd place the following prefab in your map:
Destructible自動車が特別なプレハブディレクトリからRadiantに置かれます。 例えば、緑セダン1destructible自動車を置くために、あなたは以下のプレハブをあなたのマップに置くでしょう:
\map_source\prefabs\mp_destructibles\vehicle_80s_sedan1_green_destructible.map
Then in your level.csv file, you'd define these lines for all the Sedan 1 cars (regardless of the color):
それからあなたのlevel.csvファイルの中に、あなたはすべてのセダン1自動車のためのこれらのラインを定義するでしょう(カラーにかかわらず):
xmodel vehicle_80s_sedan1_glass_f
xmodel vehicle_80s_sedan1_glass_lf
xmodel vehicle_80s_sedan1_glass_lb
xmodel vehicle_80s_sedan1_glass_rf
xmodel vehicle_80s_sedan1_glass_rb
xmodel vehicle_80s_sedan1_glass_b
xmodel vehicle_80s_sedan1_glass_f_dam
xmodel vehicle_80s_sedan1_glass_lf_dam
xmodel vehicle_80s_sedan1_glass_lb_dam
xmodel vehicle_80s_sedan1_glass_rf_dam
xmodel vehicle_80s_sedan1_glass_rb_dam
xmodel vehicle_80s_sedan1_glass_b_dam
For the Green Sedan 1 car specifically, you'd also put the following lines in your level.csv file:
緑セダン1自動車のために特に、あなたは同じく(すでに)あなたのlevel.csvファイルに以下のラインを入れていました:
xmodel vehicle_80s_sedan1_green_hood
xmodel vehicle_80s_sedan1_green_hood_dam
xmodel vehicle_80s_sedan1_green_trunk
xmodel vehicle_80s_sedan1_green_trunk_dam
xmodel vehicle_80s_sedan1_green_wheel_lf
xmodel vehicle_80s_sedan1_green_door_lf
xmodel vehicle_80s_sedan1_green_door_lb
xmodel vehicle_80s_sedan1_green_door_rf
xmodel vehicle_80s_sedan1_green_door_rb
xmodel vehicle_80s_sedan1_green_bumper_f
xmodel vehicle_80s_sedan1_green_bumper_b
xmodel vehicle_80s_sedan1_green_mirror_l
xmodel vehicle_80s_sedan1_green_mirror_r
xmodel vehicle_80s_sedan1_green_light_lf
xmodel vehicle_80s_sedan1_green_light_lf_dam
xmodel vehicle_80s_sedan1_green_light_lb
xmodel vehicle_80s_sedan1_green_light_lb_dam
xmodel vehicle_80s_sedan1_green_light_rf
xmodel vehicle_80s_sedan1_green_light_rf_dam
xmodel vehicle_80s_sedan1_green_light_rb
xmodel vehicle_80s_sedan1_green_light_rb_dam
xmodel vehicle_80s_sedan1_green_destroyed
Be aware that each type of destructible car you use (car type / color combo) uses up a significant amount of memory. So you should start by adding only one type of car throughout your map, then gradually add variety to the map.
メモリのかなりの量の上にそれぞれのあなたが使うdestructible自動車のタイプ(自動車タイプ / カラーコンボ)が使うことを知っていてください。 それであなたは、あなたのマップを通じて自動車のたった1つのタイプを加えることによって、始めて、それから次第にマップに多様性を加えるべきです。
Creating the level_load.csv file
The level_load.csv should also be created in order for the map to work properly. It goes in the same directory as the level.csv:
level_load.csvは同じくマップが適切に機能するために作られるべきです。 それはlevel.csvと同じディレクトリに入ります:
\zone_source\mp_yourmap_load.csv
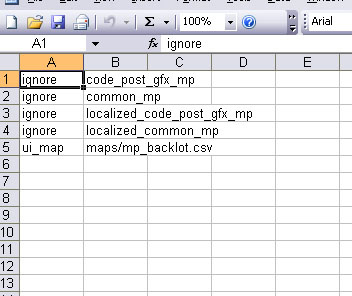
Below is a screenshot of mp_backlot_load.csv. A user-made map should have the same values, with the bottom value replaced to have the name of the custom map instead of mp_backlot.
下はmp_backlot_load.csvのスクリーンショットです。 ユーザ製のマップがmp_backlotの代わりにカスタムマップの名声を得るために、置き換えられた下部値で、同じ値を得るべきです。