Editing Terrain
Ok, you have learned on how to first create a section of terrain, now lets make a area of terrain for your level.
オーケー、あなたは最初にどのように地形の区画を作るべきかについて、今あなたのレベルのための地形のエリアをしようと知りました。
What we are going to do is make an area, and make different elevated areas and add decals and blend the decals to the area.
我々がしようとしていることはエリアをして、そしてエリアに異なった高尚なエリアと増せデカールとブレンド、デカール、をすることです。
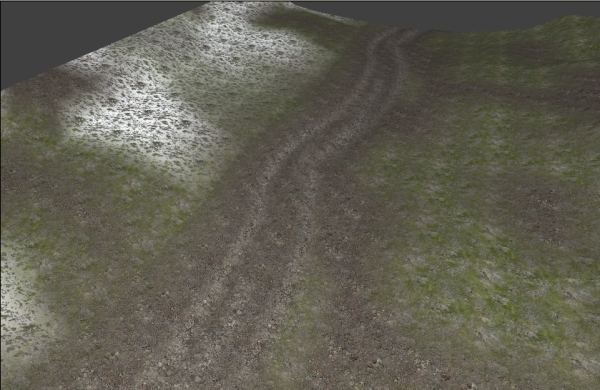
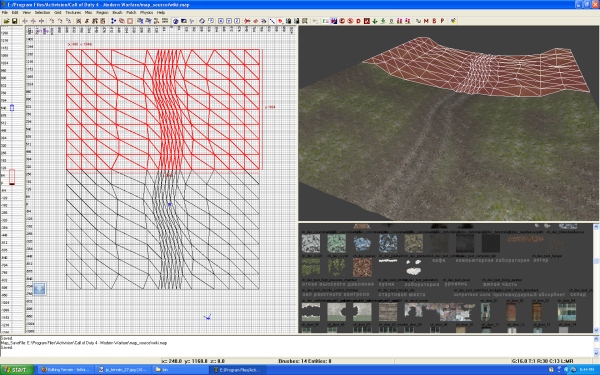
The final result will look like this.
最終結果はこれのように見えるでしょう。
Grass areas with a gravel road and some snow on the hill.
砂利道を持っている草エリアと丘陵の上の若干の雪。

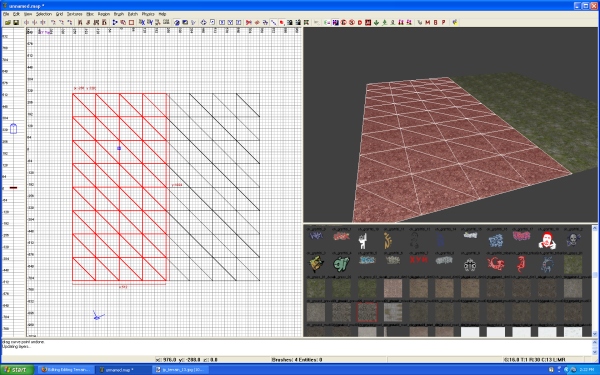
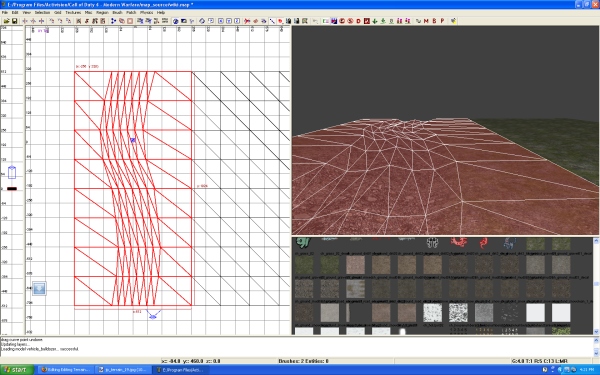
First I have make a section of terrain and apllied the ch_grass_01 texture.
最初に私はch_grass_01テクスチャが地形の区画をして、そしてapllied するようにします。
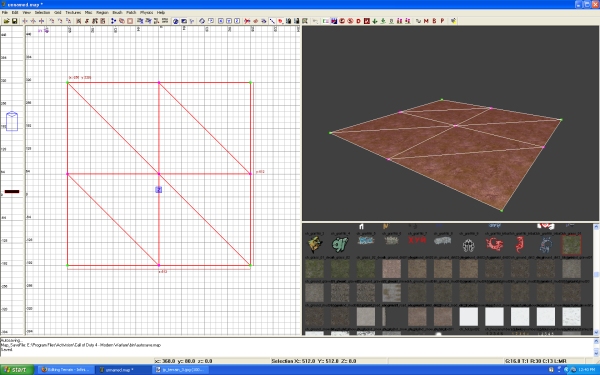

I then made duplicates (Spacebar) of the terrain patch and lined them to each other
私はそれから地形パッチから複製(Spacebar)を作って、そしてお互いにそれらの内側を覆いました


I then selected all the pieces of terrain and I want to cap the texture. Capping a texture is properly projecting the texture to fit the area of selected terrain.
私はそれから地形のすべての断片を選択しました、そして私はキャップにテクスチャを欲します。テクスチャにキャップをかぶせることは適切にフィット、選択済み地形のエリア、にテクスチャを計画することです。
using cap will project the texture in a Z plane.
Zプレーンの中に使用キャップ意志プロジェクト、テクスチャ。
There are 2 ways to cap a texture.
そこに2方法がキャップにテクスチャですか。
1. Is to bring up the Surface Properties window (S key) and clicking on the Cap button
1.サーフェスの上に情報ウィンドウ(Sキー)とCapボタンをクリックすることを持って来るはずです
2. Is to use the hotkeys of Ctrl+Shift+P
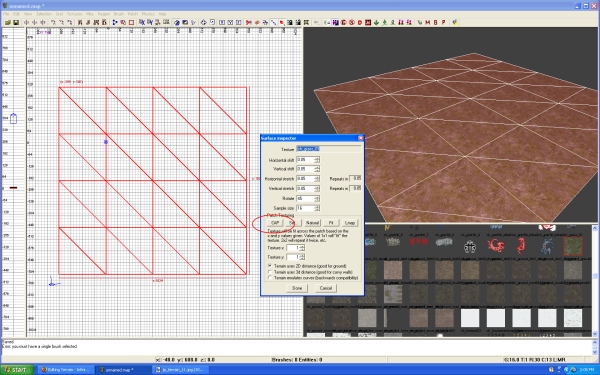

2.Ctrl+Shift+P
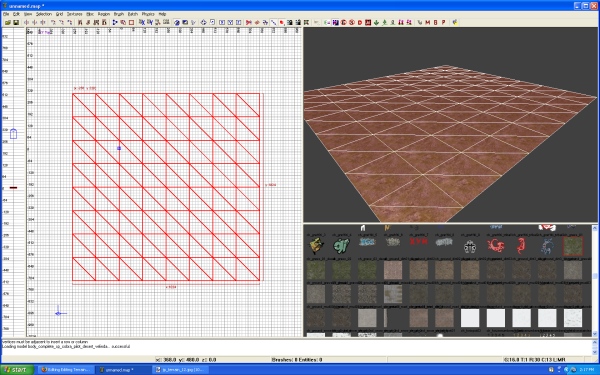
I went ahead and added a bunch of new rows to have more areas to edit. Know that when adding rows to a section of terrain, you can not exceed more then 16 rows in 1 direction.
私は先に進んで、そしてエディットにもっと多くのエリアを得る新しい列の束を加えました。 地形の区画に列を加えるとき、あなたキャン1つの方向の中にさらに多くそれから16列を超えないでくださいと知ってください。

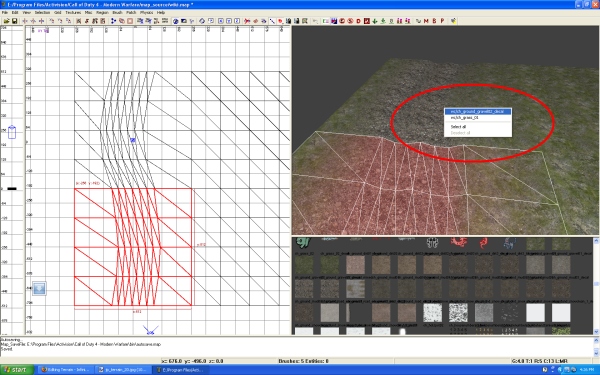
Next I duplicated 2 sections of terrain and apllied the ch_ground_gravel02_decal.
次に私は地形の2つの区画を繰り返して、そしてch_ground_gravel02_decalをapllied しました。
I then place it directly on top of the section I duplicated from that has the ch_grass_01 texture.
私はそれからの1複製したが持つ区画、ch_grass_01テクスチャ、の上に直接それからそれを置きます。

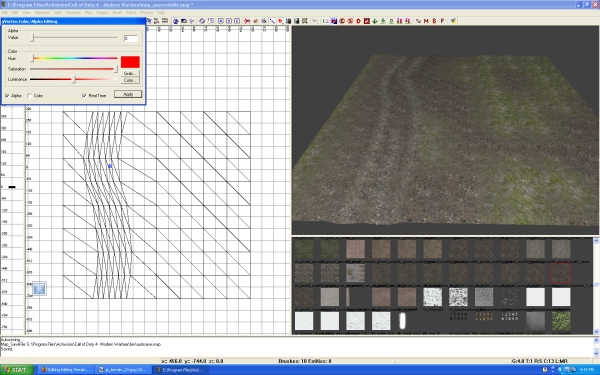
Then I am going to bring up the gVertex Color/Alpha Editing window. (G key)
それで私はgVertexの上にカラー/アルファ編集ウィンドウを持って来るつもりです。(G key)
I want to Alpha out the areas of the gravel texture so I can make a stone path.
私は出発するアルファに砂利テクスチャのエリアを欲します、それで1キャンが石経路を作ります。
Check the box next to Alpha.
確認、アルファの隣りのボックス。
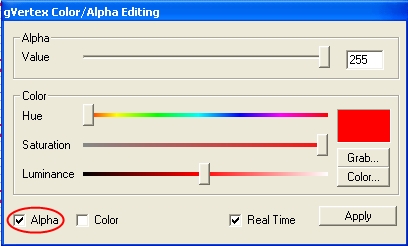

I will then select the vertice points I want and scroll the Alpha Value Bar down to 0
私はそれから私が欲する頂点ポイントを選択して、そして0まで下がっているアルファ値バーをスクロールするでしょう

As you slide the bar you will see the gravel texture become transparent on the vertice points you have selected.
あなたがバーを滑らせるように、あなた意志はあなたが得る頂点ポイントに透過的になった砂利テクスチャが選択されるのを見ます。
This method will only work on Decals. Notice that in the texture window there are 2 ch_ground-gravel textures, bit 1 of them has _decal on the end of the name.
この方法意志のみがデカールにうまくいきます。 テクスチャウィンドウの中にそこに2つのch_ground -砂利テクスチャである、それらの1つをかんだ通知が名前の終わりで_decalを持っています。
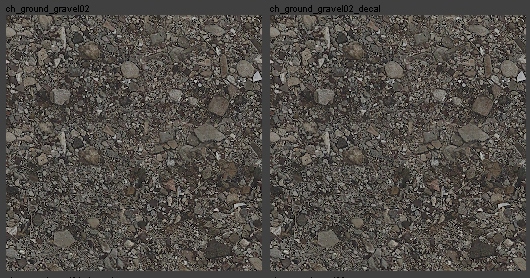

The one without the _decal is a base texture. It is solid and can not have Alpha properties added. The one with the _decal is the decal version. It is not solid. (no player collision) You can added and remove the Alpha properties to blend your textures.
_decalな(人たち・もの)がない(の・もの・人)はベーステクスチャです。 それはソリッドです、そしてキャンが付け加えられてアルファプロパティを得ません。 _decalな(人たち・もの)と一緒の(の・もの・人)はデカールバージョンです。 それはそうではないソリッド。あなたのテクスチャを混合する(プレーヤーコリジョン)、加えられた権限:と削除、アルファプロパティ、.
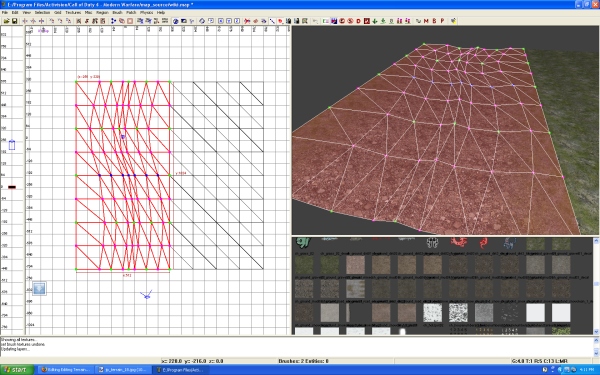
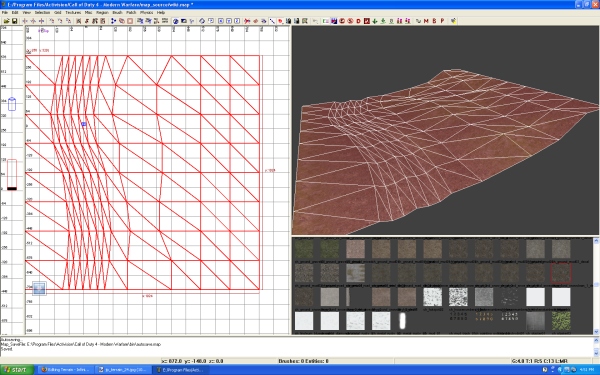
OK, Now I am going to add a few more rows (Ctrl+Shift+A) and I am going to pull down the vertices.
オーケー、今私は列(Ctrl+Shift+A)もっと少数を加えるつもりです、そして私は頂点の下方にプルに行きます。


Next I want to move the vertices around to give it more of a bend.
次に私はそれに曲りのさらに多くを与えるために頂点を動かすことを望みます。
Remember to move vertice points you are first selecting the vertices by LMB and drag the blue selection box, then holding Alt and LMB dragging the mouse to move the terrain vertices.
LMBとドラッグ、青色選択肢ボックス、それからホールディングAlt、と地形頂点を動かすためにマウスをドラッグしているLMBによって頂点ポイントを動かすために、あなたが最初に頂点を選択していることを覚えていてください。
You can select one vertice and still keep that selected and select another by holding Ctrl as you LMB dragging the blue selection box.
あなたキャン選択1つの頂点とスチルがあなた青色選択ボックスをドラッグしているLMBとしてホールディングCtrlによってその選択済みと選択をもう1(つ・人)にしておきます。
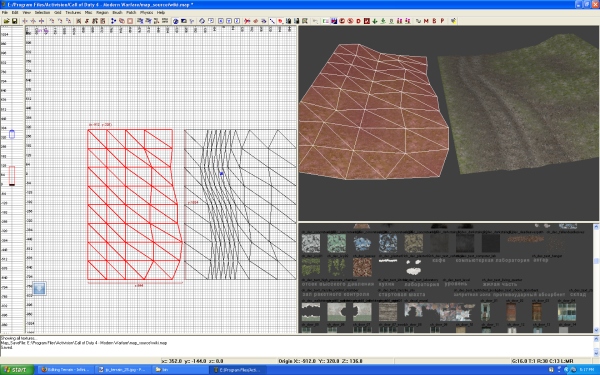
Now I am going to bring the rows in tighter.
今私はもっとしっかりと中に列を持って来るつもりです。

I want to add more decal layers. Want to add some mud.
私はもっと多くのデカールレイヤーを加えることを望みます。若干の泥を加えることを望んでください。
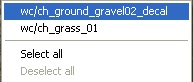
There is a way to select a single piece of terrain that is with multiple layers.
そこに方法は選択に複数レイヤーと一緒の地形つまりのシングル断片ですか。
Just right click you mouse button in the 3D camera window and you will get a drop menu listing the layers by the texture that is applied.
3Dカメラウィンドウの中にすぐ右クリックあなたマウスボタンとあなた意志はmenuリスト出力、テクスチャつまりによってのレイヤー、が適用した落下距離を取ります。
I then make a duplicate of the all the ch_grass_01 textured terrain.
私はそれからすべてch_grass_01的なテクスチャ地形の複写を作ります。
Then I apply the ch_ground_mud03_decal from the texture window to the copies of terrain.
それから私はテクスチャウィンドウから地形のcopyまでch_ground_mud03_decalを用います。
Place the new terrain patches on top of the others.
他のものの上に新しい地形パッチを置いてください。
Then using the Vertex Editor I will get creative with alpha the vertices.
それから頂点エディタを使って私は頂点をアルファで創造的にするでしょう。
Mine looks like this.
このような鉱山様子。


So I go on to raise up the terrain on the other end to create a hill.
それで私は丘陵を作るために他方の端で地形の上にraiseに進みます。

Now I want to create the other side of my little road. The easiest thing to do is to make a copy of preexisting geometry. I selected the right side and made a duplicate. I then dragged it over to the other side and rotated the selection using Shift+D. Each you rotate it will rotate the selected object 90 degrees.
今私は私の小さい道路の他の側面を作ることを望みます。 するべき最も容易なことは前もって存在しているジオメトリのコピーを作ることです。 私は右辺を選択して、そして複写を作りました。 私はそれから他の側面にそれをドラッグして、そして選択肢使用Shift+Dを回転させました。 それぞれあなた回転それ意志回転、選択済みオブジェクト90度。

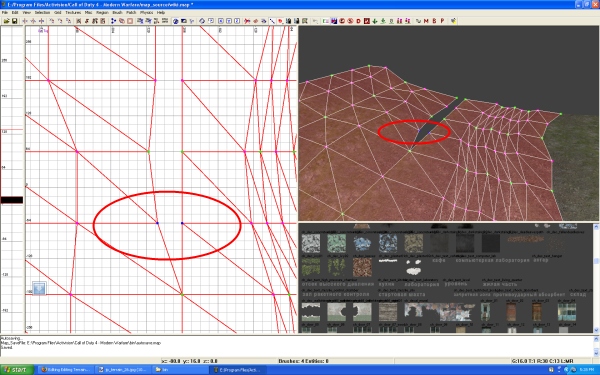
Now I need to connect the vertices, so I select the 2 points I want to connect and I use W Key.
今連結への1必要、頂点、それで私は私が連結に欲する2つのポイントを選択します、そして私はWキーを使います。
This will connect the 2 together.
この意志は一緒に2を結びます。
Helpful hint!
When you are joining vertices, you will notice one will stay stationary and the other will move to the other vertice.
あなたが連結頂点であるとき、あなた意志は据え付けの滞在と他の意志が他の頂点に動かす1つの意志に気付きます。
There is a way to choose which vertice point you want to stay stationary. Its in the order of selection. The first section of terrain that is selected, its points will stay stationary.
あなたが据え付けの滞在にどの頂点ポイントを欲するか決めるためにそこに方法です。 そ選択肢のオーダーの中に. 地形つまり選択済みの最初区画、据え付けのそのポイント意志滞在。地形つまり選択済みの最初区画、据え付けのそのポイント意志滞在。
The next selected section of terrain, its vertice points will be the one to move to the other.
地形の次の選択済み区画、その頂点ポイントは他に移動する(の・もの・人)でしょう。

I then selected all the terrain and made a duplicate and matched it end to end.
私はそれからすべての地形を選択して、そして複写を作って、そしてマッチしました、それは終わるために終わります。
Using the Vertex Editor I matched all the Alpha blending

Using the Vertex Editor I matched all the Alpha blending
私が混合してすべてのアルファに匹敵した使用、頂点エディタ
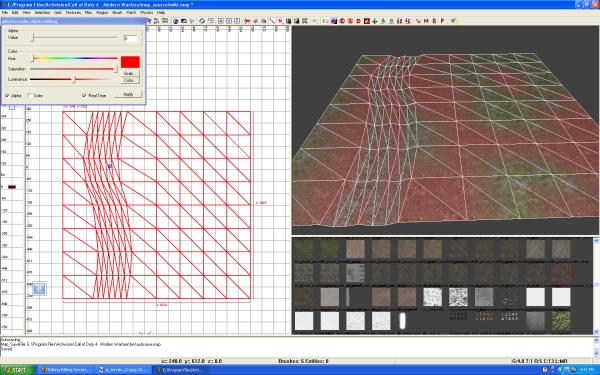
I then made a copy of the mud on the left side and applied the ch_ground_snow_decal_2
私はそれから左側で泥のコピーをして、そしてch_ground_snow_decal_2を適用しました
Changed around the alpha blending and completed the end result.
アルファ・ブレンディングと完了、最終結果、を変えました。


To Learn how to place trees and grass, you can find the tutorial HERE
ツリーと草を置く方法を学ぶために、あなたキャン発見、ここの学習。
Tutorial by J. Porter
