DynagenでCCIEを目指す
20100407 RIPng 基本設定
最終更新:
it_certification
-
view
目的
- RIPngの基本的な使い方を確認します。
構成
- 設定概要
- RIPngでルーティングします。
- 構成図

- netファイル
ghostios = True
sparsemem = True
model = 3620
[localhost]

	[[3620]]
		image = C:\Program Files\Dynamips\images\c3620-j1s3-mz.123-18.bin
		ram = 256

	[[ROUTER R1]]
		e0/0 = R2 e0/0
		e0/1 = R2 e0/1

	[[ROUTER R2]]
		e0/2 = R3 e0/2

	[[ROUTER R3]]
- 初期設定 R1
!
version 12.3
service timestamps debug datetime msec
service timestamps log datetime msec
no service password-encryption
!
hostname R1
!
boot-start-marker
boot-end-marker
!
!
no aaa new-model
ip subnet-zero
!
!
!
ip cef
ipv6 unicast-routing
!
!
!
!
!
!
!
!
!
!
!
!
!
!
!
interface Ethernet0/0
 no ip address
 full-duplex
 ipv6 address 2000::10:1/116
!
interface Ethernet0/1
 no ip address
 full-duplex
 ipv6 address 2000::11:1/116
!
interface Ethernet0/2
 no ip address
 shutdown
 half-duplex
!
interface Ethernet0/3
 no ip address
 shutdown
 half-duplex
!
ip http server
ip classless
!
!
!
!
!
!
!
!
line con 0
line aux 0
line vty 0 4
!
!
end
- 初期設定 R2
!
version 12.3
service timestamps debug datetime msec
service timestamps log datetime msec
no service password-encryption
!
hostname R2
!
boot-start-marker
boot-end-marker
!
!
no aaa new-model
ip subnet-zero
!
!
!
ip cef
ipv6 unicast-routing
!
!
!
!
!
!
!
!
!
!
!
!
!
!
!
interface Ethernet0/0
 no ip address
 full-duplex
 ipv6 address 2000::10:2/116
!
interface Ethernet0/1
 no ip address
 full-duplex
 ipv6 address 2000::11:2/116
!
interface Ethernet0/2
 no ip address
 full-duplex
 ipv6 address 2000::20:2/116
!
interface Ethernet0/3
 no ip address
 shutdown
 half-duplex
!
ip http server
ip classless
!
!
!
!
!
!
!
!
line con 0
line aux 0
line vty 0 4
!
!
end
- 初期設定 R3
!
version 12.3
service timestamps debug datetime msec
service timestamps log datetime msec
no service password-encryption
!
hostname R3
!
boot-start-marker
boot-end-marker
!
!
no aaa new-model
ip subnet-zero
!
!
!
ip cef
ipv6 unicast-routing
!
!
!
!
!
!
!
!
!
!
!
!
!
!
!
interface Ethernet0/0
 no ip address
 shutdown
 half-duplex
!
interface Ethernet0/1
 no ip address
 shutdown
 half-duplex
!
interface Ethernet0/2
 no ip address
 full-duplex
 ipv6 address 2000::20:3/116
!
interface Ethernet0/3
 no ip address
 shutdown
 half-duplex
!
ip http server
ip classless
!
!
!
!
!
!
!
!
line con 0
line aux 0
line vty 0 4
!
!
end
検証1 RIPng設定方法の確認
- RIPngの設定
各I/Fに対してRIPngの設定を行います。なお、HOGEというのはプロセス名です。OSPF等と同様に、RIPngは複数プロセスの起動も可能です。
R1(config)#interface Ethernet 0/0
R1(config-if)#ipv6 rip HOGE enable
「show ipv6 rip」で、RIPngの設定を確認します。
R1#show ipv6 rip
RIP process "HOGE", port 521, multicast-group FF02::9, pid 107
     Administrative distance is 120. Maximum paths is 16
     Updates every 30 seconds, expire after 180
     Holddown lasts 0 seconds, garbage collect after 120
     Split horizon is on; poison reverse is off
     Default routes are not generated
     Periodic updates 3, trigger updates 0
  Interfaces:
    Ethernet0/0
  Redistribution:
    None
running-configを確認します。RIPngをI/Fに対して有効にすると、自動的にRIPngプロセスの設定が加筆されます。
R1#show running-config | begin router
ipv6 router rip HOGE
!
- 設定項目の確認
RIPngプロセスに対してどのような設定が可能かを確認します。従来のRIPv2のように、network文を用いて指定する事はできなくなっているようです。
R1(config)#ipv6 router rip HOGE
R1(config-rtr)#?
  default          Set a command to its defaults
  distance         Administrative distance
  distribute-list  Filter networks in routing updates
  exit             Exit from IPv6 routing protocol configuration mode
  maximum-paths    Forward packets over multiple paths
  no               Negate a command or set its defaults
  poison-reverse   Poison reverse updates
  port             Port and multicast address
  redistribute     Redistribute IPv6 prefixes from another routing protocol
  split-horizon    Split horizon updates
  summary-prefix   Configure IPv6 summary prefix
  timers           Adjust routing timers
- ルーティングテーブルの確認
全I/Fに対しRIPngを有効にし、ルーティングテーブルを確認します。なお、show ipv6 routeの後にripと加筆すると、ripのみのルートを表示する事ができます。
R1#show ipv6 route rip
IPv6 Routing Table - 7 entries
Codes: C - Connected, L - Local, S - Static, R - RIP, B - BGP
       U - Per-user Static route
       I1 - ISIS L1, I2 - ISIS L2, IA - ISIS interarea, IS - ISIS summary
       O - OSPF intra, OI - OSPF inter, OE1 - OSPF ext 1, OE2 - OSPF ext 2
       ON1 - OSPF NSSA ext 1, ON2 - OSPF NSSA ext 2
R   2000::20:0/116 [120/2]
     via FE80::CE01:AFF:FE00:0, Ethernet0/0
     via FE80::CE01:AFF:FE00:1, Ethernet0/1
R1#

R3#show ipv6 route rip
IPv6 Routing Table - 6 entries
Codes: C - Connected, L - Local, S - Static, R - RIP, B - BGP
       U - Per-user Static route
       I1 - ISIS L1, I2 - ISIS L2, IA - ISIS interarea, IS - ISIS summary
       O - OSPF intra, OI - OSPF inter, OE1 - OSPF ext 1, OE2 - OSPF ext 2
       ON1 - OSPF NSSA ext 1, ON2 - OSPF NSSA ext 2
R   2000::10:0/116 [120/2]
     via FE80::CE01:AFF:FE00:2, Ethernet0/2
R   2000::11:0/116 [120/2]
     via FE80::CE01:AFF:FE00:2, Ethernet0/2
検証2 等コストロードバランス
- 経路確認
R1からR3に対し、tracerouteを実行します。ロードバランスされている事が確認できます。
R1#traceroute 2000::20:3

Type escape sequence to abort.
Tracing the route to 2000::20:3

  1 2000::11:2 48 msec                  <- R2 e0/1 経由
    2000::10:2 72 msec                  <- R2 e0/0 経由
    2000::11:2 56 msec                  <- R2 e0/1 経由
  2 2000::20:3 96 msec 60 msec 76 msec
検証3 ロードバランス禁止設定
- ロードバランス禁止設定
ロードバランスを禁止する事もできます。RIPngプロセスに対し、maximum-pathsを設定します。maximum-pathsは最大何本までの経路でのロードバランスを許容するかの設定ですので、maximum-pathsに1を設定すると「ロードバランスしない」の意味になります。
R1(config)#ipv6 router rip HOGE
R1(config-rtr)#maximum-paths 1
- ルーティングテーブルの確認
検証2の時点では2本あった経路が1本になった事が確認できます。
R1#show ipv6 route rip
IPv6 Routing Table - 7 entries
Codes: C - Connected, L - Local, S - Static, R - RIP, B - BGP
       U - Per-user Static route
       I1 - ISIS L1, I2 - ISIS L2, IA - ISIS interarea, IS - ISIS summary
       O - OSPF intra, OI - OSPF inter, OE1 - OSPF ext 1, OE2 - OSPF ext 2
       ON1 - OSPF NSSA ext 1, ON2 - OSPF NSSA ext 2
R   2000::20:0/116 [120/2]
     via FE80::CE01:AFF:FE00:1, Ethernet0/1
検証4 メトリックの調整
- メトリックの設定
R2, R3間のメトリックを加算します。
R2(config)#interface Ethernet 0/2
R2(config-if)#ipv6 rip HOGE metric-offset 10

R3(config)#interface Ethernet 0/2
R3(config-if)#ipv6 rip HOGE metric-offset 10
- ルーティングテーブルの確認
ルーティングテーブルを確認します。どうやら、RIPv2のoffset-listのように、I/Fから送信or受信時にメトリックを加算する仕様ではないようです。R3のみメトリックが加算されている事から推測すると、「ルーティングテーブルに載せる直前にメトリックを加算する」仕様のようです。
R1#show ipv6 route rip
IPv6 Routing Table - 7 entries
Codes: C - Connected, L - Local, S - Static, R - RIP, B - BGP
       U - Per-user Static route
       I1 - ISIS L1, I2 - ISIS L2, IA - ISIS interarea, IS - ISIS summary
       O - OSPF intra, OI - OSPF inter, OE1 - OSPF ext 1, OE2 - OSPF ext 2
       ON1 - OSPF NSSA ext 1, ON2 - OSPF NSSA ext 2
R   2000::20:0/116 [120/2]
     via FE80::CE01:AFF:FE00:1, Ethernet0/1

R3#show ipv6 route rip
IPv6 Routing Table - 6 entries
Codes: C - Connected, L - Local, S - Static, R - RIP, B - BGP
       U - Per-user Static route
       I1 - ISIS L1, I2 - ISIS L2, IA - ISIS interarea, IS - ISIS summary
       O - OSPF intra, OI - OSPF inter, OE1 - OSPF ext 1, OE2 - OSPF ext 2
       ON1 - OSPF NSSA ext 1, ON2 - OSPF NSSA ext 2
R   2000::10:0/116 [120/11]
     via FE80::CE01:AFF:FE00:2, Ethernet0/2
R   2000::11:0/116 [120/11]
     via FE80::CE01:AFF:FE00:2, Ethernet0/2
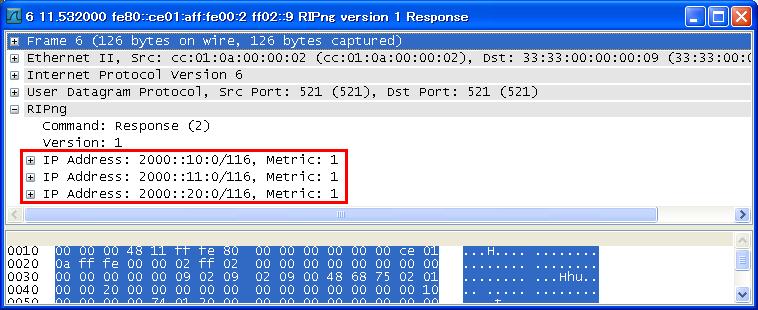
- パケットキャプチャの確認
パケットキャプチャでも確認致しましたが、送受信時にメトリックが加算された様子は見られませんでした。やはりルーティングテーブルに載る直前にメトリックを加算しているようです。ちなみに、以下の画像は、R2 e0/2でキャプチャしたものです。
検証5 経路の集約
- 経路集約の設定
R2でR1への経路を集約してR3に伝えるよう設定します。
R2(config)#interface Ethernet 0/2
R2(config-if)#ipv6 rip HOGE summary-address 2000::10:0/115
- ルーティングループの確認
R2のルーティングテーブルを確認します。OSPFやEIGRPと異なり、ルーティングループ防止用のNull0への経路は自動的に付加されないようです。
R2#show ipv6 route
IPv6 Routing Table - 8 entries
Codes: C - Connected, L - Local, S - Static, R - RIP, B - BGP
       U - Per-user Static route
       I1 - ISIS L1, I2 - ISIS L2, IA - ISIS interarea, IS - ISIS summary
       O - OSPF intra, OI - OSPF inter, OE1 - OSPF ext 1, OE2 - OSPF ext 2
       ON1 - OSPF NSSA ext 1, ON2 - OSPF NSSA ext 2
C   2000::10:0/116 [0/0]
     via ::, Ethernet0/0
L   2000::10:2/128 [0/0]
     via ::, Ethernet0/0
C   2000::11:0/116 [0/0]
     via ::, Ethernet0/1
L   2000::11:2/128 [0/0]
     via ::, Ethernet0/1
C   2000::20:0/116 [0/0]
     via ::, Ethernet0/2
L   2000::20:2/128 [0/0]
     via ::, Ethernet0/2
L   FE80::/10 [0/0]
     via ::, Null0
L   FF00::/8 [0/0]
     via ::, Null0
- ルーティングテーブルの確認
R3のルーティングテーブルを確認します。RIPv2と異なり、集約前の経路も通知されています・・・
R3#clear ipv6 route *
R3#show ipv6 route rip
IPv6 Routing Table - 7 entries
Codes: C - Connected, L - Local, S - Static, R - RIP, B - BGP
       U - Per-user Static route
       I1 - ISIS L1, I2 - ISIS L2, IA - ISIS interarea, IS - ISIS summary
       O - OSPF intra, OI - OSPF inter, OE1 - OSPF ext 1, OE2 - OSPF ext 2
       ON1 - OSPF NSSA ext 1, ON2 - OSPF NSSA ext 2
R   2000::10:0/115 [120/11]
     via FE80::CE01:AFF:FE00:2, Ethernet0/2
R   2000::10:0/116 [120/11]
     via FE80::CE01:AFF:FE00:2, Ethernet0/2
R   2000::11:0/116 [120/11]
     via FE80::CE01:AFF:FE00:2, Ethernet0/2
しかし、しばらく経ってから、再度ルーティングテーブルを確認すると、なぜか2000::10:0/116のエントリのみ消えていました。
R3#show ipv6 route rip
R3#show ipv6 route rip
IPv6 Routing Table - 6 entries
Codes: C - Connected, L - Local, S - Static, R - RIP, B - BGP
       U - Per-user Static route
       I1 - ISIS L1, I2 - ISIS L2, IA - ISIS interarea, IS - ISIS summary
       O - OSPF intra, OI - OSPF inter, OE1 - OSPF ext 1, OE2 - OSPF ext 2
       ON1 - OSPF NSSA ext 1, ON2 - OSPF NSSA ext 2
R   2000::10:0/115 [120/11]
     via FE80::CE01:6FF:FE20:2, Ethernet0/2
R   2000::11:0/116 [120/11]
     via FE80::CE01:6FF:FE20:2, Ethernet0/2
R2 e0/2上でパケットキャプチャをしても、確かに2000::10:0/116のエントリは見られませんでした。
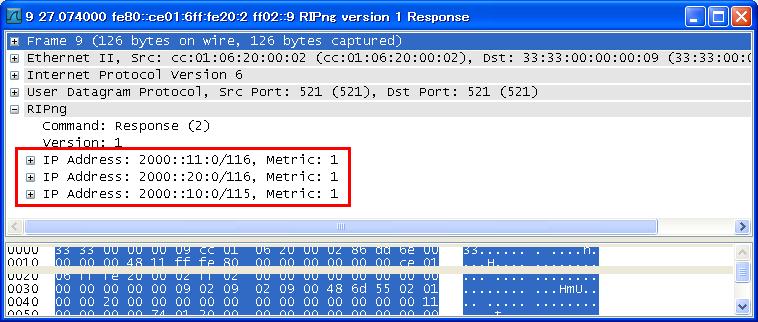
この現象がバグか仕様かは不明です。もしかしたら、4桁区切り(16bit)での経路集約しか認めないという仕様の可能性もあります。しかし、あまり深追いしすぎるとCCIEの試験対策が終わらない気がするので、このシナリオは以上で終了にします。
