DynagenでCCIEを目指す
20100904 Authorization
最終更新:
it_certification
-
view
1. 目的
- 認可(Authorization)を設定する方法を確認します。
2. 構成
2.1. 設定概要
- ルータの初期設定はIPアドレスのみです。
- トップページ/手順書 サーバ系/TACACS+ インストール手順に基づいて、TACCAS+がインストールされているものとします。
- トップページ/手順書 サーバ系に基づいて、coLinuxが設定されているものとします。
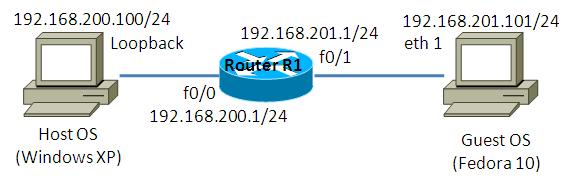
2.2. 構成図
2.3. netファイル
model = 3660
[localhost]

	[[3660]]
		image = C:\Program Files\Dynamips\images\c3660-ik9o3s-mz.124-6.T.bin
		ram = 128

	[[ROUTER R1]]
		f0/0 = NIO_gen_eth:\Device\NPF_{Host OS Loopback}
		f0/1 = NIO_gen_eth:\Device\NPF_{Guest OS eth1}
2.4. 初期設定
- R1
!
version 12.4
service timestamps debug datetime msec
service timestamps log datetime msec
no service password-encryption
!
hostname R1
!
boot-start-marker
boot-end-marker
!
!
no aaa new-model
!
resource policy
!
memory-size iomem 5
!
!
ip cef
no ip domain lookup
!
!
!
!
!
!
!
!
!
!
!
!
!
!
!
!
!
!
!
!
!
!
!
!
interface FastEthernet0/0
 ip address 192.168.200.1 255.255.255.0
 duplex auto
 speed auto
!
interface FastEthernet0/1
 ip address 192.168.201.1 255.255.255.0
 duplex auto
 speed auto
!
ip http server
no ip http secure-server
!
!
!
no cdp run
!
!
!
control-plane
!
!
!
!
!
!
!
!
!
line con 0
line aux 0
line vty 0 4
!
!
end
2.5. tac_plus.conf
* 一部のみの抜粋です

user=tac15 {
        login = cleartext tac15
}
user=tac07 {
        login = cleartext tac07
}
user=tac01 {
        login = cleartext tac01
}
3. [設定] 検証環境構築
3.1. ローカルユーザの作成
以下のローカルユーザを作成します。
R1(config)#username local01 privilege 1 secret local01
R1(config)#username local07 privilege 7 secret local07
R1(config)#username local15 privilege 15 secret local15
3.2. AAAの有効化
VTYではTACACS+による認証、CONSOLEではローカルユーザによる認証を行うよう設定します。
R1(config)#aaa new-model
R1(config)#
R1(config)#
R1(config)#tacacs-server host 192.168.201.101
R1(config)#
R1(config)#
R1(config)#aaa authentication login LOGIN_VTY group tacacs+
R1(config)#aaa authentication login LOGIN_CONSOLE local
R1(config)#
R1(config)#
R1(config)#line vty 0 4
R1(config-line)#login authentication LOGIN_VTY
R1(config-line)#exit
R1(config)#
R1(config)#line console 0
R1(config-line)#login authentication LOGIN_CONSOLE
TACACS+のユーザでログインできる事を確認します。
C:\>telnet 192.168.200.1
接続中: 192.168.200.1...

User Access Verification

Username: tac15
Password:

R1>
ローカルユーザでログインできる事を確認します。
User Access Verification

Username: local15
Password:

R1>
4. [検証] 認可の基本設定
4.1. 認可の設定
TACACS+とローカルユーザによる認可を行います。
R1(config)#aaa authorization exec default group tacacs+ local
4.2. 認可の確認
VTY接続による動作確認を行います。R1にtelnet接続しようとしてもエラーが発生してしまいます。
[root@localhost ~]# telnet 192.168.201.1
Trying 192.168.201.1...
Connected to 192.168.201.1.
Escape character is '^]'.


User Access Verification

Username: tac07
Password:
% Authorization failed.
Connection closed by foreign host.
[root@localhost ~]#
この時、ルータで表示されてるデバッグメッセージは以下の通りです。どうやら認可(Authorization)で失敗しているようです。
R1#debug aaa authentication
AAA Authentication debugging is on
R1#
R1#debug aaa authorization
AAA Authorization debugging is on
R1#
*Mar  1 00:22:16.115: AAA/BIND(0000000F): Bind i/f
*Mar  1 00:22:16.123: AAA/AUTHEN/LOGIN (0000000F): Pick method list 'LOGIN_VTY'
*Mar  1 00:22:23.699: AAA/AUTHOR (0xF): Pick method list 'default'
*Mar  1 00:22:23.767: AAA/AUTHOR/EXEC(0000000F): Authorization FAILED
R1#
4.3. tac_plus.confの設定
上記telnet接続に失敗したのは、TACACS+でprivilegeが定義されていないためです。/etc/tac_plus.confを以下の通り編集します。
user=tac15 {
        login = cleartext tac15
        service = exec {
                priv-lvl = 15
        }
}
user=tac07 {
        login = cleartext tac07
        service = exec {
                priv-lvl = 7
        }
}
user=tac01 {
        login = cleartext tac01
        service = exec {
                priv-lvl = 1
        }
}
設定を反映させるために再起動します。
[root@localhost ~]# /etc/init.d/tac_plus restart
Shutting down tacacs+:                                     [  OK  ]
Starting tacacs+:                                          [  OK  ]
[root@localhost ~]#
4.4. VTY認可の確認
telnet接続を試みます。tac_plusにprivilegeの設定を追加した事によって、telnet接続に成功しました。また、ログイン時のprivilegeはデフォルトでは1ですが、execに対する認可を設定する事によって各ユーザ毎に定義されたprivilegeが設定されるようになりました。
[root@localhost ~]# telnet 192.168.201.1
Trying 192.168.201.1...
Connected to 192.168.201.1.
Escape character is '^]'.


User Access Verification

Username: tac07
Password:

R1#show privilege
Current privilege level is 7 <- authorization設定前は 1 になっていました。
R1#
5. [検証] CONSOLEに対する認可の有効化
5.1. デフォルトの挙動確認
CONSOLE接続を試みます。接続そのものは成功しますが、privilegeは1です。これはCONSOLEに対する認可はデフォルトで無効にされているためです。
User Access Verification

Username: local15
Password:
*Mar  1 00:35:17.587: AAA/BIND(00000012): Bind i/f
*Mar  1 00:35:17.591: AAA/AUTHEN/LOGIN (00000012): Pick method list 'LOGIN_CONSOLE'

R1>show privilege
Current privilege level is 1
R1>
5.2. CONSOLEに対する認可の有効化
CONSOLEに対する認可を有効にします。(以下のコマンドはIOSの種類によっては、隠しコマンドになっています。)
R1(config)#aaa authorization console
5.3. CONSOLEに対する認可の確認
ユーザ「local15」で、CONSOLE接続します。接続は拒否されましたが、CONSOLEに対する認可を行うようになった可能性が高い事が、この時点で推測できます。
User Access Verification

Username: local15
Password:
% Authorization failed.
5.4. 接続拒否の挙動について
接続が拒否されてしまったは、ユーザ「local15」がTACACS+サーバで定義されていないからです。以下に現在の設定を再掲します。CONSOLE接続の場合は、まずローカルユーザによる認証が行われます。次にTACACS+, localの順で認可が行われますが、localで認可が行われるのはTACACS+への接続エラーの場合のみです。TACACS+はエラーを返したわけではなく、「local15なんてユーザはいない」と返答したため、接続が拒否されてしまいました。
このように、「aaa authorization console」の設定は認可プロセスに混乱を招く可能性が高いため、ciscoは非推奨としています。また、私個人の意見になりますが、認証サーバに障害が発生した際にCONSOLE経由でさえログインできなくなってしまうのは、障害復旧が大幅に遅れてしまうので、あまり投入したくない設定であると考えています。
このように、「aaa authorization console」の設定は認可プロセスに混乱を招く可能性が高いため、ciscoは非推奨としています。また、私個人の意見になりますが、認証サーバに障害が発生した際にCONSOLE経由でさえログインできなくなってしまうのは、障害復旧が大幅に遅れてしまうので、あまり投入したくない設定であると考えています。
aaa new-model
!
tacacs-server host 192.168.201.101
tacacs-server directed-request
!
aaa authentication login LOGIN_VTY group tacacs+
aaa authentication login LOGIN_CONSOLE local
aaa authorization console
aaa authorization exec default group tacacs+ local
!
line con 0
 login authentication LOGIN_CONSOLE
line aux 0
line vty 0 4
 login authentication LOGIN_VTY
6. [検証] 回線毎の認可設定
6.1. 回線毎の認可設定
CONSOLE接続の際は、ローカルユーザによる認可を行うよう設定します。なお、現在の設定では、CONSOLE経由で接続する事ができないため、telnet経由で接続して設定して下さい。
[root@localhost ~]# telnet 192.168.201.1
Trying 192.168.201.1...
Connected to 192.168.201.1.
Escape character is '^]'.


User Access Verification

Username: tac15
Password:

R1#configure terminal
Enter configuration commands, one per line.  End with CNTL/Z.
R1(config)#aaa authorization exec AUTH_CONSOLE local
R1(config)#
R1(config)#line console 0
R1(config-line)#authorization exec AUTH_CONSOLE
6.2. 認可の確認
CONSOLE経由で接続し、認可が機能している事を確認します。
User Access Verification

Username: local07
Password:

R1#show privilege
Current privilege level is 7 <- privilegeが7になっている事を確認
R1#
6.3. 順序の確認
認証でも認可でも同じ事ですが、明示的に指定した回線とdefaultでは明示的に指定した回線の方が優先されます。現在の認証認可の設定を以下に再掲します。CONSOLEに対してはAUTH_CONSOLE, defaultの2種類の認可が定義されていますが、AUTH_CONSOLEの設定の方が優先されます。
aaa new-model
!
aaa authentication login LOGIN_VTY group tacacs+
aaa authentication login LOGIN_CONSOLE local
aaa authorization console
aaa authorization exec default group tacacs+ local
aaa authorization exec AUTH_CONSOLE local
!
tacacs-server host 192.168.201.101
tacacs-server directed-request
!
line con 0
 authorization exec AUTH_CONSOLE
 login authentication LOGIN_CONSOLE
line aux 0
line vty 0 4
 login authentication LOGIN_VTY
7. [検証] コマンドに対する認可
7.1. コマンドに対する認可の有効化
コマンドに対する認可を設定します。以下の設定により、level 15とlevel 1のコマンドに対する認可があるかどうかをTACACS+サーバに問い合わせるようになります。
R1(config)#aaa authorization commands 15 default group tacacs+
R1(config)#aaa authorization commands 1 default group tacacs+
7.2. コマンドに対する認可の確認
ユーザ「tac15」でログインします。privilege 15であるのにも関わらず、「conf t」すら実行できなくなっています。これは、TACACS+側でコマンドに対する認可が全く設定されていないからです。
[root@localhost ~]# telnet 192.168.201.1
Trying 192.168.201.1...
Connected to 192.168.201.1.
Escape character is '^]'.


User Access Verification

Username: tac15
Password:

R1#conf t
Command authorization failed.
    ^
% Invalid input detected at '^' marker.

R1#
7.3. tac_plus.confの設定
ユーザ「tac15」, ユーザ「tac07」に対して、「conf t」と「show run」を実行する権限を与えます。/etc/tac_plus.confを以下の通り編集します。
user=tac15 {
user=tac15 {
       #name = "Test User"
       login = cleartext tac15
       service = exec {
               priv-lvl = 15
               #default service = permit
       }
       cmd = configure {
               permit terminal
       }
       cmd = show {
               permit running-config
       }
}
user=tac07 {
user=tac07 {
       #name = "TAC_07"
       login = cleartext tac07
       service = exec {
               priv-lvl = 7
               #default service = permit
       }
       cmd = configure {
               permit terminal
       }
       cmd = show {
               permit running-config
       }
}
user=tac01 {
user=tac01 {
       login = cleartext tac01
       service = exec {
               priv-lvl = 1
               #default service = permit
       }
}
設定を反映させるために、tac_plusを再起動します。
設定を反映させるために、tac_plusを再起動します。
root@localhost ~]# /etc/init.d/tac_plus restart
Shutting down tacacs+:                                     [  OK  ]
Starting tacacs+:                                          [  OK  ]
[root@localhost ~]#
7.4. コマンドに対する認可の確認
ユーザ「tac15」で「conf t」が実行できる事を確認します。
[root@localhost ~]# telnet 192.168.201.1
Trying 192.168.201.1...
Connected to 192.168.201.1.
Escape character is '^]'.


User Access Verification

Username: tac15
Password:

R1#conf t
Enter configuration commands, one per line.  End with CNTL/Z.
R1(config)#
一方、ユーザ「tac07」は「conf t」を実行できません。コマンドが実行できるかは、まず「充分なprivilegeが与えられているか」を判断し、次に「コマンドに対する認可がサーバで定義されているか」で判断します。ユーザ「tac07」の場合は、conf tがlevel 15であるのに対し、tac07はlevel 7なので実行できません。
[root@localhost ~]# telnet 192.168.201.1
Trying 192.168.201.1...
Connected to 192.168.201.1.
Escape character is '^]'.


User Access Verification

Username: tac07
Password:

R1#conf t
      ^
% Invalid input detected at '^' marker.

R1#show run
         ^
% Invalid input detected at '^' marker.

R1#
8. [検証] privilege levelの変更
8.1. privilege levelの変更
コマンド毎に定義されたprivilege levelを変更する事もできます。以下の設定を投入し、「conf t」「show run」のprivilege levelを15から7に下げ、level 7で定義されたコマンドに対する認可をTACACS+サーバに問い合わせるようにします。
R1(config)#privilege exec level 7 conf t
R1(config)#privilege exec level 7 show run
R1(config)#
R1(config)#
R1(config)#aaa authorization commands 7 default group tacacs+
8.2. privilege levelの確認
level 7 のユーザ「tac07」で「conf t」「show run」が実行できるようになった事を確認します。
[root@localhost ~]# telnet 192.168.201.1
Trying 192.168.201.1...
Connected to 192.168.201.1.
Escape character is '^]'.


User Access Verification

Username: tac07
Password:

R1#show run
Building configuration...

Current configuration : 55 bytes
!
boot-start-marker
boot-end-marker
!
!
!
!
!
!
!
end

R1#conf t
Enter configuration commands, one per line.  End with CNTL/Z.
R1(config)#
9. [検証] デフォルトのprivilegeの変更
9.1. デフォルトのprivilegeの変更
デフォルトのprivilegeは設定により変更する事ができます。SONSOLE接続, VTY接続時のデフォルトのprivilegeを15に変更します。
R1(config)#line console 0
R1(config-line)#privilege level 15
R1(config-line)#exit
R1(config)#
R1(config)#
R1(config)#line vty 0 4
R1(config-line)#privilege level 15
9.2. tac_plus.confの設定
ユーザ「tac07」がprivilegeを確認できるよう、全てのshowコマンドに対する認可を与えます。/etc/tac_plus.confを以下の通り編集します。
user=tac15 {
        #name = "Test User"
        login = cleartext tac15
        service = exec {
                priv-lvl = 15
                #default service = permit
        }
        cmd = configure {
                permit terminal
        }
        cmd = show {
                permit running-config
        }
}
user=tac07 {
        #name = "TAC_07"
        login = cleartext tac07
        service = exec {
                priv-lvl = 7
                #default service = permit
        }
        cmd = configure {
                permit .*
        }
        cmd = show {
                permit .*
        }
}
user=tac01 {
        login = cleartext tac01
        service = exec {
                priv-lvl = 1
                #default service = permit
        }
}
設定を反映させるために再起動します。
[root@localhost ~]# /etc/init.d/tac_plus restart
Shutting down tacacs+:                                     [  OK  ]
Starting tacacs+:                                          [  OK  ]
[root@localhost ~]#
9.3. privilegeの確認
CONSOLE接続の場合は、privilegeが15になっていません。認可に対する設定の方が優先されている事を確認します。
User Access Verification

Username: local07
*Mar  1 01:27:15.575: AAA/BIND(00000026): Bind i/f
*Mar  1 01:27:15.579: AAA/AUTHEN/LOGIN (00000026): Pick method list 'LOGIN_CONSOLE
Password:

R1#
R1#show privilege
Current privilege level is 7
R1#
VTY接続の場合も、privilegeが15になっていません。認可に対する設定の方が優先されている事を確認します。
[root@localhost ~]# telnet 192.168.201.1
Trying 192.168.201.1...
Connected to 192.168.201.1.
Escape character is '^]'.


User Access Verification

Username: tac07
Password:

R1#show privilege
Current privilege level is 7
R1#
9.4. 認可設定の無効化
認可設定の無効化
R1(config)#no aaa authorization console
R1(config)#no aaa authorization exec default group tacacs+ local
R1(config)#no aaa authorization exec AUTH_CONSOLE local
9.5. privilegeの確認
認可設定を無効化する事で、CONSOLE接続に対するprivilegeが15になった事を確認します。
User Access Verification

Username: local07
Password:

R1#show privilege
Current privilege level is 15
R1#
認可設定を無効化する事で、VTY接続に対するprivilegeが15になった事を確認します。
[root@localhost ~]# telnet 192.168.201.1
Trying 192.168.201.1...
Connected to 192.168.201.1.
Escape character is '^]'.


User Access Verification

Username: tac07
Password:

R1#show privilege
Current privilege level is 15
R1#
10. [補足] デフォルトでCONSOLEに対する認可が無効になっている確認
10.1 CONSOLEに対する認可設定
「aaa authorization console」を入力する前に、CONSOLEに対して認可を設定しようとすると、以下の通り警告のメッセージが表示されます。
R1(config)#aaa authorization exec AUTH_CONSOLE local
R1(config)#
R1(config)#
R1(config)#line console 0
R1(config-line)#authorization exec AUTH_CONSOLE
%Authorization without the global command 'aaa authorization console' is useless

R1(config-line)#
10.2. デバッグメッセージの確認
上記設定の状態で、configurationモードでコマンドを発行すると、「authorization not enabled」とのデバッグメッセージが出力されます。
R1#debug aaa authentication
AAA Authentication debugging is on
R1#debug aaa authorization
AAA Authorization debugging is on
R1#
R1#conf t
Enter configuration commands, one per line.  End with CNTL/Z.
R1(config)#
*Mar  1 01:35:03.795: AAA/AUTHOR: console user is permitted
R1(config)#int f0/0
R1(config-if)#
*Mar  1 01:35:14.819: AAA/AUTHOR: config command authorization not enabled
R1(config-if)#
添付ファイル
