DynagenでCCIEを目指す
20100426 OSPF 認証の設定
最終更新:
it_certification
-
view
目的
- virtual-linkによって、OSPF area 1とarea 2を接続する方法を確認します。
構成
- 設定概要
- OSPFによってルーティングします。
- R1とR2をvirtual-linkによって接続します。
- トップページ/動作検証 ネットワーク系/20100424 OSPF virtual-link 標準接続の検証終了時の設定と全く同じです。
- 構成図
- netファイル
ghostios = True
sparsemem = True
model = 3620
[localhost]

	[[3620]]
		image = C:\Program Files\Dynamips\images\c3620-j1s3-mz.123-18.bin
		ram = 256

	[[ROUTER R1]]
		e0/0 = R2 e0/0

	[[ROUTER R2]]
- 初期設定 R1
!
version 12.3
service timestamps debug datetime msec
service timestamps log datetime msec
no service password-encryption
!
hostname R1
!
boot-start-marker
boot-end-marker
!
!
no aaa new-model
ip subnet-zero
!
!
!
ip cef
!
!
!
!
!
!
!
!
!
!
!
!
!
!
!
interface Loopback0
 ip address 1.1.1.1 255.255.255.255
!
interface Ethernet0/0
 ip address 192.168.2.1 255.255.255.0
 full-duplex
 no keepalive
!
interface Ethernet0/1
 ip address 192.168.1.1 255.255.255.0
 full-duplex
 no keepalive
!
interface Ethernet0/2
 no ip address
 shutdown
 half-duplex
!
interface Ethernet0/3
 no ip address
 shutdown
 half-duplex
!
router ospf 1
 log-adjacency-changes
 area 1 virtual-link 2.2.2.2
 network 192.168.1.0 0.0.0.255 area 0
 network 192.168.2.0 0.0.0.255 area 1
!
ip http server
ip classless
!
!
!
!
!
!
!
!
line con 0
line aux 0
line vty 0 4
 login
!
!
end
- 初期設定 R2
!
version 12.3
service timestamps debug datetime msec
service timestamps log datetime msec
no service password-encryption
!
hostname R2
!
boot-start-marker
boot-end-marker
!
!
no aaa new-model
ip subnet-zero
!
!
!
ip cef
!
!
!
!
!
!
!
!
!
!
!
!
!
!
!
interface Loopback0
 ip address 2.2.2.2 255.255.255.255
!
interface Ethernet0/0
 ip address 192.168.2.2 255.255.255.0
 full-duplex
!
interface Ethernet0/1
 ip address 192.168.3.2 255.255.255.0
 full-duplex
 no keepalive
!
interface Ethernet0/2
 no ip address
 shutdown
 half-duplex
!
interface Ethernet0/3
 no ip address
 shutdown
 half-duplex
!
router ospf 1
 log-adjacency-changes
 area 1 virtual-link 1.1.1.1
 network 192.168.2.0 0.0.0.255 area 1
 network 192.168.3.0 0.0.0.255 area 0
!
ip http server
ip classless
!
!
!
!
!
!
!
!
line con 0
line aux 0
line vty 0 4
 login
!
!
end
検証1 I/F単位での認証の有効化(平文)
- 認証の設定
R1に以下の設定を投入します。R1のみ認証を設定するとneighborが切断されるのが確認できます。
R1(config)#interface Ethernet 0/0
R1(config-if)#ip ospf authentication
R1(config-if)#ip ospf authentication-key hoge
*Mar  1 00:12:07.087: %OSPF-5-ADJCHG: Process 1, Nbr 2.2.2.2 on Ethernet0/0 from FULL to DOWN, Neighbor Down: Dead timer expired
*Mar  1 00:12:12.591: %OSPF-5-ADJCHG: Process 1, Nbr 2.2.2.2 on OSPF_VL2 from FULL to DOWN, Neighbor Down: Interface down or detached
R2に以下の設定を投入します。R1, R2の両方に認証が定義されることによって、neighborが再確立されるのが確認できます。
R2(config)#inter Ethernet 0/0
R2(config-if)#ip ospf authentication
R2(config-if)#ip ospf authentication-key hoge
*Mar  1 00:15:50.503: %OSPF-5-ADJCHG: Process 1, Nbr 1.1.1.1 on Ethernet0/0 from LOADING to FULL, Loading Done
*Mar  1 00:16:15.663: %OSPF-5-ADJCHG: Process 1, Nbr 1.1.1.1 on OSPF_VL1 from LOADING to FULL, Loading Done
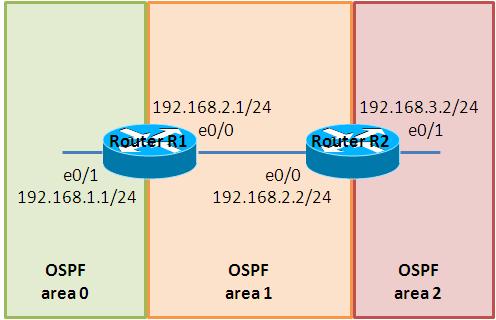
- パケットキャプチャ
R1, R2間のパケットをキャプチャします。OSPF header内にパスワードが平文で記載されているのが確認できます。
- 設定削除
平文による認証設定を削除します。
R1(config)#interface Ethernet 0/0
R1(config-if)#no ip ospf authentication
R1(config-if)#no ip ospf authentication-key hoge

R2(config)#interface Ethernet 0/0
R2(config-if)#no ip ospf authentication
R2(config-if)#no ip ospf authentication-key hoge
検証2 I/F単位での認証の有効化(MD5)
- 認証の設定
MD5による認証を設定します。なお、下記設定の10はkey-idと呼ばれる値で、認証をするルータ間で一致させる必要があります。
R1(config)#interface Ethernet 0/0
R1(config-if)#ip ospf authentication message-digest
R1(config-if)#ip ospf message-digest-key 10 md5 hoge

R2(config)#interface Ethernet 0/0
R2(config-if)#ip ospf authentication message-digest
R2(config-if)#ip ospf message-digest-key 10 md5 hoge
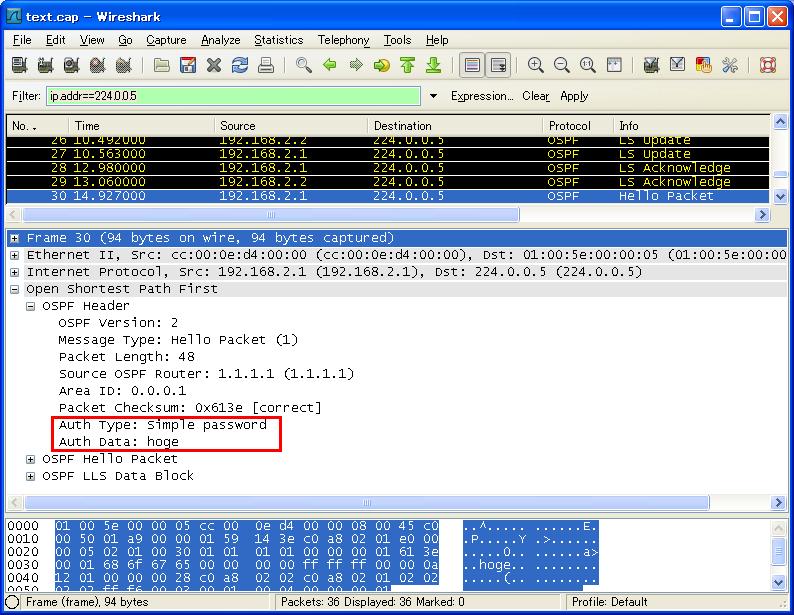
- パケットキャプチャ
R1, R2間のパケットをキャプチャします。OSPF header内にkey-idおよびハッシュ化されたパスワードが平文で記載されているのが確認できます。
- 設定の削除
MD5認証設定を削除します。
R1(config)#interface Ethernet 0/0
R1(config-if)#no ip ospf authentication ?
  <cr>

R1(config-if)#no ip ospf authentication
R1(config-if)#no ip ospf message-digest-key 10 md5 hoge
R1(config-if)#do show run | begin Ethernet0/0
interface Ethernet0/0
 ip address 192.168.2.1 255.255.255.0
 full-duplex
 no keepalive

R2(config)#interface Ethernet 0/0
R2(config-if)#no ip ospf authentication
R2(config-if)#no ip ospf message-digest-key 10 md5 hoge
検証3 area単位での認証の有効化
- 認証の設定
検証1とは違い、area単位で認証を有効にする事もできます。以下の設定を投入します。
R1(config)#router ospf 1
R1(config-router)#area 1 authentication
R1(config-router)#exit
R1(config)#interface Ethernet 0/0
R1(config-if)#ip ospf authentication-key foo

R2(config)#router ospf 1
R2(config-router)#area 1 authentication
R2(config-router)#exit
R2(config)#interface Ethernet 0/0
R2(config-if)#ip ospf authentication-key foo
- 設定の削除
認証の設定を削除します。
R1(config)#router ospf 1
R1(config-router)#no area 1 authentication
R1(config-router)#exit
R1(config)#interface Ethernet 0/0
R1(config-if)#no ip ospf authentication-key foo
- MD5認証
area単位で認証を有効にしても、検証2と同様の手順でMD5認証もれきます。
configについては省略します。
configについては省略します。
検証4 virtual-linkの認証(失敗)
- 認証の設定
virtual-link間の認証を定義します。下記、設定を投入します。
R1(config)#router ospf 1
R1(config-router)#area 0 authentication
R1(config-router)#area 1 virtual-link 2.2.2.2 authentication-key baa

R2(config)#router ospf 1
R2(config-router)#area 0 authentication
R2(config-router)#area 1 virtual-link 1.1.1.1 authentication-key baa
- keyの変更
neighbor up/downやデバッグメッセージなどから、認証が設定された事が確認できませんでした。
認証が行われているかどうかを確認するために、R1とR2のkeyを異なる値にしてみます。
認証が行われているかどうかを確認するために、R1とR2のkeyを異なる値にしてみます。
R2(config)#router ospf 1
R2(config-router)#no area 1 virtual-link 1.1.1.1 authentication-key
R2(config-router)#area 1 virtual-link 1.1.1.1 authentication-key hoge
- キャプチャの確認
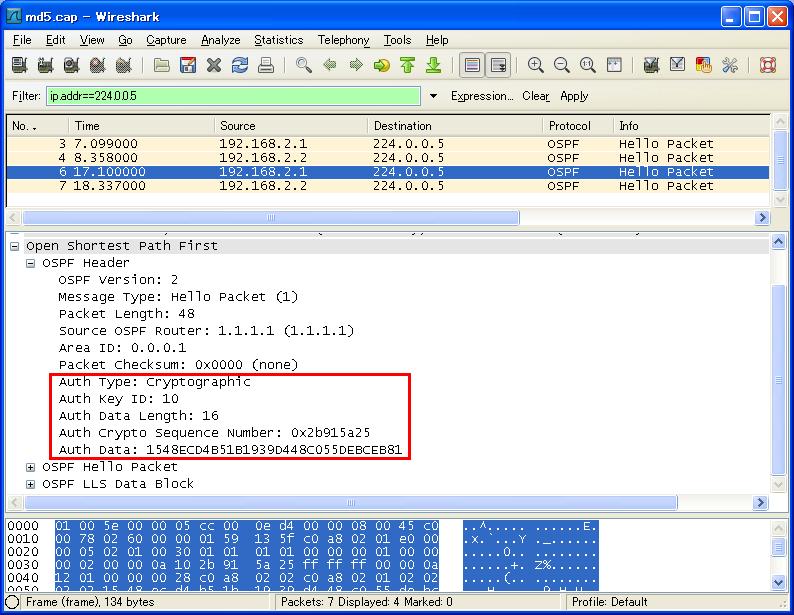
keyの値が異なっていても、neighborは確立されたままでした。
R1,R2間のパケットをキャプチャしても、認証されている様子は見当たりません。
R1,R2間のパケットをキャプチャしても、認証されている様子は見当たりません。
- 試してみた設定
キャリアデザイン塾の記事(以下URL)を元に設定を行いましたが、認証はされませんでした。
http://www.careerdesign.co.jp/index.php?option=com_content&view=article&id=165&catid=46

R1(config)#router ospf 1
R1(config-router)#area 0 authentication
R1(config-router)#area 1 virtual-link 2.2.2.2 authentication
R1(config-router)#area 1 virtual-link 2.2.2.2 authentication-key baa

R2(config)#router ospf 1
R2(config-router)#area 0 authentication
R2(config-router)#area 1 virtual-link 1.1.1.1 authentication
R2(config-router)#area 1 virtual-link 1.1.1.1 authentication-key baa
MD5による設定も試みましたが、ダメでした。
R1(config)#router ospf 1
R1(config-router)#area 0 authentication
R1(config-router)#area 1 virtual-link 2.2.2.2 authentication message-digest
R1(config-router)#area 1 virtual-link 2.2.2.2 message-digest-key 1 md5 baa

R2(config)#router ospf 1
R2(config-router)#area 0 authentication
R1(config-router)#area 1 virtual-link 1.1.1.1 authentication message-digest
R1(config-router)#area 1 virtual-link 1.1.1.1 message-digest-key 1 md5 baa
補足 area 0の認証有効化
以下geneさんの記事の引用になりますが、area 0の認証を有効にした途端、virtual-linkが切れてしまうという落とし穴があるそうです。「virtual-linkはarea 0に所属するもの」と言えば当たり前の事になってしまいますが、この場合シナリオについても機会を見て検証したいと思います。
http://www.n-study.com/network/2005/09/0_for_ccie_ospf.html
