DynagenでCCIEを目指す
telnet and ssh management
最終更新:
it_certification
-
view
1. 目的
- telnet sshによる接続方法を確認します。
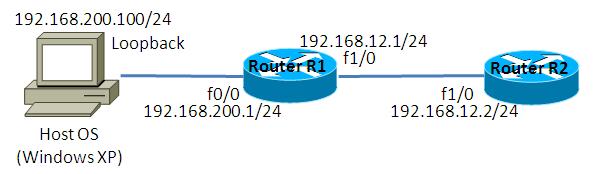
2. 構成
2.1. 設定概要
- ルータの初期設定はIPアドレスのみです。
2.2. 構成図
2.3. netファイル
ghostios = True
sparsemem = True

model = 2620
[localhost]

	[[2620]]
		image = C:\Program Files\Dynamips\images\c2600-ipbasek9-mz.124-21.bin
		ram = 128

	[[ROUTER R1]]
		f0/0 = NIO_gen_eth:\Device\NPF_{8B89D910-5ED3-4A43-9DE9-6A272A3D7592}
		f1/0 = R2 f1/0

	[[ROUTER R2]]
2.4. 初期設定
- R1
!
version 12.4
service timestamps debug datetime msec
service timestamps log datetime msec
no service password-encryption
!
hostname R1
!
boot-start-marker
boot-end-marker
!
!
no aaa new-model
memory-size iomem 15
ip cef
!
!
!
!
!
!
!
!
!
!
!
interface Loopback0
 ip address 1.1.1.1 255.255.255.255
!
interface FastEthernet0/0
 ip address 192.168.200.1 255.255.255.0
 duplex auto
 speed auto
!
interface FastEthernet1/0
 ip address 192.168.12.1 255.255.255.0
 duplex auto
 speed auto
!
ip forward-protocol nd
!
ip http server
no ip http secure-server
!
!
control-plane
!
!
line con 0
line aux 0
line vty 0 4
 login
!
!
end
- R2
!
version 12.4
service timestamps debug datetime msec
service timestamps log datetime msec
no service password-encryption
!
hostname R2
!
boot-start-marker
boot-end-marker
!
!
no aaa new-model
memory-size iomem 15
ip cef
!
!
!
!
!
!
!
!
!
!
!
interface FastEthernet0/0
 no ip address
 shutdown
 duplex auto
 speed auto
!
interface FastEthernet1/0
 ip address 192.168.12.2 255.255.255.0
 duplex auto
 speed auto
!
ip forward-protocol nd
!
ip http server
no ip http secure-server
!
!
control-plane
!
!
line con 0
line aux 0
line vty 0 4
 login
!
!
end
3. [検証] telnet接続 基本設定
3.1. 初期設定の確認
コマンドプロンプトを起動し、Host OSからR1へtelnet接続を試みます。初期設定では、Passwordが設定されていないので、接続を拒否されます。
C:\>telnet 192.168.200.1
接続中: 192.168.200.1...

Password required, but none set

ホストとの接続が切断されました。

C:\>
3.2. 設定投入
telnet接続時のパスワードを定義します。パスワードは「cisco」とします。
R1(config)#line vty 0 4
R1(config-line)#password cisco
R1(config-line)#login
3.2. デバッグの有効化
以下のデバッグを有効にする事で、どのようなコマンドが実行されたかを確認する事ができます。
R1#debug event manager action cli
Debug EEM action cli debugging is on
R1#
3.3. 接続確認
Host OSからR1へtelnet接続ができる事を確認します。
C:\>telnet 192.168.200.1
接続中: 192.168.200.1...

User Access Verification

Password:
R1>
4. [検証] ssh接続 基本設定
4.1. ユーザの定義
ssh接続する際のユーザを定義します。ユーザ名は「village」、パスワードは「vanguard」とします。
R1(config)#username village password vanguard
4.2. rsa keyの生成
まず、鍵生成の前提となるドメイン名を定義します。その後、以下の要領でrsa keyを生成します。
R1(config)#ip domain-name R1.cisco.com
R1(config)#crypto key generate rsa
The name for the keys will be: R1.R1.cisco.com
Choose the size of the key modulus in the range of 360 to 2048 for your
  General Purpose Keys. Choosing a key modulus greater than 512 may take
  a few minutes.

How many bits in the modulus [512]:         <- 鍵長はデフォルトの512bitとします。
% Generating 512 bit RSA keys, keys will be non-exportable...[OK]

R1(config)#
*Mar  1 00:13:05.187: %SSH-5-ENABLED: SSH 1.99 has been enabled
R1(config)#
4.3. SSH接続の許可
sshとtelnetによる接続を許可し、認証にはローカルデータベースを使用するように設定します。
R1(config)#line vty 0 4
R1(config-line)#transport input ssh telnet
R1(config-line)#login local
4.4. ルータ間の接続確認
R2からR1へssh接続が可能な事を確認します。
R2#ssh -l village 192.168.12.1 <- "-l"でユーザ名を指定します。

Password: <- パスワード「vanguard」を入力します。

R1>
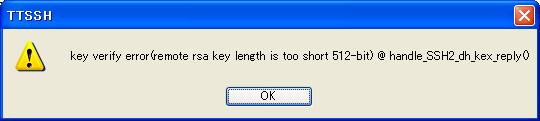
4.5. Tera Termによる接続確認
Host OSでTera Termを起動し、R1へのSSH接続を試みます。しかし、鍵長が短すぎると怒られて接続する事ができません。(SSH1ならば512bitの鍵でも接続できます。また、puttyならば512bitの鍵長でも接続できます。)

5. [検証] rsa鍵長の変更
5.1. rsa鍵長の変更
rsa鍵長をデフォルトの512bitから1024bitへ変更します。
R1(config)#crypto key generate rsa
% You already have RSA keys defined named R1.R1.cisco.com.
% Do you really want to replace them? [yes/no]: yes
Choose the size of the key modulus in the range of 360 to 2048 for your
  General Purpose Keys. Choosing a key modulus greater than 512 may take
  a few minutes.

How many bits in the modulus [512]:
*Mar  1 00:18:49.975: %SSH-5-DISABLED: SSH 1.99 has been disabled1024 <- 1024と入力
% Generating 1024 bit RSA keys, keys will be non-exportable...[OK]

R1(config)#
*Mar  1 00:19:01.935: %SSH-5-ENABLED: SSH 1.99 has been enabled
R1(config)#
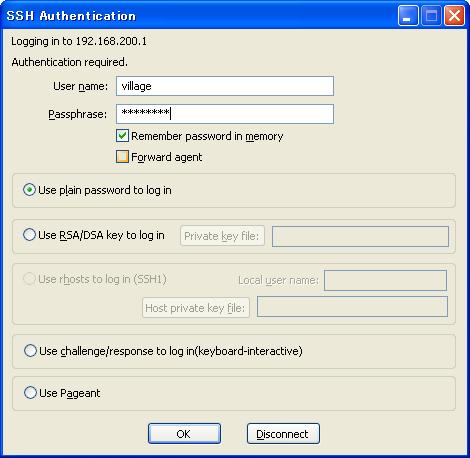
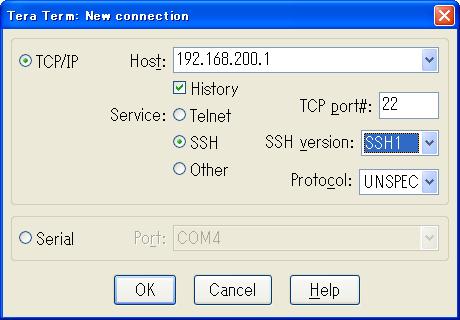
5.2. Tera Termによる接続確認
Host OSでTera Termを起動し、R1へのSSH接続できる事を確認します。
6. [検証] 接続制限
6.1. 接続拒否の設定
以下のように「transpport input none」と指定する事で、telnet接続とssh接続を拒否する事ができます。(「transpport input ssh」とすると、SSHのみ許可します)
R1(config)#line vty 0 4
R1(config-line)#transport input none
6.2. 接続確認
Host OSからR1へtelnet接続ができなくなった事を確認します。
C:\>telnet 192.168.200.1
接続中: 192.168.200.1...ホストへ接続できませんでした。 ポート番号 23: 接続に失敗
しました

C:\>
7. [補足] SSH詳細設定
7.1. デフォルト設定の確認
現在のSSHの設定は「show ip ssh」で確認する事ができます。
R1#show ip ssh
SSH Enabled - version 1.99
Authentication timeout: 120 secs; Authentication retries: 3
R1#
なお、上記の「version 1.99」の表記は、version 1, version 2の両方を許可するの意味です。version表記の詳細は以下を確認してください。
http://www.cisco.com/JP/support/public/ht/tac/100/1007844/ssh-j.shtml
7.2. SSHの設定変更
以下の要領で、SSHの設定を変更します。
R1(config)#ip ssh version 2
R1(config)#ip ssh time-out 10
R1(config)#ip ssh authentication-retries 2
showコマンドで設定を確認します。
R1#show ip ssh
SSH Enabled - version 2.0
Authentication timeout: 10 secs; Authentication retries: 2
R1#
7.3. 設定確認
上記設定が反映されているかを確認します。
Host OSからssh version 1による接続を試みますが、正常に接続できてしまいます。どうやらSSHのバージョン指定の設定は反映されていないようです。
Host OSからssh version 1による接続を試みますが、正常に接続できてしまいます。どうやらSSHのバージョン指定の設定は反映されていないようです。
R2からR1へのssh接続を行います。パスワード間違えの際の際認証回数は2回に設定されていますが、3回パスワードを聞かれてしまいます。どうやら設定が反映されていないようです。
R2#ssh -l village 192.168.12.1

Password:

Password:

Password:

% Authentication failed.

[Connection to 192.168.12.1 closed by foreign host]
R2#
SSHに関するバグっぽい挙動をするIOSのバージョンは以下の通りです。もし、設定方法が間違っているならば、ご指摘して頂けると非常にありがたいです。
R1#show version
Cisco IOS Software, C2600 Software (C2600-IPBASEK9-M), Version 12.4(21), RELEASE SOFTWARE (fc1)
Technical Support: http://www.cisco.com/techsupport
Copyright (c) 1986-2008 by Cisco Systems, Inc.
Compiled Thu 10-Jul-08 01:21 by prod_rel_team

ROM: ROMMON Emulation Microcode
ROM: C2600 Software (C2600-IPBASEK9-M), Version 12.4(21), RELEASE SOFTWARE (fc1)

R1 uptime is 55 minutes
System returned to ROM by unknown reload cause - suspect boot_data[BOOT_COUNT] 0x0, BOOT_COUNT 0, BOOTDATA 19
System image file is "tftp://255.255.255.255/unknown"
