DynagenでCCIEを目指す
Wighted Fair Queueing
最終更新:
it_certification
-
view
1. 目的
- WFQ(Weighted Fair Queuing)の設定方法について確認します。
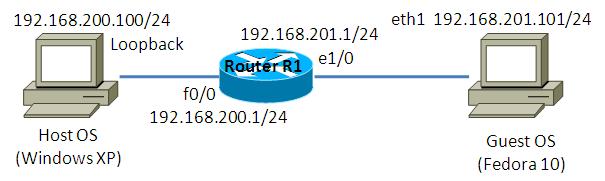
2. 構成
2.1. 設定概要
- 初期設定はIPアドレスのみです。
- Host OS側でApacheを起動させます。
- Guest OS, R1間は10Mで接続する事で、わざと輻輳を発生させます。
2.2. 構成図
2.3. netファイル
model = 3620
[localhost]

	[[3620]]
		image = C:\Program Files\Dynamips\images\c3620-j1s3-mz.123-18.bin
		ram = 128

	[[ROUTER R1]]
		f0/0 = NIO_gen_eth:\Device\NPF_{8B89D910-5ED3-4A43-9DE9-6A272A3D7592}
		e1/0 = NIO_gen_eth:\Device\NPF_{5933302A-7AAA-475C-A8FE-A6B82B0C0F98}
2.4. 初期設定
- R1
!
version 12.3
service timestamps debug datetime msec
service timestamps log datetime msec
no service password-encryption
!
hostname R1
!
boot-start-marker
boot-end-marker
!
!
no aaa new-model
ip subnet-zero
!
!
no ip domain lookup
!
ip cef
!
!
!
!
!
!
!
!
!
!
!
!
!
!
!
interface FastEthernet0/0
 ip address 192.168.200.1 255.255.255.0
 duplex auto
 speed auto
!
interface Ethernet1/0
 ip address 192.168.201.1 255.255.255.0
 half-duplex
!
interface Ethernet1/1
 no ip address
 shutdown
 half-duplex
!
interface Ethernet1/2
 no ip address
 shutdown
 half-duplex
!
interface Ethernet1/3
 no ip address
 shutdown
 half-duplex
!
ip http server
ip classless
!
!
no cdp run
!
!
!
!
!
!
line con 0
line aux 0
line vty 0 4
!
!
end
2.5. Apache 設定
ホストOSにApacheをインストールし、ポートベースのバーチャルホストを定義します。構築方法はトップページ/手順書 サーバ系/Apache HTTP Server バーチャルホストの設定を参考にして下さい。
この検証例で実際に使用したhttpd.confの要所となる部分を以下に記載します。
この検証例で実際に使用したhttpd.confの要所となる部分を以下に記載します。
Listen 10880
Listen 10881
Listen 10882

NameVirtualHost *:10880
NameVirtualHost *:10881
NameVirtualHost *:10882

<VirtualHost *:10880>
    DocumentRoot "C:/Program Files/Apache Software Foundation/Apache2.2/htdocs"
</VirtualHost>

<VirtualHost *:10881>
    DocumentRoot "C:/Program Files/Apache Software Foundation/Apache2.2/htdocs10881"
</VirtualHost>

<VirtualHost *:10882>
    DocumentRoot "C:/Program Files/Apache Software Foundation/Apache2.2/htdocs10882"
</VirtualHost>
2.6. サーバ側 ルーティング設定
- Host OS
route add 192.168.201.0 mask 255.255.255.0 192.168.200.1
- Guest OS
route add -net 192.168.200.0/24 gw 192.168.201.1
3. [準備] Markingの設定
3.1. ip precedenceの設定
WFQはip precedenceの値を元に優先度を決めるキューです。事前準備として、以下のmarkingをFa0/0のinput方向で行います。
| 通信 | ip precedence |
|---|---|
| SSH | 5(critical) |
| tcp10880を使用したHTTP | 3(flash) |
| tcp10881を使用したHTTP | 1(priority) |
| tcp10882を使用したHTTP | 0(routine) |
投入するconfigは以下の通りです。
R1(config)#ip access-list extended ACL_SSH
R1(config-ext-nacl)#permit tcp any any eq 22
R1(config-ext-nacl)#exit
R1(config)#
R1(config)#ip access-list extended ACL_10880
R1(config-ext-nacl)#permit tcp any eq 10880 any
R1(config-ext-nacl)#exit
R1(config)#
R1(config)#ip access-list extended ACL_10881
R1(config-ext-nacl)#permit tcp any eq 10881 any
R1(config-ext-nacl)#exit
R1(config)#
R1(config)#ip access-list extended ACL_10882
R1(config-ext-nacl)#permit tcp any eq 10882 any
R1(config-ext-nacl)#exit
R1(config)#
R1(config)#
R1(config)#class-map CLASS_SSH
R1(config-cmap)#match access-group name ACL_SSH
R1(config-cmap)#exit
R1(config)#
R1(config)#class-map CLASS_10880
R1(config-cmap)#match access-group name ACL_10880
R1(config-cmap)#exit
R1(config)#
R1(config)#class-map CLASS_10881
R1(config-cmap)#match access-group name ACL_10881
R1(config-cmap)#exit
R1(config)#
R1(config)#class-map CLASS_10882
R1(config-cmap)#match access-group name ACL_10882
R1(config-cmap)#exit
R1(config)#
R1(config)#
R1(config)#policy-map POLICY_F00_IN
R1(config-pmap)#class CLASS_SSH
R1(config-pmap-c)#set ip precedence critical
R1(config-pmap-c)#exit
R1(config-pmap)#
R1(config-pmap)#class CLASS_10880
R1(config-pmap-c)#set ip precedence flash
R1(config-pmap-c)#exit
R1(config-pmap)#
R1(config-pmap)#class CLASS_10881
R1(config-pmap-c)#set ip precedence priority
R1(config-pmap-c)#exit
R1(config-pmap)#
R1(config-pmap)#class CLASS_10882
R1(config-pmap-c)#set ip precedence routine
R1(config-pmap-c)#exit
R1(config-pmap)#exit
R1(config)#
R1(config)#
R1(config)#interface FastEthernet 0/0
R1(config-if)#service-policy in POLICY_F00_IN
4. [検証] WFQ
4.1. WFQの設定
e1/0でWFQを設定します。
R1(config)#interface Ethernet 1/0
R1(config-if)#fair-queue
4.2. テストトラフィックの送信
Host OSからGuest OSへssh接続い、以下要領のwgetコマンドを3つ同時に実行します。
ip precedenceの値が大きいものほど、ダウンロード速度が速い事を確認します。
ip precedenceの値が大きいものほど、ダウンロード速度が速い事を確認します。
[root@localhost ~]# wget -O /dev/null http://192.168.200.100:10880/large.html
--2010-11-09 15:41:56--  http://192.168.200.100:10880/large.html
Connecting to 192.168.200.100:10880... connected.
HTTP request sent, awaiting response... 200 OK
Length: 23016000 (22M) [text/html]
Saving to: `/dev/null'

19% [========>                                        ] 4,447,304   18.5K/s  eta 23m 36s

[root@localhost ~]# wget -O /dev/null http://192.168.200.100:10881/large.html
--2010-11-09 15:42:19--  http://192.168.200.100:10881/large.html
Connecting to 192.168.200.100:10881... connected.
HTTP request sent, awaiting response... 200 OK
Length: 23016000 (22M) [text/html]
Saving to: `/dev/null'

14% [======>                                          ] 3,407,872   10.8K/s  eta 31m 47s

[root@localhost ~]# wget -O /dev/null http://192.168.200.100:10882/large.html
--2010-11-09 15:42:41--  http://192.168.200.100:10882/large.html
Connecting to 192.168.200.100:10882... connected.
HTTP request sent, awaiting response... 200 OK
Length: 23016000 (22M) [text/html]
Saving to: `/dev/null'

10% [===>                                             ] 2,317,384   4.69K/s  eta 47m 28s
4.3. showコマンドによる確認
show queueingコマンドでqueueingの設定を確認する事ができます。
(show queueing fairでWFQのみを表示する事ができます。)
(show queueing fairでWFQのみを表示する事ができます。)
R1#show queueing fair
Current fair queue configuration:

  Interface           Discard    Dynamic  Reserved  Link    Priority
                      threshold  queues   queues    queues  queues
  Ethernet1/0         64         256      0         8       1

R1#
show queueing interfaceコマンドで各queueを通過したパケット数を確認する事ができます。
R1#show queueing interface Ethernet 1/0
Interface Ethernet1/0 queueing strategy: priority

Output queue utilization (queue/count)
        high/1401 medium/34481 normal/8058 low/1208
R1#
show queueing interfaceコマンドで各queueの保持しているパケット数やドロップしたパケット数を確認する事ができます。
R1#show queueing interface Ethernet 1/0
Interface Ethernet1/0 queueing strategy: fair
  Input queue: 0/75/0/0 (size/max/drops/flushes); Total output drops: 0
  Queueing strategy: weighted fair
  Output queue: 14/1000/64/0 (size/max total/threshold/drops)
     Conversations  2/5/256 (active/max active/max total)
     Reserved Conversations 0/0 (allocated/max allocated)
     Available Bandwidth 7500 kilobits/sec

  (depth/weight/total drops/no-buffer drops/interleaves) 3/8096/0/0/0
  Conversation 219, linktype: ip, length: 590
  source: 192.168.200.100, destination: 192.168.201.101, id: 0x262B, ttl: 127,
  TOS: 96 prot: 6, source port 10880, destination port 43097

  (depth/weight/total drops/no-buffer drops/interleaves) 12/16192/0/0/0
  Conversation 246, linktype: ip, length: 590
  source: 192.168.200.100, destination: 192.168.201.101, id: 0x2616, ttl: 127,
  TOS: 32 prot: 6, source port 10881, destination port 41338


R1#
5. [検証] WFQの詳細設定
5.1. 設定項目
WFQはport番号やip addressを元にパケットをフローに分類します。各フローに対応したキューが作成され、そのキューに対して詳細な設定を行う事ができます。
構文は以下の通りです。
構文は以下の通りです。
Cisco(config-if)# fair-queue <discard-threshold> <dynamic-queues> <reserval-queues>
| 項目 | 値 | 説明 |
|---|---|---|
| discard-threshold | 1-4096 | Congestive Discard Threshold &br; 各キューに格納できるパケット数です。 |
| dynamic-queues | 16-4096 | Number Dynamic Conversation Queues &br; 作成できるキューの数です。 |
| reserva-queues | 0-1000 | Number Reservable Conversation Queues &br; RSVPに予約されたキューの数です。 |
5.2. 設定例
WFQに詳細設定を投入します。設定例は以下の通りです。
R1(config)#interface Ethernet 1/0
R1(config-if)#fair-queue 32 16 0
設定はshow queueingなどで確認する事ができます。
R1#show queueing fair
Current fair queue configuration:

  Interface           Discard    Dynamic  Reserved  Link    Priority
                      threshold  queues   queues    queues  queues
  Ethernet1/0         32         16       0         8       1

R1#
添付ファイル
