DynagenでCCIEを目指す
Frame Relay Traffic Shaping
最終更新:
it_certification
-
view
1. 目的
- Frame Relay Traffic Shapingの設定方法について確認します。
2. 構成
2.1. 設定概要
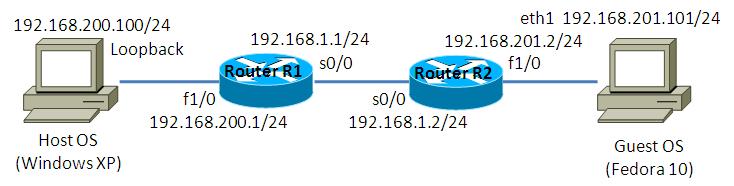
- Host OS側でApacheを起動させます。
- R1, R2間はframe-relayで接続します。
- R1, R2はOSPFでルーティングします。
2.2. 構成図
2.3. netファイル
model = 3620

[localhost]

    [[3620]]
        image = C:\Program Files\Dynamips\images\c3620-j1s3-mz.123-18.bin
        ram = 128

    [[ROUTER R1]]
 		 f1/0 = NIO_gen_eth:\Device\NPF_{8B89D910-5ED3-4A43-9DE9-6A272A3D7592}
        s0/0 = SW 0

    [[FRSW SW]]
        0:100 = 1:100

    [[ROUTER R2]]
		 f1/0 = NIO_gen_eth:\Device\NPF_{5933302A-7AAA-475C-A8FE-A6B82B0C0F98}
        s0/0 = SW 1
2.4. 初期設定
- R1
!
version 12.3
service timestamps debug datetime msec
service timestamps log datetime msec
no service password-encryption
!
hostname R1
!
boot-start-marker
boot-end-marker
!
!
no aaa new-model
ip subnet-zero
!
!
!
ip cef
!
!
!
!
!
!
!
!
!
!
!
!
!
!
!
interface Serial0/0
 ip address 192.168.1.1 255.255.255.0
 encapsulation frame-relay
 ip ospf network broadcast
 serial restart-delay 0
 frame-relay map ip 192.168.1.2 100 broadcast
!
interface Serial0/1
 no ip address
 shutdown
 serial restart-delay 0
!
interface Serial0/2
 no ip address
 shutdown
 serial restart-delay 0
!
interface Serial0/3
 no ip address
 shutdown
 serial restart-delay 0
!
interface FastEthernet1/0
 ip address 192.168.200.1 255.255.255.0
 duplex auto
 speed auto
!
router ospf 1
 log-adjacency-changes
 passive-interface default
 no passive-interface Serial0/0
 network 192.168.1.1 0.0.0.0 area 0
 network 192.168.200.1 0.0.0.0 area 0
!
ip http server
ip classless
!
!
!
!
!
!
!
!
line con 0
line aux 0
line vty 0 4
!
!
end
- R2
!
version 12.3
service timestamps debug datetime msec
service timestamps log datetime msec
no service password-encryption
!
hostname R2
!
boot-start-marker
boot-end-marker
!
!
no aaa new-model
ip subnet-zero
!
!
!
ip cef
!
!
!
!
!
!
!
!
!
!
!
!
!
!
!
interface Serial0/0
 ip address 192.168.1.2 255.255.255.0
 encapsulation frame-relay
 ip ospf network broadcast
 serial restart-delay 0
 frame-relay map ip 192.168.1.1 100 broadcast
!
interface Serial0/1
 no ip address
 shutdown
 serial restart-delay 0
!
interface Serial0/2
 no ip address
 shutdown
 serial restart-delay 0
!
interface Serial0/3
 no ip address
 shutdown
 serial restart-delay 0
!
interface FastEthernet1/0
 ip address 192.168.201.2 255.255.255.0
 duplex auto
 speed auto
!
router ospf 1
 log-adjacency-changes
 passive-interface default
 no passive-interface Serial0/0
 network 192.168.1.2 0.0.0.0 area 0
 network 192.168.201.2 0.0.0.0 area 0
!
ip http server
ip classless
!
!
!
!
!
!
!
!
line con 0
line aux 0
line vty 0 4
!
!
end
2.5. Apache 設定
ホストOSにApacheをインストールし、ポートベースのバーチャルホストを定義します。構築方法はトップページ/手順書 サーバ系/Apache HTTP Server バーチャルホストの設定を参考にして下さい。
この検証例で実際に使用したhttpd.confの要所となる部分を以下に記載します。
この検証例で実際に使用したhttpd.confの要所となる部分を以下に記載します。
Listen 10880
Listen 10881
Listen 10882

NameVirtualHost *:10880
NameVirtualHost *:10881
NameVirtualHost *:10882

<VirtualHost *:10880>
    DocumentRoot "C:/Program Files/Apache Software Foundation/Apache2.2/htdocs"
</VirtualHost>

<VirtualHost *:10881>
    DocumentRoot "C:/Program Files/Apache Software Foundation/Apache2.2/htdocs10881"
</VirtualHost>

<VirtualHost *:10882>
    DocumentRoot "C:/Program Files/Apache Software Foundation/Apache2.2/htdocs10882"
</VirtualHost>
2.6. サーバ側 ルーティング設定
- Host OS
route add 192.168.201.0 mask 255.255.255.0 192.168.200.1
- Guest OS
route add -net 192.168.200.0/24 gw 192.168.201.2
3. [準備] デフォルト送信速度の確認
3.1. デフォルト送信速度の確認
shapingの効果の有無を確認するために、予めshapingを実装する前の送信速度をメモしておきます。
Guest OSでHost OSへのwgetコマンドを実施する事で送信速度を確認します。私の環境の場合では、20.9K/sの速度になります。
Guest OSでHost OSへのwgetコマンドを実施する事で送信速度を確認します。私の環境の場合では、20.9K/sの速度になります。
[root@localhost ~]# wget -O /dev/null http://192.168.200.100:10880/large.html
--2010-11-23 19:38:01--  http://192.168.200.100:10880/large.html
Connecting to 192.168.200.100:10880... connected.
HTTP request sent, awaiting response... 200 OK
Length: 23016000 (22M) [text/html]
Saving to: `/dev/null'

 0% [                                                 ] 169,508     20.9K/s  eta 18m 46s
4. [検証] 基本設定
4.1. 基本設定の投入
R1 s0/0でshapingの設定を投入します。以下の設定は、150kbpsまでが認定アクション、200kbpsまでが超過アクションという意味です。
R1(config)#map-class frame-relay F-SHAPE
R1(config-map-class)#frame-relay traffic-rate 150000 200000
R1(config-map-class)#exit
R1(config)#
R1(config)#interface Serial 0/0
R1(config-if)#frame-relay traffic-shaping
R1(config-if)#frame-relay class F-SHAPE
4.2. 設定確認
show traffic-shape, show traffic-shape statisticsで設定を確認する事ができます。
R1#show traffic-shape

Interface   Se0/0
       Access Target    Byte   Sustain   Excess    Interval  Increment Adapt
VC     List   Rate      Limit  bits/int  bits/int  (ms)      (bytes)   Active
100           150000    8593   150000    50000     125       2343      -
R1#

R1#show traffic-shape statistics
                  Acc. Queue Packets   Bytes     Packets   Bytes     Shaping
I/F               List Depth                     Delayed   Delayed   Active
Se0/0                   8     2659      1324628   2446      1268320   yes
R1#
Guest OSで下記wgetコマンドを実行し、帯域が制限されている事を確認します。
[root@localhost ~]# wget -O /dev/null http://192.168.200.100:10880/large.html
--2010-11-23 19:33:35--  http://192.168.200.100:10880/large.html
Connecting to 192.168.200.100:10880... connected.
HTTP request sent, awaiting response... 200 OK
Length: 23016000 (22M) [text/html]
Saving to: `/dev/null'

 4% [=>                                               ] 1,003,520   8.02K/s  eta 45m 49s
4.3. bc beの定義
CARと同様に、cir, bc, beのパラメータを用いて送信速度を定義する事もできます。また、frame-relay網内での輻輳を検知した際の、最低保証帯域をmincirで定義する事もできます(mincirが定義されていない場合は、最低保証帯域はcirの半分になります)
R1(config)#interface Serial 0/0
R1(config-if)#no frame-relay traffic-shaping
R1(config-if)#no frame-relay class F-SHAPE
R1(config-if)#exit
R1(config)#
R1(config)#
R1(config)#no map-class frame-relay F-SHAPE
R1(config)#map-class frame-relay F-SHAPE
R1(config-map-class)#frame-relay cir 150000
R1(config-map-class)#frame-relay bc 300
R1(config-map-class)#frame-relay be 400
R1(config-map-class)#frame-relay mincir 100000
R1(config-map-class)#exit
R1(config)#
R1(config)#
R1(config)#interface Serial 0/0
R1(config-if)#frame-relay traffic-shaping
R1(config-if)#frame-relay class F-SHAPE
4.4. 設定確認
設定を確認します。
R1#show traffic-shape

Interface   Se0/0
       Access Target    Byte   Sustain   Excess    Interval  Increment Adapt
VC     List   Rate      Limit  bits/int  bits/int  (ms)      (bytes)   Active
100           150000    237    1500      400       10        187       -
R1#
Guest OSで下記wgetコマンドを実行し、帯域が制限されている事を確認します。
[root@localhost ~]# wget -O /dev/null http://192.168.200.100:10880/large.html
--2010-11-23 19:33:35--  http://192.168.200.100:10880/large.html
Connecting to 192.168.200.100:10880... connected.
HTTP request sent, awaiting response... 200 OK
Length: 23016000 (22M) [text/html]
Saving to: `/dev/null'

 4% [=>                                               ] 1,003,520   8.02K/s  eta 45m 49s
5. queueingの併用
5.1. queueingの併用
Frame Relay Traffic Shapingはpriority queueing, custom queueingと併用する事ができます。
以下は、tcp10881よりもtcp10880の方を優先するpriority queueingを併用する設定例です。
以下は、tcp10881よりもtcp10880の方を優先するpriority queueingを併用する設定例です。
R1(config)#access-list 122 permit tcp any any eq 22
R1(config)#access-list 180 permit tcp any eq 10880 any
R1(config)#access-list 181 permit tcp any eq 10881 any
R1(config)#priority-list 1 protocol ip high list 122
R1(config)#priority-list 1 protocol ip medium list 180
R1(config)#priority-list 1 protocol ip low list 181
R1(config)#map-class frame-relay F-SHAPE
R1(config-map-class)#frame-relay priority-group 1
5.2. 送信速度の確認
Guest OSで以下のwgetコマンドを2つ同時に実行します。
tcp10880の方が送信速度が速い事を確認します。
tcp10880の方が送信速度が速い事を確認します。
[root@localhost ~]# wget -O /dev/null http://192.168.200.100:10880/large.html
--2010-11-23 19:46:41--  http://192.168.200.100:10880/large.html
Connecting to 192.168.200.100:10880... connected.
HTTP request sent, awaiting response... 200 OK
Length: 23016000 (22M) [text/html]
Saving to: `/dev/null'

15% [======>                                          ] 3,648,060   16.2K/s  eta 19m 41s

[root@localhost ~]# wget -O /dev/null http://192.168.200.100:10881/large.html
--2010-11-23 19:47:09--  http://192.168.200.100:10881/large.html
Connecting to 192.168.200.100:10881... connected.
HTTP request sent, awaiting response... 200 OK
Length: 23016000 (22M) [text/html]
Saving to: `/dev/null'

 0% [                                                 ] 56,085       270B/s  eta 23h 17m
添付ファイル
