DynagenでCCIEを目指す
DHCP on a Switch
最終更新:
it_certification
-
view
1. 目的
- L3スイッチでDHCPを設定する方法を確認します。
2. 構成
2.1. 設定概要
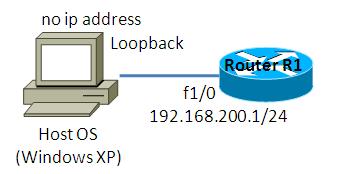
- Host OS Loopback, DHCPでIPアドレスを取得するように設定します。
- 初期設定はホスト名のみです。
- NM-16ESWモジュールを使用して、L3スイッチを再現します。(若干、実際のL3SWと挙動が異なります。)
2.2. 構成図

2.3. netファイル
model = 3660
[localhost]

	[[3660]]
		image = C:\Program Files\Dynamips\images\c3660-ik9o3s-mz.124-6.T.bin
		ram = 128

	[[ROUTER R1]]
		slot1 = NM-16ESW
		f1/0 = NIO_gen_eth:\Device\NPF_{ Loopback }
2.4. 初期設定
- R1
!
version 12.4
service timestamps debug datetime msec
service timestamps log datetime msec
no service password-encryption
!
hostname R1
!
boot-start-marker
boot-end-marker
!
!
no aaa new-model
!
resource policy
!
memory-size iomem 5
!
!
ip cef
!
!
!
!
!
!
!
!
!
!
!
!
!
!
!
!
!
!
!
!
!
!
!
!
interface FastEthernet0/0
 no ip address
 shutdown
 duplex auto
 speed auto
!
interface FastEthernet0/1
 no ip address
 shutdown
 duplex auto
 speed auto
!
interface FastEthernet1/0
!
interface FastEthernet1/1
!
interface FastEthernet1/2
!
interface FastEthernet1/3
!
interface FastEthernet1/4
!
interface FastEthernet1/5
!
interface FastEthernet1/6
!
interface FastEthernet1/7
!
interface FastEthernet1/8
!
interface FastEthernet1/9
!
interface FastEthernet1/10
!
interface FastEthernet1/11
!
interface FastEthernet1/12
!
interface FastEthernet1/13
!
interface FastEthernet1/14
!
interface FastEthernet1/15
!
interface Vlan1
 no ip address
!
ip http server
no ip http secure-server
!
!
!
!
!
!
control-plane
!
!
!
!
!
!
!
!
!
line con 0
line aux 0
line vty 0 4
!
!
end
3. [検証] DHCP 基本設定
3.1. 検証準備
f1/0に対してIPアドレスを設定します。
まずvlanを作成します。(L3SWの設定手順と若干異なるので注意が必要です。)
まずvlanを作成します。(L3SWの設定手順と若干異なるので注意が必要です。)
R1#vlan database
R1(vlan)#vlan 200 name VLAN200
VLAN 200 added:
    Name: VLAN200
R1(vlan)#apply
APPLY completed.
R1(vlan)#exit
APPLY completed.
Exiting....
R1#
IPアドレスを設定します。
R1(config)#interface vlan 200
R1(config-if)#ip address 192.168.200.1 255.255.255.0
R1(config-if)#exit
R1(config)#
R1(config)#
R1(config)#
R1(config)#interface FastEthernet 1/0
R1(config-if)#switchport mode access
R1(config-if)#switchport access vlan 200
R1(config-if)#
*Mar  1 00:06:47.355: %LINEPROTO-5-UPDOWN: Line protocol on Interface Vlan1, changed state to down
*Mar  1 00:06:47.427: %LINEPROTO-5-UPDOWN: Line protocol on Interface Vlan200, changed state to up
R1(config-if)#
3.2. DHCP 基本設定
Host OSがDHCPでIPアドレスを取得するよう設定します。設定方法はルータと全く同じです。
R1(config)#ip dhcp excluded-address 192.168.200.1
R1(config)#
R1(config)#ip dhcp pool WINDOWS
R1(dhcp-config)#network 192.168.200.0 255.255.255.0
3.3. DHCP 設定確認
Host OS(Windows)でコマンドプロンプトを立ち上げ、「ipconfig」を入力します。(IPアドレスが取得できない場合は、/renewオプションを付ける事で再取得できます。なおオプションの指定方法はWindowsのバージョンによって異なります。)
C:\>ipconfig /renew *Loop*

Windows IP Configuration


Ethernet adapter ローカル エリア接続:

        Media State . . . . . . . . . . . : Media disconnected

Ethernet adapter TAP:

        Media State . . . . . . . . . . . : Media disconnected

Ethernet adapter Loopback:

        Connection-specific DNS Suffix  . :
        IP Address. . . . . . . . . . . . : 192.168.200.2
        Subnet Mask . . . . . . . . . . . : 255.255.255.0
        Default Gateway . . . . . . . . . :

C:\>
ルータR1で「show ip dhcp binding」と入力し、割り当てたIPアドレスを確認します。
R1#show ip dhcp binding
Bindings from all pools not associated with VRF:
IP address          Client-ID/              Lease expiration        Type
                    Hardware address/
                    User name
192.168.200.2       0102.004c.4f4f.50       Mar 02 2002 12:05 AM    Automatic
R1#
4. [補足] その他のDHCP設定
4.1. その他のDHCP設定
L3SWもルータもDHCPの設定方法は変わりません。その他の設定に関しましては、トップページ/動作検証 ネットワーク系/DHCPを参照下さい。
添付ファイル