“YOU CAN'T ESCAPE FROM ME!”
| + | Contents |
Overview
Level Explanation:
| LEVEL | FINAL ERA |
| FINAL GRADE | GRADUATION CLASS |
| TEACHER | WILLIAM THORNE |
| DESCRIPTION | The FINAL ERA. Leave all hope, you who enter. Beat William's curse and save everyone! |
Unofficial Difficulty Chart:
| Default Mode | ★★★☆☆ |
- Final Era Level is the fifth level of this game and the final level of Story Mode.
- This is the level where you finally confront the root of all evil, William Thorne himself. Unlike previous levels, the goal here is to defeat him and save everyone.
- Therefore, there is no notebook, and the objectives are quite different.
- Defeating him leads to the ending. This level is also notable for its numerous cutscenes, including the ending movie.
- This level has a special specification: the only selectable difficulty is Default. Moreover, it's set to a considerably high difficulty level, meaning you'll likely need multiple attempts to clear it... or so you'd think. However, due to a certain mechanic (detailed later), even that becomes difficult.
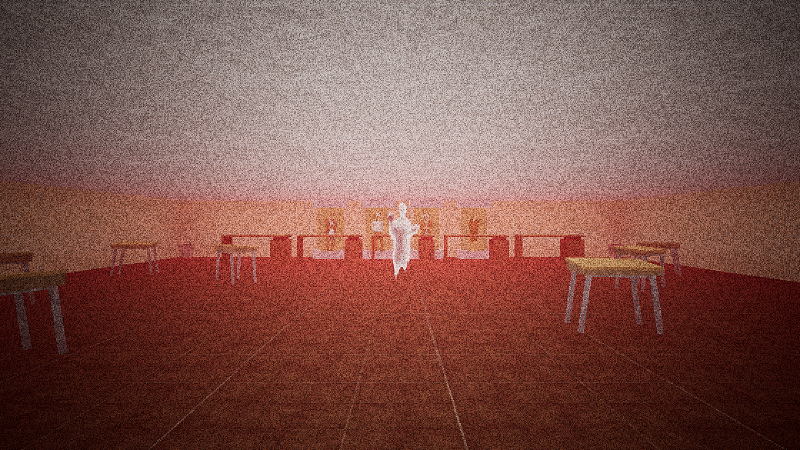
- Perhaps due to William's curse, a red haze permeates the entire level, causing screen noise. Players will likely be startled by this eerie atmosphere upon starting the level.
- While the remastered version removed the screen noise, the level remains stained red by the haze.
- As mentioned earlier, defeating William successfully leads to the ending. Conversely, if you fail to defeat him and lose, Emily's soul will also be turned into William's puppet, and you will immediately enter a bad ending where your save data is destroyed. Therefore, if you do lose, you'll need to replay all previous levels to get back here.
- According to the official teaser video, Final Era is a dangerous level, and you should attempt it at your own risk.
- To avoid save data destruction, the countermeasures described later are essential. Note that these countermeasures must be implemented before save data destruction occurs.
- However, if you have cleared this level even once, your save data will not be destroyed; you will simply be returned to the title screen. Therefore, you need not worry about save data destruction when attempting this in Hardcore Mode. That said, even when attempting it in Hardcore mode, dying here means losing far too much, so you can't die anyway...
Characters Appearing
Items Appearing
- (None)
Notebook
- (None)
Gallery
| + | Image Included |


Audio
| + | Audio Included |
Strategy
| + | Map Image |

| + | Walkthrough Video |
- As described in the overview, dying while this level is uncompleted will corrupt your save data. Therefore, to avoid save data corruption, you must perform the countermeasure described later beforehand.
- When the level begins, a cutscene starts showing the protagonist walking down a long corridor toward William. During this cutscene, no actions except camera control are possible; just watch.
- In the corridor, perhaps due to William's curse, you can hear muffled murmurs resembling the voices of previously encountered characters mixed with static. Additionally, inscriptions are carved into the left wall at regular intervals. You can read messages that can be interpreted as warnings from William or words of encouragement from other characters.
- After progressing a certain distance, the sound of the Helpscreen voice or ringing in the ears begins, and the screen gradually fades to white. The scene then cuts to the moment you reach the confrontation room with William.
- Upon reaching the confrontation room, William declares war, and music begins to play. Similar to the final chase in Math Level, the door lock unlocks when the music intensifies, and William begins pursuit. The direct confrontation with him finally begins.
- Note: The cutscenes up to this point cannot be skipped. Since the cutscenes are quite lengthy, it's recommended to pass the time during replays by watching YouTube videos on your phone or checking this wiki.
- The goal in the direct confrontation with William is to run and evade capture while throwing desks found along the path to attack and defeat him.
- Desks can be grabbed with the E key, but throwing them requires pressing the Space key. Note that once the chase begins, you can also grab the desk in the confrontation room, but fighting there is disadvantageous. Instead, dash outside the moment the door lock unlocks.
- William has 25 HP. Hitting him with a desk 25 times will secure victory.
- The objective is simple, but perhaps because he's the final boss, the difficulty is absurdly high.
- First, the controls are quite finicky, making even basic combat challenging until you get used to them. Grabbing desks isn't the problem; the issue arises when throwing them. To throw the desk at William behind you, you need to turn around. However, since you're constantly being pursued, you must keep running or you'll be caught. This means you have to release the W key and press the S key the instant you turn around, attacking while running backwards. Furthermore, the key to throw is the Spacebar, requiring an unfamiliar operation like using your thumb. At first, just attacking is a struggle.
- Furthermore, because you have to run backwards, it's hard to tell if there's a desk in your path. Unless you've memorized the desk layout or established a strategy chart, you'll often run into them. And if that happens, he'll close the distance on you instantly.
- Furthermore, since you must constantly keep running, any delay in changing your viewpoint means you run in the wrong direction for that duration, allowing William to close the distance. Consequently, it also demands the advanced skill of frequently and rapidly changing your viewpoint multiple times
- To make matters worse, the need to throw desks as attacks is never explained beforehand, and the fact that throwing is done with the space bar is only revealed when you actually grab a desk makes reacting on first sight extremely difficult. In most cases, you won't chip away a single millimeter of the enemy's HP gauge before your save data gets destroyed. And since players never expect their save data to be destroyed, they usually have no countermeasures prepared, guaranteeing a restart from the beginning.
- Furthermore, William's pursuit speed is quite fast, clearly faster than your running speed. Hitting him with an attack can stall him briefly, but it only stops him for a very short time, so you must escape properly while attacking or he'll catch up in an instant. If you miss an attack, he'll close the distance in one go.
- The long corridor area poses a particularly problematic challenge. After progressing a certain distance, you encounter a long corridor. Since there are absolutely no desks here, if you haven't maintained sufficient distance, you will definitely get caught here. Due to William's speed and hitbox mechanics, it's impossible to retreat back to your position while holding him off. Therefore, you must essentially break through this corridor.
- Given his pursuit speed, it's also crucial to ensure you're escaping via the most efficient route and that you can complete your turn-around during attacks in an instant.
- Furthermore, both grabbing and throwing desks are surprisingly tricky. Until you get used to it, unexpected failures often lead directly to death. First, the grab detection point is lower than you'd expect, and if you try to grab while looking straight ahead, you might not grab it properly and just get stuck. Moreover, the detection area itself is a bit narrow, so even if you try to grab from the corner of the desk, you might not grab it properly Even if you manage to grab it, the desk's flight path isn't just influenced by your facing direction left or right, but also by up or down—so if you don't align your direction properly, it might fly off downward or upward and miss its target.
- First, the controls are quite finicky, making even basic combat challenging until you get used to them. Grabbing desks isn't the problem; the issue arises when throwing them. To throw the desk at William behind you, you need to turn around. However, since you're constantly being pursued, you must keep running or you'll be caught. This means you have to release the W key and press the S key the instant you turn around, attacking while running backwards. Furthermore, the key to throw is the Spacebar, requiring an unfamiliar operation like using your thumb. At first, just attacking is a struggle.
- With all these challenging elements piled on, winning is tough until you get used to the mechanics and grasp the tricks. And yet that's just too much that the save data gets destroyed if lose.
- Furthermore, since you constantly need to run away while quickly changing your viewpoint, if the environment is heavy or frame drops occur, clearing the level can become physically difficult. Therefore, it is strongly recommended to prepare the highest-performance device possible, close unnecessary apps, and attempt the challenge in the lightest possible environment.
- Given this situation, special caution is required when running capture software, so streamers and video creators should be especially careful.
- Ideally, 60FPS is best, but a slight drop is acceptable. If it falls below 30FPS, you might want to reconsider.
- There are three main combat approaches: depleting HP before reaching the long corridor, fighting while crossing the corridor, or escaping completely before reaching it.
- The “deplete before reaching” method requires relentless attacking and demands frantic, fast-paced controls.
- By fleeing from William while rapidly throwing every desk you encounter, you can barely scrape by and deplete his HP. However, attempting to grab desks directly beside or behind you significantly increases the risk of being caught up to. Therefore, primarily grab only desks directly in front of you or diagonally in front.
- Because you need to attack relentlessly, you must throw the desk as quickly as possible after grabbing it. However, if you miss an attack, he can close the distance instantly, and your chances of fully depleting his HP drop significantly. Therefore, you must throw accurately to ensure hits, not just throw carelessly. Also, if you're too focused on throwing and forget to look down when grabbing a desk, you might fail to grab it and end up colliding with it. Naturally, this drastically increases the risk of being caught, so don't forget to look down.
- Due to the need to turn around frequently and run diagonally rather than straight ahead, you can't create significant distance from William. If you reach the long corridor without depleting his HP, death is essentially guaranteed. Therefore, you must focus all your efforts on finishing him off.
- While this method allows defeating William early, it's difficult to execute and hard to stabilize. It's essential for time attacks, but generally not recommended for normal play, especially in Hardcore mode.
- The method of fighting while crossing the long corridor demands maintaining distance from William above all else.
- Since there are no desks in the corridor, you must create significant distance from William beforehand to cross it.
- Therefore, you must essentially run straight ahead. Running diagonally to grab a desk reduces your forward speed, allowing him to close the gap, so running straight is crucial. Only grab desks directly ahead of your path.
- Quickly changing your viewpoint, such as turning around, is also extremely important. As mentioned earlier, taking time to change your viewpoint allows William to close the distance.
- While this method takes a bit longer, it's relatively easy to stabilize, making it a fairly recommended approach.
- The method of escaping until you cross the long corridor involves running away without attacking at all until you completely cross the corridor, then starting to attack once you've crossed.
- In fact, you can escape entirely just by running without attacking at all until you cross the corridor. Since you can easily break through the tricky corridor, the difficulty of the fight drops significantly.
- If there's one key point, it's to run as straight ahead as possible without turning around. Turning or running diagonally allows him to close the distance, and in the worst case, he might catch up. That said, if you keep these points in mind, you'll rarely get caught, so you can feel confident.
- Once you've crossed the long corridor, it's just a standard fight. You can fight using the same tactics you used while crossing the corridor. One thing to note, though: it's generally best to avoid crossing the long corridor again. While you could cross if you've gained a large enough lead, there are plenty of desks without crossing it. Considering the risk of getting caught and the time it takes, it's basically only a disadvantage, so it's better not to cross again.
- If you can reduce William's HP to zero, a cutscene will start, leading directly to the ending.
| + | Ending Spoilers |
- The remastered version altered many textures, graphics, audio, and even some cutscenes, significantly changing the atmosphere.
- The crowd murmur at level start was slightly shortened, allowing combat to begin a bit sooner. However, the wait is still nearly a minute, making retries just as tedious. Worse, the reduced length caused some text to become unreadable, degrading the presentation.
- Furthermore, the constant screen-wide noise effect was removed. While this makes recording easier (see side note for details), it also diminishes the eerie and ominous atmosphere, representing another downgrade in presentation.
- Conversely, the abnormally high difficulty, lengthy wait times, and the loss of save data upon defeat remain unchanged, preserving the design's tendency to feel unreasonable.
- Furthermore, some voices suggest the classic version's altered audio better captured the atmosphere. Considering the points above, this level is sometimes evaluated as inferior to the classic version.
- While the item store was implemented in version 1.3.0 of the remastered version, items cannot be brought into this level. The reason becomes somewhat clear if you check the side note section.
How to Avoid Save Data Destroyed
- As mentioned earlier, dying in this level leads directly to a bad ending and corrupts your save data. However, several methods exist to avoid this. We recommend trying them if restarting from the beginning is troublesome or if you wish to prevent the loss of accumulated ACoins and achievements.
- Note that these countermeasures must be taken before the save data is destroyed, so be careful.
- First, as a prerequisite, this game's save data is stored in the folder C:\Users\username\AppData\Local\ACHS on Windows. Replace username with your Windows user folder name. Taking measures on this folder can protect your save data from destruction.
- If you don't know your user folder name, check the location C:\Users. Among the folders there, the one that is neither named “Public” nor “Default” is your user folder, and its name is your user folder name.
- Note that the remastered version saves save data in the “ACHSR” folder, not the “ACHS” folder. Therefore, if you are playing the remastered version, you must replace all instances of ‘ACHS’ in these instructions with “ACHSR”.
- The first method involves creating a backup of your save data. Copy and paste the ACHS folder mentioned earlier beforehand. If your save data gets corrupted, delete the ACHS folder, copy and paste the backup folder you made, and rename it back to “ACHS”. This allows you to easily restore your save data.
- Note that you only need to perform the initial copy and paste once; you won't need to do it again. This initial step is purely for creating the backup. Once the backup exists, you can restore your save data simply by copying and pasting it.
- The second method involves setting the save data folder to read-only. Right-click the ACHS folder mentioned earlier, select “Properties” from the menu, and open its Properties window. In the Attributes section, check the “Read-only” checkbox (do not select the square). After checking it, press the “OK” button. In the subsequent dialog, select “Apply changes to this folder, subfolders, and files” and press “OK”. This prevents writing to the save data, stopping the game from adding, modifying, or deleting it, thus preventing corruption.
- However, this measure also prevents saving entirely. Therefore, after defeating William, you must disable read-only mode before the end credits begin. The method is almost identical to before, with one key difference: instead of checking the “Read-only” checkbox, you must uncheck it to leave it blank, then press the “OK” button.
- While these precautions prevent save data corruption, you'll have to endure the unskippable long opening and level cutscenes every time you die, and returning is quite a hassle so you should aim to avoid dying whenever possible. Despite it, the difficulty is ridiculously high. It's really unreasonable.
- Incidentally, save data gets corrupted the instant William captures you. You can avoid this by pressing Alt+F4 to quit the game right before capture. However, since corruption occurs the moment the screen goes black after capture, using this technique realistically is quite difficult. You might try it if you're certain you'll die in the long corridor area.
Side Note
- In versions beta 0.1.0 to 0.2.0, after clearing Music Level, pressing the “What is it?” button on the level selection screen allowed you to see this level in its unfinished state.
- There, instead of the long corridor, there was a single room with just William standing in the center surrounded by several Rusty forks.
- Given this fact and that the Rusty fork was implemented at this unfinished stage, coupled with the complete lack of any practical use in these versions, it's possible the Rusty fork was originally intended to appear as a weapon for the William battle but the plan was scrapped midway.
- Furthermore, William's speaking voice and content were entirely different, featuring a whispering voice similar to the Watcher in AEwVS.
- There, instead of the long corridor, there was a single room with just William standing in the center surrounded by several Rusty forks.
- Official Teaser Video Judging from the official teaser video, the format for the William battle seems to have been inspired by the Null battle in BBiEaL. Indeed, the combat formats of both are remarkably similar.
- However, while they are similar, the actual play skills required differ significantly between the two.This one has a higher difficulty level partly because AEwVS's controls act as a hindrance.
- Due to screen noise or attempting to record this level of video on a low-performance device, massive frame loss or video corruption may occur. Reducing recording quality or priority can sometimes prevent these issues, so try that if they happen.
- In version 1.0.0 when this level was implemented, the BGM for the William battle was different from the current version.
- An arranged version of “Gravity Break,” one of the game's main themes, played not only during the very first Math Level and the title screen right after launching the game, but also throughout certain levels. This created a highly dramatic effect where an arranged version of the main theme heard numerous times before played during the final battle.
- As you can hear in the audio section of this page, this arrangement is up-tempo, expressing the intensity of the battle while also featuring a composition that evokes hope and melancholy, emphasizing that this is the final battle of the story.
- Furthermore, since this track has a short intro, combat began almost immediately after William's declaration of war, without much delay.
- In version 1.1.0, the battle BGM was replaced with the current “William's Curse.” Simultaneously, the title screen BGM upon game startup was changed to “Overture To The Sun,” and other sections previously using “Gravity Break” were either silenced or switched to different BGMs, eliminating this intense effect. Why such a downgrading update was implemented remains unclear. Incidentally, the BGM for bad endings was also changed at this time.
- An arranged version of “Gravity Break,” one of the game's main themes, played not only during the very first Math Level and the title screen right after launching the game, but also throughout certain levels. This created a highly dramatic effect where an arranged version of the main theme heard numerous times before played during the final battle.
- If you exit the confrontation room and immediately turn back, you can see a sign above the door, similar to those in classrooms. Looking closely at this sign reveals it actually reads “William's Office.” It's meticulous of them to include this detail, considering no one would ever notice it.
- Another example of this meticulous attention to detail is the elevator buttons being oriented downward instead of upward. This one goes beyond mere meticulousness—it's physically impossible to see unless you use a cheat to move the camera. It speaks to the developers' passion for crafting the world. I wish they'd channeled some of that passion into other areas of the game...
- As mentioned earlier, once the chase begins, you can grab the desks in the confrontation room. If you play your cards right, it's possible to throw all the desks in the confrontation room and still survive. For detailed instructions, check out this video. However, it's incredibly difficult, unreliable, and doesn't even guarantee a faster clear time, so unless you're aiming for a performance run, you probably shouldn't attempt it.
- Note: In the remastered version, the long desk has been replaced with a short one, making this feat impossible.
- In version 1.3.0 of the remastered version, which implemented the Item Store, it was possible to bring items into this level. This allowed for various unexpected behaviors. While this is now fixed and no longer possible, you can still do it by downloading the old version from the Unofficial Archive of the Remastered Version. If you're interested, give it a try.
- Bringing the Time Freezer allowed you to freeze William's movements and attack him unilaterally. Consequently, bringing this item instantly turned the game into very easy.
- Bringing the Teleporter allowed you to warp to the initial long corridor and freely explore it. However, warping during the opening cutscene rendered you uncontrollable, so you had to wait until after being teleported to the confrontation room. Since you could freely explore areas normally inaccessible, it provided a remarkably fresh experience.