ライブラリーは、特定のアセットタイプを読込むためだけに使用する事が出来ます。例えば【File】メニューの"Opne Project from Library(ライブラリからプロジェクトを開く)"を選択した場合、ライブラリウインドウはプロジェクトモードで開きます。これはプロジェクトを表示させるだけという意味になります。同様に"Import Object from Library(ライブラリからオブジェクトをインポート)"を選択すると、ライブラリウインドウが開き、オブジェクトを表示させるだけです。
アイテムタイプは、いくつかの方法で使用されます。例えば、【File】メニューの"Import Object from Library(ライブラリからのオブジェクトのインポート)"を選択、といった特定のタイプでライブラリを開いた時、ライブラリウインドウにはそのタイプのアイテムだけを表示します。【View】メニューからライブラリを開いた場合、1組のタイプアイテムは、タイプ別に表示されたアイテムにフィルタをかけたコンテンツリストで使用出来ます。
Add files to Library(ファイルをライブラリに追加): これは、ライブラリに追加するファイルを選択するためのファイルダイアログが開きます。 ダイアログで複数のファイルを選択する事が出来ます。
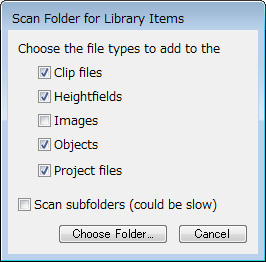
Scan folder for Library items(ライブラリアイテムのフォルダをスキャン): スキャンフォルダのダイアログが開きます。これにより、ディスク上のフォルダをスキャンする事で、ライブラリに複数のアイテムを一度に追加する事が出来ます。このダイアログでは、追加するファイルの種類と、選択したフォルダのサブフォルダもスキャンするかどうかを選択する事が出来ますが、時間が掛かるかも知れません。極端な例として、あなたのドキュメントフォルダをスキャンすると決めたとしましょう。そのフォルダには、多くのアイテムの詰まったフォルダが数多くあります。フォルダのスキャンに時間が掛かりすぎると、いつでもスキャンを中止する事は出来ますが、そういった事に留意して下さい。フォルダスキャン方法の設定後、[Choose Folder]ボタンをクリックし、対象フォルダを選択後にスキャンが実行されます。
Show selected item in Explorer/the Finder(エクスプローラまたはファインダーで選択したアイテムを表示): エクスプローラ(Windows)、またはファインダー(Mac)のメインリストで選択されたアイテムのファイルを表示する場合に、これを選択します。
Only show missing files(行方不明のファイルのみを表示): 行方不明のファイルだけをメインリストに表示させる場合これを選択します。これらはディスク上で見つからなかったファイルのアイテムです。
Refresh the Library(ライブラリを更新): これを選択すると、ライブラリを再読み込みし、ライブラリウインドウ内を更新します。行方不明のファイルがリムーバブルディスク(交換型ディスク)内にある場合などは、これを行う理由の1つとなりそうです。ディスクを置き換え、ライブラリを更新する事で再びファイルを見つけ出せるかもしれません。
閲覧モードは情報パネルと同様にプレビューを表示します。アイテム表示には、"Icon(アイコン)"、”Icon and Name(アイコンとアイテム名)”、”Icon Detailed(アイコンの詳細)”の3つの方法があります。"Icon"はアイテムのプレビューを表示するだけで、プレビューがない場合はアイテムの名前が表示されます。"Icon and Name"は、プレビューの下にアイテム名が表示されます。 "Icon Detailed"は、プレビュー、アイテム名、格付け、修正日、アイテムサイズ(該当であれば)を表示します。
リストモードでは、アイテムをテキストリストとして表示します。リスト表示には、"Name(名前)"と"Name Detailed(名前と詳細)"の2つの表示方法があります。"Name"はアイテム名のみ表示します。"Name detailed" only shows the item name. "Name detailed"は、名前に加えてタイプ、レーティング、サイズ、修正日の情報を表示します。
You can select multiple items in the main list. This is main useful for deleting items from the Library. You can only ever open one item from the Library at a time.
Missing files are shown in the main list in a special way. Please see the Missing Files section below for more information.
Bottom Toolbar
The first group of controls on the left of the bottom toolbar allows you to search for library items by name or by tag. The results of the search are displayed in main list. The search remains active either until you click the "Done" button or clear the search field.
   Search options button: Clicking this button pops up a menu which lets you choose different options for searching, for example ignoring case or only searching for whole words.
   Search field: This text field is where you enter search terms. Clear the field to stop searching and show all relevant items.
   Done button: This button will stop searching. It clears the search field.
Creation buttons are shown on the right of the bottom toolbar. Different buttons are shown depending on what type of item is selected in the main list. Creation buttons allow you to perform actions like opening a project, adding a clip or creating a new node of the appropriate type for a library item.
Missing Files
For one reason or another the Library might not be able to find the file for an item. This might happen if the file has been moved, deleted, is on a disk which has been removed or similar.
Missing files are indicated in several ways. One is that the preview image is shown in the info panel and main list (when in browsing mode) with a question mark drawn in the bottom right corner. If the main list is using one of the list display modes the item text will be drawn in red. The name of the item in the info panel will also be drawn in red.
If you want to only see missing files in the Library you can choose the "Only show missing files" item in Action button, which is in the top toolbar.
If a file has been moved or deleted then you will need to remove it from the library. You are less likely to have problems with moving files on OS X.
If the file was on a removable drive or a network drive that isn't mounted the Library will be able to find the file when that drive is available again. If you have the Library window open when the drive become available again you might want to choose "Refresh the Library" from the Action button in the top toolbar. This makes sure the Library notices the files are available again and will also update the Library window.
Advanced Topics
As mentioned in the Item Previews section, you can set up an image file so that it will be used as the preview when an object is added to the Library. To do this you place a specially named image file into the same folder as the object file. The format for the file image name is :
(model file name)_preview.XXX
where (model file name) is the name of the model file and .XXX is the image extension. The supported image extensions are ".jpg", ".png", ".tif" and ".tiff". As an example let's say you have an object called:
Ryegrass_variant1.tgo
You would need to name the image file for the preview like this:
Ryegrass_variant1_preview.jpg
The preview image can contain an alpha channel. Note that JPEGs don't support alpha. TIFF is the preferred format for the preview image file.
The back end of the Library is a database and a folder containing any previews generated for Library items. The Library data is stored here on Windows:
You can easily access these locations in the registered version by choosing "Reveal Key File" from the Help menu.
If you so desire you can delete the Library database or clear all item previews using the Library preferences panel.
When you delete the Library database all item previews are also deleted. It is important to note that deleting the Library database doesn't effect any files which were part of the Library. They are not deleted.
Some files may have integrated previews or previews may be generated on the fly (which can happen for images for example). Clearing previews will not effect those files. It won't delete integrated previews from files.


 script?guid=on